Where do I belong? Alum Goods 1687, SS16 Clone?

g0nef1sshn

Lieutenant
Joined
Feb 24, 2015
Messages
1,291
Thanks for hints on that 5200 storage. I only used it once prior, and found it solid in the tube shortly thereafter. The label said something like 24 hrs limit after opening.


Here's a brief update with a few pics.


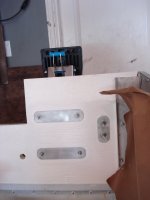
The transom replacement was laminated out of two layers of exterior grade 3/4" plywood, glued and screwed with short deck screws. After curing I pulled out the decks screws, and shot some G-flex into hole to seal it up. Then multiple coats of 'Old Timers Formula' treatment. Will finish off with multiple coats of straight urethane once all the holes are drilled and plugged. Anyone else add time capsule notes to their transom replacement? Also note the narrow splashwell compared to the genuine SS16 models. 


Question on the fasteners used for up the side of the transom (circled in red below). The previous setup used what appeared to be large (1/4" diameter) steel wood screws into the transom wood. They were badly corroded such that some had no threads remaining at all. I have since cut away the spray foam used under the back of the splashwell area, and plan to through-bolt using stainless machine screws, rather than screwing into the transom wood itself. Does that make sense? What's done on the genuine Starcraft specimens? Thanks again for the comments and encouragement!

My memory could be off as my boat is on the other side of the country from Mr. But, I think the screws you circled in red are through bolts with nuts on our ss's. Not just screws.
 

renns

Petty Officer 1st Class
Joined
Dec 20, 2017
Messages
316
I added larger aluminum square plates to the ubolts on each side. In my head it helps disperse the pressure of really snuggin them down.
Thanks for the reply. I've purchased replacement u-bolts that come with a stainless plate front and back. Here's the ones I purchased: https://www.ebay.ca/itm/265240607578
Thread length does allow for a second larger plate on the backside though, which I plan to do.
As for those four fasteners up the edge of the transom, through bolts seem to be a much better idea.
 
Last edited:

g0nef1sshn

Lieutenant
Joined
Feb 24, 2015
Messages
1,291
Screenshot_20211216-194133_DuckDuckGo.jpg

I probably got the same ones. Here is what mine looked like adding the plates. I even did it for other through bolts. I did however end replacing this transom. I left it uncovered in harsh southern humidity with out a proper transom cap. When I redid it I still added plates but completed a transom cap for it also.
 

Attachments

  • Screenshot_20211216-194215_DuckDuckGo.jpg
    Screenshot_20211216-194215_DuckDuckGo.jpg
    265.5 KB · Views: 6

renns

Petty Officer 1st Class
Joined
Dec 20, 2017
Messages
316
SHSU - thanks for the pics. I think those big wood screws I mentioned are stock, as the backside area was all solid with spray foam from the factory, and there was no sign of any nuts/washers encapsulated in the foam. Stainless machine screws/washers/nylocks will be used on re-assembly.
I'll need to go back and look at your build thread again. That doesn't look like stock SS16 transom profile? That is the biggest difference I've been able to find between our boat and the genuine SS16. I think the narrow splashwell likely provides better support for the transom, as our knee brace was in nice shape in spite of the transom wood being mostly mulch.
 

SHSU

Lieutenant Junior+Starmada Splash Of The Year 2019
Joined
Mar 8, 2017
Messages
1,741
You are correct that isn't that standard transom. I thought the oversized splashwell was a waste of space. I modified it so that I could fit two livewells, one on each side. Also I have no issues climbing or jumping around on it, where I always had concern with the original.

SHSU
 

renns

Petty Officer 1st Class
Joined
Dec 20, 2017
Messages
316
You are correct that isn't that standard transom. I thought the oversized splashwell was a waste of space. I modified it so that I could fit two livewells, one on each side. Also I have no issues climbing or jumping around on it, where I always had concern with the original.

SHSU
Nice! I've just been going through your build thread again now, and see your setup looks quite similar to the way our boat is set up. Ours waste the space in those 'shoulders', though filled with 6" of spray foam. I quickly found climbing around on there very handy for quickly popping on mooring cover when the rain clouds come in. I suppose that's a benefit of that spray foam - the aluminum panels are quite rigid.
Back to your build thread now for more inspiration!
 

renns

Petty Officer 1st Class
Joined
Dec 20, 2017
Messages
316
So I think we've settled on eliminating our back-to-back seats in favour of two pedestal seats for front row, but wondering about the back area. Any thoughts on this side-bench arrangement from SmokerCraft? I'm thinking it would keep passenger weights better balanced fore/aft, and would provide some nice storage in the boxes underneath.
tmp17073_8551_0.jpg
 

ShoestringMariner

Lieutenant Commander
Joined
Apr 18, 2015
Messages
1,600
You are correct that isn't that standard transom. I thought the oversized splashwell was a waste of space. I modified it so that I could fit two livewells, one on each side. Also I have no issues climbing or jumping around on it, where I always had concern with the original.

SHSU
I totally agree. Phase 37 on my SS is putting it back under the knife to completely rework the SW.
 

ShoestringMariner

Lieutenant Commander
Joined
Apr 18, 2015
Messages
1,600
So I think we've settled on eliminating our back-to-back seats in favour of two pedestal seats for front row, but wondering about the back area. Any thoughts on this side-bench arrangement from SmokerCraft? I'm thinking it would keep passenger weights better balanced fore/aft, and would provide some nice storage in the boxes underneath.
tmp17073_8551_0.jpg
I love this layout. That’s smart. 2 swivels to move around and 2fixed seats with storage etc. could the pedestals of the side seats be large enough for a live well ? I’ve never had a boat with one.
 

SHSU

Lieutenant Junior+Starmada Splash Of The Year 2019
Joined
Mar 8, 2017
Messages
1,741
How are you going to use the boat? Fishing, cruising, tubing? If for fishing, then I would test trying to hold rods or getting to rods across the boat with that setup. I did a single center swivel seat in the back which allows me to comfortably get to rods on both sides of the boat without having to get up. Works well for how we use our boat.

SHSU
 

renns

Petty Officer 1st Class
Joined
Dec 20, 2017
Messages
316
This will truly be a multi-purpose boat, used for basic transport and hauling of gear and supplies to our water-access cottage, as well as cruising, fishing, tubing. I showed my wife some pics of that layout, and she's concerned about it not being very comfortable, and suggested moving the benches back to the splashwell. A small cushion mounted to the front of the splashwell would then make them into corner seats. Jury is still out on this topic.

SSM - I was thinking the same about those boxes supporting the bench seats - perfect for storage! I'd like to have a spot on-board to stash the mooring cover when the boat is on active duty, and one of those would be perfect. The other could hold the requisite stash of life jackets. Would be perfect for a live well also, but that's beyond our needs for this boat.

I picked up two pedestals with bases and hardware from a fellow that restores boats nearby. He has an Islander in his shop, and a 22' Crestliner in the driveway, both set up for big lake fishing. I learned about fixed pedestals vs removable, speed limits for those fishing-only pedestals - all topics new to me.
 
Last edited:

ShoestringMariner

Lieutenant Commander
Joined
Apr 18, 2015
Messages
1,600
This will truly be a multi-purpose boat, used for basic transport and hauling of gear and supplies to our water-access cottage, as well as cruising, fishing, tubing. I showed my wife some pics of that layout, and she's concerned about it not being very comfortable, and suggested moving the benches back to the splashwell. A small cushion mounted to the front of the splashwell would then make them into corner seats. Jury is still out on this topic.

SSM - I was thinking the same about those boxes supporting the bench seats - perfect for storage! I'd like to have a spot on-board to stash the mooring cover when the boat is on active duty, and one of those would be perfect. The other could hold the requisite stash of life jackets. Would be perfect for a live well also, but that's beyond our needs for this boat.

I picked up two pedestals with bases and hardware from a fellow that restores boats nearby. He has an Islander in his shop, and a 22' Crestliner in the driveway, both set up for big lake fishing. I learned about fixed pedestals vs removable, speed limits for those fishing-only pedestals - all topics new to me.

I’m going with the Springfield AD and AP taper lock pedestals so I can move the swivel seats around. They are class A (high speed rating).
Actually, my wife likes the sleeper seats so I’m making them so they come out easily and hidden underneath are the pedestal sockets so I have flexibility to turn my boat from a family boat to a fishing boat within minutes.

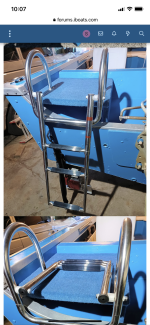
I too was mulling over reworking my splash well and incorporating 2 small folding jump seats in the corners, but they may end up pretty narrow. but I just picked up this swim ladder for one corner, so I’d be down to one jump seat unless I could somehow incorporate a step to the walkover platform. This photo is from another iboats Starcraft forum mate (sorry my feeble memory forgot the member name) and I really quite like it over the swim platform that sticks out the back.
 

Attachments

  • 767DDB84-16E9-4499-A310-97FCC4C3DBC5.png
    767DDB84-16E9-4499-A310-97FCC4C3DBC5.png
    5 MB · Views: 13

renns

Petty Officer 1st Class
Joined
Dec 20, 2017
Messages
316
SSM - thx for the info. I like the swim ladder idea as well. That just might get added to the list.

I'm still waiting for the gas guy to hook up the radiant tube heater, so I'm stuck doing 'cold' work in the shop for now. I've been cutting and fitting 5/8" ply to the floor. Next step is drilling and mounting the seat posts for the front two pedestals. The aft seating is still under review. The pedestals I bought are longer than needed, so I'm carefully cutting them down. They do include adjustable height function, although that is reduced obviously as the pedestal gets shorter.
 

ShoestringMariner

Lieutenant Commander
Joined
Apr 18, 2015
Messages
1,600
SSM - thx for the info. I like the swim ladder idea as well. That just might get added to the list.

I'm still waiting for the gas guy to hook up the radiant tube heater, so I'm stuck doing 'cold' work in the shop for now. I've been cutting and fitting 5/8" ply to the floor. Next step is drilling and mounting the seat posts for the front two pedestals. The aft seating is still under review. The pedestals I bought are longer than needed, so I'm carefully cutting them down. They do include adjustable height function, although that is reduced obviously as the pedestal gets shorter.
Anytime. If you want to see the ladder full scale, let me know. I’m not far from you.
 

SHSU

Lieutenant Junior+Starmada Splash Of The Year 2019
Joined
Mar 8, 2017
Messages
1,741
The pedestals I bought are longer than needed, so I'm carefully cutting them down. They do include adjustable height function, although that is reduced obviously as the pedestal gets shorter.

Which pedestals did you go with? I tried to cut mine down, but found out that the top had a minuscule tapper. Got it to work eventually, but wasn't as clean cut as I had hoped.

SHSU
 

Rasdiir

Petty Officer 2nd Class
Joined
Jul 18, 2011
Messages
167
I’m going with the Springfield AD and AP taper lock pedestals so I can move the swivel seats around. They are class A (high speed rating).
Actually, my wife likes the sleeper seats so I’m making them so they come out easily and hidden underneath are the pedestal sockets so I have flexibility to turn my boat from a family boat to a fishing boat within minutes.

I too was mulling over reworking my splash well and incorporating 2 small folding jump seats in the corners, but they may end up pretty narrow. but I just picked up this swim ladder for one corner, so I’d be down to one jump seat unless I could somehow incorporate a step to the walkover platform. This photo is from another iboats Starcraft forum mate (sorry my feeble memory forgot the member name) and I really quite like it over the swim platform that sticks out the back.
How are you planning the attachment for the removable sleeper seat? I've been trying to think of a way to do this but haven't found any suitable ways that don't leave bolts or a mount sticking out of the floor
 

ShoestringMariner

Lieutenant Commander
Joined
Apr 18, 2015
Messages
1,600
How are you planning the attachment for the removable sleeper seat? I've been trying to think of a way to do this but haven't found any suitable ways that don't leave bolts or a mount sticking out of the floor
I’m using brass threaded rubber plugs. On top of the floor there will be a small rubber flange. Once the plug is inserted and bolted it expands beneath the floor.

I just trying to find it. But it is stashed away with the rest of the components. Once I start the floors, I will be pulling out all my bases and seat components. I will snap a picture of it then.

Sorry Renns, not trying to hijack your post
 
Last edited:

PaulyV

Chief Petty Officer
Joined
Sep 7, 2008
Messages
525
I’m going with the Springfield AD and AP taper lock pedestals so I can move the swivel seats around. They are class A (high speed rating).
Actually, my wife likes the sleeper seats so I’m making them so they come out easily and hidden underneath are the pedestal sockets so I have flexibility to turn my boat from a family boat to a fishing boat within minutes.

I too was mulling over reworking my splash well and incorporating 2 small folding jump seats in the corners, but they may end up pretty narrow. but I just picked up this swim ladder for one corner, so I’d be down to one jump seat unless I could somehow incorporate a step to the walkover platform. This photo is from another iboats Starcraft forum mate (sorry my feeble memory forgot the member name) and I really quite like it over the swim platform that sticks out the back.
Thats Slik
 

renns

Petty Officer 1st Class
Joined
Dec 20, 2017
Messages
316
Which pedestals did you go with? I tried to cut mine down, but found out that the top had a minuscule tapper. Got it to work eventually, but wasn't as clean cut as I had hoped.

SHSU
I picked up a couple Garelick fixed-post pedestals. Both are adjustable in height, and the helm post top has slide rails for fore/aft adjustment as well. The posts are I think 2-3/4" diameter, and definitely not tapered. The post is roll-formed into the base flange, making the posts permanently attached to the base. I cut them down to length using my wood miter saw, and was surprised how nicely it cut. Slow feed rate is key. Minor burrs were cleaned up with a file.

SSM - no worries, hijack away! More traffic on my thread is always welcome.

One issue I found yesterday while working the floor, is that the rib ends on the port side are low by about 1/4". I'm not sure what's caused that, but it does seem consistent across the half dozen ribs I checked. Those longitudinal members (do they have a name?) were loose in my boat due to wet foam freezing and pulling the pop rivets. I re-riveted back into the original location, so I don't know what the cause is, but I'm tempted to just put a 1/4" strip of shim material of some type along the underside of the floor on port side, and call it day. That does screw up rivet length though... 1/4" shim + 5/8" ply + .080 rib = nearly 1"! Or maybe those crimped ends of the ribs could be 'tweaked' back up a bit? Thoughts and recommendations welcome here.
 
Top