Where do I belong? Alum Goods 1687, SS16 Clone?

ShoestringMariner

Lieutenant Commander
Joined
Apr 18, 2015
Messages
1,600
That boat was built by Alcan who also made aluminum boats for or owned Peterborough boats. I bought and sold one 2 years ago. Very similar to sylvan super sportster. My Brother owns one possibly under aluminum goods tag also
 

renns

Petty Officer 1st Class
Joined
Dec 20, 2017
Messages
316
Thanks for info. Did that brand get bought out by Princecraft? That's what I was told by a guy, and might be why the previous owner put the Princecraft decals on the boat.
 

ShoestringMariner

Lieutenant Commander
Joined
Apr 18, 2015
Messages
1,600
Thanks for info. Did that brand get bought out by Princecraft? That's what I was told by a guy, and might be why the previous owner put the Princecraft decals on the boat.
I stand corrected, the one I had was a springbok. Wish I had kept it.
 

renns

Petty Officer 1st Class
Joined
Dec 20, 2017
Messages
316
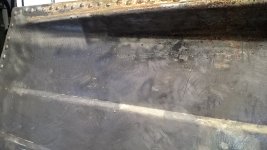
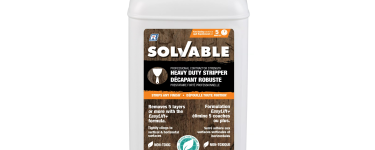
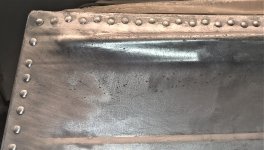
Paint stripping is well underway. This job might be worse than removing water-logged foam! I tried a few strippers, and wasn't having much luck. Then I tried a container of Solvable Heavy Duty Stripper I picked up at the ReStore (Habitat for Humanity). That stuff works very well, even in the cold shop temperatures. Here's where I'm at so far.
WP_20211129_12_12_27_Pro.jpg
The transom is completely stripped, and other side looks similar to this one currently. Hoping one or two more nights of work, and then trailer the shell in turtle-pose down to the carwash for a good warm water rinse.
There are a couple minor dents, and one larger dent on the starboard side (out of view).
Questions of the day:
1.) When stripping the bottom, should I take care to avoid stripper running into the seam? I'm worried it might attack the sealant along that joint.
2.) There's an area of corrosion pits on the side above the chine just near the stern along the waterline. I could patch this area, or just JB weld and sand smooth? I'll get a better lit picture on the next post, but here's the area of concern.
WP_20211129_12_12_37_Pro.jpg

Edit: I should mention that there doesn't appear to be any sign of prior owner sealant or repair attempts, so at least the hull is relatively un-molested on that front. There are a couple rivets that look like that could use re-bucking, but none that are missing or damaged that I've seen so far.
 

classiccat

"Captain" + Starmada Splash Of The Year 2020
Joined
Dec 20, 2010
Messages
3,412
Paint stripping is well underway. This job might be worse than removing water-logged foam! I tried a few strippers, and wasn't having much luck. Then I tried a container of Solvable Heavy Duty Stripper I picked up at the ReStore (Habitat for Humanity). That stuff works very well, even in the cold shop temperatures. Here's where I'm at so far.
View attachment 353292
The transom is completely stripped, and other side looks similar to this one currently. Hoping one or two more nights of work, and then trailer the shell in turtle-pose down to the carwash for a good warm water rinse.
There are a couple minor dents, and one larger dent on the starboard side (out of view).
Questions of the day:
1.) When stripping the bottom, should I take care to avoid stripper running into the seam? I'm worried it might attack the sealant along that joint.
2.) There's an area of corrosion pits on the side above the chine just near the stern along the waterline. I could patch this area, or just JB weld and sand smooth? I'll get a better lit picture on the next post, but here's the area of concern.
View attachment 353299

Edit: I should mention that there doesn't appear to be any sign of prior owner sealant or repair attempts, so at least the hull is relatively un-molested on that front. There are a couple rivets that look like that could use re-bucking, but none that are missing or damaged that I've seen so far.
I don't recall seeing external pitting on the side skin. I wonder if this was slipped with shore power for some time.

I think your plan of attack sounds good...clean out the corrosion, treat the aluminum then skim with JBWELD or MarineTex. Anything deep may need more mechanical protection (Like a rivet to fill a hole or a patch)
 

renns

Petty Officer 1st Class
Joined
Dec 20, 2017
Messages
316
cc - not sure on the shore power - would that just be for battery charging in a boat this size? It was a cottage boat, sitting in fresh water 6 months/yr, and the corrosion appears to follow the waterline, but almost exclusively near the stern. I'll clean the area with vinegar/water once the paint stripping work is complete, and will post more pics then.

jd - thanks, hoping to get past the grunt work soon!
 

classiccat

"Captain" + Starmada Splash Of The Year 2020
Joined
Dec 20, 2010
Messages
3,412
cc - not sure on the shore power - would that just be for battery charging in a boat this size? It was a cottage boat, sitting in fresh water 6 months/yr, and the corrosion appears to follow the waterline, but almost exclusively near the stern. I'll clean the area with vinegar/water once the paint stripping work is complete, and will post more pics then.

jd - thanks, hoping to get past the grunt work soon!
correct; it's known to happen in marinas where you're dealing with stray currents in the water. This is where you get into the subjects of sacrificial anodes and galvanic isolators. If it's never been slipped, it may have occurred as a result of faulty wiring (i.e. using the hull as a ground path &/or conductor) and the PO used shore power extensively.
 

renns

Petty Officer 1st Class
Joined
Dec 20, 2017
Messages
316
cc - thx, good to know. I'll be re-wiring the boat when reassembly begins, and will keep a close eye on best practices there.
 

renns

Petty Officer 1st Class
Joined
Dec 20, 2017
Messages
316
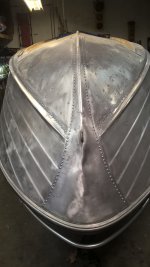
Time for a picture update! Exterior layers of paint stripped off all but bottom. As this boat will remain in the lake all summer, and tented beside the cottage all winter, I'm questioning whether to bother any further paint removal work on the bottom, as it will never be visible. One thought would be to clean around each rivet, and G-Flex the rivet heads for insurance, even though a water test showed no rivet leaks. Then just leave it as-is. ClassicCat - I can't get the search box to work on your thread nicely, but I'm assuming you've used Sharkhide or some such product to protect your beautiful polished sides?
WP_20211202_15_06_38_Pro.jpg
As for painting, I'm still unsure on what's the best option to proceed. Currently I'm leaning towards painting the top three lapstrakes blue, and leaving everything below that as-is. I'd appreciate some input here if this is a bad idea. After a good cleaning with scotchbrite, will it not oxidize fairly evenly, to a dull gray color on its own?
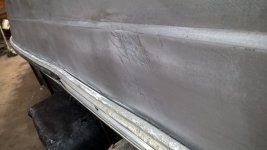
Also, it appears to have been hit in the side at some point, bending the gunnel trim and side in a bit. See pic below. I'm going to try to put 2x4 across the outside and with a big clamp work it back closer to straight.
WP_20211202_15_15_35_Pro.jpg
The pitting areas mentioned earlier don't appear to be very deep, so I'm planning to vinegar etch a few more times, then rinse, and fill with JB Weld.
WP_20211202_15_06_09_Pro (2).jpg
 

BOYS & TOYS

Petty Officer 2nd Class
Joined
Mar 1, 2008
Messages
149
Looking good. I left my transom bare and it's not showing any signs of corrosion. I leave it in fresh water for weeks at a time. I always rinse with fresh water after trips to the ocean.
The water line and below is a little different shade of gray.
 

SHSU

Lieutenant Junior+Starmada Splash Of The Year 2019
Joined
Mar 8, 2017
Messages
1,741
Looking good!!

One thing to keep in mind, if you tested water leaks prior to removing the paint, you might want to test again since you plan to leave it bare. The paint may have helped "seal" some of the rivets. Might be a worry wort, but something to ponder.

SHSU
 

renns

Petty Officer 1st Class
Joined
Dec 20, 2017
Messages
316
Looking good. I left my transom bare and it's not showing any signs of corrosion. I leave it in fresh water for weeks at a time. I always rinse with fresh water after trips to the ocean.
The water line and below is a little different shade of gray.
Thanks. All the boats I see sitting in our lakes end up with a brownish tint below the waterline due to tannins and/or algae in the water. I'm not worried about those issues.
Looking good!!

One thing to keep in mind, if you tested water leaks prior to removing the paint, you might want to test again since you plan to leave it bare. The paint may have helped "seal" some of the rivets. Might be a worry wort, but something to ponder.

SHSU
I agree, that would be nice. I'll need to keep an eye on weather. I'm near Toronto, and winter is on its way, so I may not get a chance. I'm planning to G-Flex the seams and bottom rivet heads from the outside, and then repeat the process again from the inside. I was worried about it making a mess, but the video here shows the use of a syringe to apply the product in a very controlled manner. Here's hoping it works that well in practice.
Making serious headway....got any motivation for sale??
LOL, I'm trying to muster up the effort to keep momentum rolling while the shop is still above freezing. I usually wrap up shop work about Christmas when the tools start to freeze to my hands.
My son is looking into getting a propane tube heater system installed by his buddy. If that works out, we'd have winter heat in the workshop for the first time ever!
 

ShoestringMariner

Lieutenant Commander
Joined
Apr 18, 2015
Messages
1,600
Thanks. All the boats I see sitting in our lakes end up with a brownish tint below the waterline due to tannins and/or algae in the water. I'm not worried about those issues.

I agree, that would be nice. I'll need to keep an eye on weather. I'm near Toronto, and winter is on its way, so I may not get a chance. I'm planning to G-Flex the seams and bottom rivet heads from the outside, and then repeat the process again from the inside. I was worried about it making a mess, but the video here shows the use of a syringe to apply the product in a very controlled manner. Here's hoping it works that well in practice.

LOL, I'm trying to muster up the effort to keep momentum rolling while the shop is still above freezing. I usually wrap up shop work about Christmas when the tools start to freeze to my hands.
My son is looking into getting a propane tube heater system installed by his buddy. If that works out, we'd have winter heat in the workshop for the first time ever!
FYI those can really bake you out depending on your shop configuration. If it is a garage, you might want to consider a hot dawg instead?

I have a 1.5 car garage. Insulated. I use a 230 V sharp heater that has a wall/ceiling mount. Thermostat. Turns down To about 7° on its lowest setting. Keeps everything from freezing, but will heat the shop up to 25° in less than an hour. Haven’t really noticed a huge dent on my Hydro bill.
 

renns

Petty Officer 1st Class
Joined
Dec 20, 2017
Messages
316
FYI those can really bake you out depending on your shop configuration. If it is a garage, you might want to consider a hot dawg instead?

I have a 1.5 car garage. Insulated. I use a 230 V sharp heater that has a wall/ceiling mount. Thermostat. Turns down To about 7° on its lowest setting. Keeps everything from freezing, but will heat the shop up to 25° in less than an hour. Haven’t really noticed a huge dent on my Hydro bill.
Our workshop is about 24x36, with two garage doors on one end, 10' ceiling. There is a layer of spray foam in the walls and ceiling. I've got an old 230v construction heater kicking around. I think I need to wire up a different plug so it will connect to my welder receptacle. Should add that to my list.
 
Top