Where do I belong? Alum Goods 1687, SS16 Clone?

renns

Petty Officer 1st Class
Joined
Dec 20, 2017
Messages
316
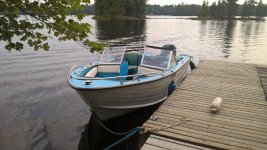
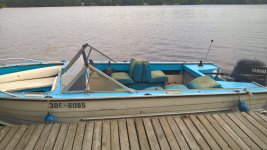
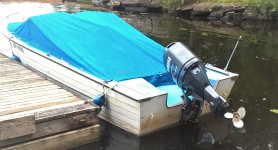
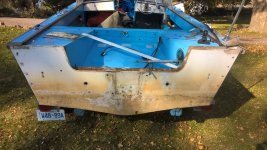
So... after searching for a while for my first real 'project' boat, I ended up with this:
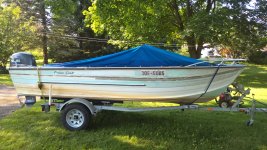
WP_20210726_17_00_31_Pro.jpg
WP_20210806_09_51_57_Pro.jpg
WP_20210806_09_52_07_Pro.jpg
WP_20210726_16_47_33_Pro.jpg
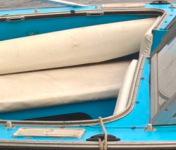
I purchased it from the estate of a couple in their 90's, who'd had the boat at their cottage for a very long time. In 2007 it was re-powered with a new fuel injected 4-stroke Yamaha 60, so I figured I was worst-case buying a modern engine with a boat-shaped engine stand. We took it out on the lake numerous times, and have decided the size, configuration, and performance are near perfect for our needs. Surprisingly it will haul 5 big guys and some gear up on plane, which is an extreme loading case for us. However, the wiring is a mess, windshield crazed, paint (multiple layers of what appears to be latex house paint??) and interior need work. Oh, and the transom is soft as well, reinforced to survive the season. I've tackled many other mechanical projects in the past, and I have a shop to work in. I do not, however, have much nautical experience, and am looking for advice on how to evaluate and proceed.

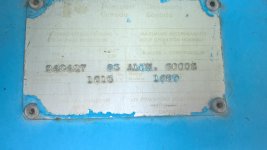
As for my post title... This boat is an 'Aluminum Goods Company' model 1687 boat, likely from the 70's. From my research, that company was purchased by Princecraft, and the previous owner applied his own decals to that effect. I can find almost no info about this model, although from sniffing around iboats, it looks to be very similar to the SS16 Starcraft. So...where do my questions related to this boat belong? If I'm allowed to hang here, I'll carry on with this thread, but if that's not appropriate, an alternate sub-forum, or other site would be most appreciated!
 

racerone

Supreme Mariner
Joined
Dec 28, 2013
Messages
36,269
Ask some dealers in the Orillia area.----I agree it has the Starcraft look.
 

matt167

Captain
Joined
Sep 27, 2012
Messages
3,689
It is my understanding that Starcraft built bare hulls for a few manufactures. It is possible they provided that hull... If I were to guess, it's at least modeled after an Super Sport 16.. But it also looks like Aluminum Goods copied Duracraft earlier so it's hard to know if they built your hull or outsourced it.
 

classiccat

"Captain" + Starmada Splash Of The Year 2020
Joined
Dec 20, 2010
Messages
3,405
Welcome! That's a cool boat.

You're right...very similar to an SS16 esp with the integrated spray rail & double-rivet seam at the outer chine. Enough DNA to join the Starmada IMO...plus you brought pictures. :ROFLMAO:

There are some subtle differences that immediately jump out is the missing bow nose piece; the rub rail is continuous rather than 2 piece like an OG SS.

1636077915076.png
and the trimmed-out curves in front of the windshield.
1636077979512.png
 

renns

Petty Officer 1st Class
Joined
Dec 20, 2017
Messages
316
Thanks for the info! I've noticed subtle differences in the lapstrake size/number compared to SS16's I've seen online. The other difference is the narrower splashwell.
WP_20210808_10_48_12_Pro (2).jpg

Unfortunately the fancy aluminum casting at the top corner of the transom has been replaced by a 'fabri-cobbled' equivalent. Not sure if the SS16 one would be a suitable replacement.
Another issue to address in this area is the rain-water entry at the back of the gunnels, where it runs under that casting, and down the inside of the transom. I think with this mooring cover arrangement that may be more of an issue than normal. Maybe some sealant, and a relief notch at the end of the upper rub-rail trim to allow water to exit overboard?
 

renns

Petty Officer 1st Class
Joined
Dec 20, 2017
Messages
316
Racerone-I have a friend in Orillia. Next time I'm visiting, I'll check out some older marinas to see if I can find any info.
matt - I was wondering the same, but the I think the lapstrake pattern on this boat is different than the SS16's?
 

renns

Petty Officer 1st Class
Joined
Dec 20, 2017
Messages
316
WP_20211104_19_20_06_Pro.jpg
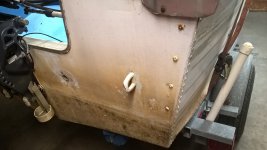
Transom - see multiple layers of paint, and what looks to be machine screws up the side? Also, the motor is not mounted down all the way on the transom. Looking underneath, it was mounted this way so the bottom holes on the motor mount would still pass through transom wood, rather than through the z-channel transom support. My thought is to rebuild the transom higher by that gap dimension to allow proper mounting upon replacement.
WP_20211104_19_20_16_Pro.jpg

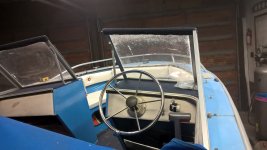
Above in an interior shot, showing nice blue carpet as console top, and permanent chafe guard at top of windshields. Center windshield section is missing, and others are crazed badly, so I'm hoping to find a suitable replacement set rather than deal with all those panels individually. As always, recommendations welcome!
WP_20211104_19_02_55_Pro.jpg
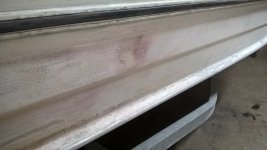
I've read that pics are a must on this forum, so here's another one! Lower aft portion of hull as well as transom seem to have a thick reddish coating under the white paint. Would this be some older anti-foul coating? I've been going at the hull a bit with orbital sander and 240 grit just to see how many layers exist. Looks like several... Rumour has it the grandkids helped with the recent paint jobs. It shows!
 

renns

Petty Officer 1st Class
Joined
Dec 20, 2017
Messages
316
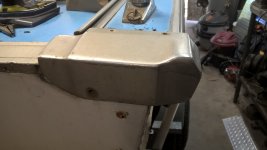
Motor off, transom top and corners off, hoping to pull transom board tonight. Here's the starboard side transom corner casting (name correct?).
WP_20211105_15_11_43_Pro.jpg

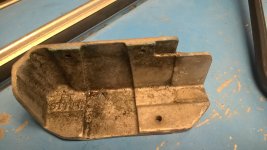
Would the SS16 have the same part? I need the port side to replace the poorly fabricated equivalent part. Here's a pic of the inside of the casting showing STTOP code. Guessing Starboard Top?
WP_20211105_15_12_10_Pro.jpg

I need some advice on steering cable. It is stiff to move, and is no easier with the engine disconnected. The stiffness is pretty even throughout. I'm wondering if there's any point in trying to grease/lubricate the cable in some fashion, or is replacement needed?
 

jbcurt00

Moderator
Staff member
Joined
Oct 25, 2011
Messages
24,863
Nope, an SCs end caps are completely different.

Take what you have to a metal fab shop & have them weld up a 1/4in plate replica.
 

renns

Petty Officer 1st Class
Joined
Dec 20, 2017
Messages
316
jbcurt, sounds like a plan! I've got a guy...

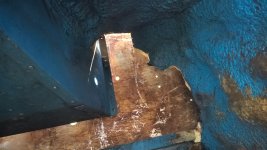
Disassembly continues today. Anyone have thoughts on the foam up the aft corners of the hull and underside of the splashwell returns? It adds significant rigidity to the splashwell area currently, and that foam isn't wet at all. Hoping I can leave the splashwell and the attached foam in place.
 

classiccat

"Captain" + Starmada Splash Of The Year 2020
Joined
Dec 20, 2010
Messages
3,405
jbcurt, sounds like a plan! I've got a guy...

Disassembly continues today. Anyone have thoughts on the foam up the aft corners of the hull and underside of the splashwell returns? It adds significant rigidity to the splashwell area currently, and that foam isn't wet at all. Hoping I can leave the splashwell and the attached foam in place.
it's probably open cell polystyrene (non ideal for flotation) but that will be fine for those locations if it remains intact since it isn't submerged and sponging up water.
 

GA_Boater

Honorary Moderator Emeritus
Joined
May 24, 2011
Messages
49,038
I need some advice on steering cable. It is stiff to move, and is no easier with the engine disconnected. The stiffness is pretty even throughout. I'm wondering if there's any point in trying to grease/lubricate the cable in some fashion, or is replacement needed?

If you are able to lube the cable, it's temporary at best. I would replace the cable and helm with a full kit. Then you have a new cable and helm for just a few bucks more.
 

renns

Petty Officer 1st Class
Joined
Dec 20, 2017
Messages
316
I was really hoping to avoid the foam-stripping exercise I've seen in so many other posts here, but alas, it appears this hull like so many others is also carrying several hundred pounds of water-soaked foam. I will follow classiccat's advice, and leave the dry higher-up foam in place, and concentrate on the expanding foam filling the floor. That foam supporting the corners of the underside of the splashwell returns can be seen below:
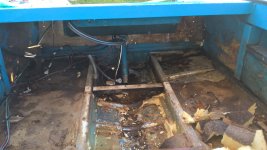
WP_20211106_14_27_59_Pro.jpg

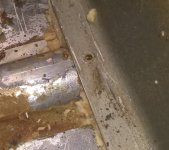
I've noticed sheared popped rivets throughout, holding the longitudinal members to the curved pieces that laterally follow the hull (need proper names here!).WP_20211106_15_02_16_Pro.jpg

Virtually every rivet at a joint like that is in the same condition. I'm wondering if water-soaked foam froze in past, and caused the failure? Those will be replaced prior to new floor being installed.

A couple other random photos follow:WP_20211106_14_32_11_Pro.jpg
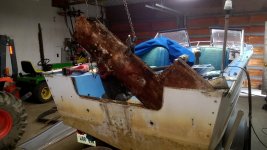
Transom after removal of all fasteners and transom board.

A__9448.jpg
Transom removal. Port side was rotted badly. Sheet metal vice grips were used to grab the middle section of the transom, and hoist used to slowly pull it loose and free of the ship.
WP_20211106_14_27_02_Pro.jpg
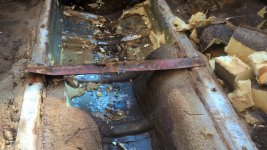
Random interior phot showing foam removal process started. I'm seeing lots of regular steel fasteners used in aluminum for holding floor, trim, etc. Most are badly corroded. I'm assuming stainless would be a better option for reassembly?

WP_20211106_14_27_07_Pro.jpg
Looks like previous owner added a mild-steel reinforcement to the middle of the floor. It was badly corroded, and is now removed.
 

racerone

Supreme Mariner
Joined
Dec 28, 2013
Messages
36,269
This foam under the floor is a great idea for the builder of the boat.------Not a good idea for the owner of a 40 year old boat.-----I am doing a boat and the foam has been tossed.------Installed structural bits instead of the foam.------No foam going into the boat once done.
 

renns

Petty Officer 1st Class
Joined
Dec 20, 2017
Messages
316
racerone - any chance you could expand on your 'structural bits'? Are they to provide for stiffness lost due to lack of foam, or for other reasons? Why not just replace the foam? Sorry if you've already discussed this at length elsewhere.
 

racerone

Supreme Mariner
Joined
Dec 28, 2013
Messages
36,269
Just buy some 2 part pourable foam and you will be good to go for 10 years or more.----Noah's in the GTA area will help you with that.
 

renns

Petty Officer 1st Class
Joined
Dec 20, 2017
Messages
316
OK, thanks for info. Getting that foam out looks easy, but is a bear. Working hunched over isn't as easy as it once was. I've been using a sharp putty knife to slit the foam into sections, and pry bar and claw hammer to pop out in chunks. This boat is spray-foamed up the sides as well, and also has a block of expanded polystyrene (white bubbled) foam under the gunnel on each side.
 

roscoe

Supreme Mariner
Joined
Oct 30, 2002
Messages
21,665
Going back to your earlier post about engine mounting, transom build up, etc.

Motor bracket does not need to rest on top of transom.
Most don't.

Motor needs to be mounted at height so that the anti-ventilation plate on the motor, (the one just above the propeller), is about 1" (2.54 cm ) above the bottom of the hull.

Looks like you are making fast progress.

We'll let you in the Starcraft club, IF.... you put at least 1 small Starcraft sticker on it. :)
 

jbcurt00

Moderator
Staff member
Joined
Oct 25, 2011
Messages
24,863
We'll let you in the Starcraft club, IF.... you put at least 1 small Starcraft sticker on it. :)
Should probably accept a Starmada sticker instead, less miss advertising, and more 'official'.šŸ˜Ž
 

renns

Petty Officer 1st Class
Joined
Dec 20, 2017
Messages
316
roscoe - thanks for info about the motor mounting, I wasn't aware of that. I'm used to tiller outboards on my smaller boats that hang on the transom and then get tightened in place. I'll keep the original shape then, as it saves me fiddling with trim and extending aluminum skin on the transom.
jb - Starmada sticker it is!
Got foam removed up to the consoles today. Things are getting drier, but the foam nearest the keel is still pretty wet. Will keep going tomorrow as time allows. Back is sore from being hunched over scraping inside that hull, but the end is in sight now!
 
Top