Where do I belong? Alum Goods 1687, SS16 Clone?

renns

Petty Officer 1st Class
Joined
Dec 20, 2017
Messages
316
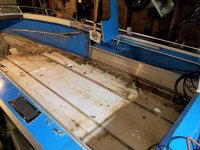
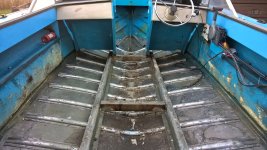
Floor foam removal complete. What a miserable job that is! First pressure wash of interior was completed as well. Found one pinhole in the floor near the transom. Looks like a corrosion spot, right under where the battery was located. Will inspect closer next work day, and post pics for some repair advice. Also near the bow when I pressure washed into the lap joints on either side, some dribbles appeared on the outside. I'm thinking if it's cleaned well, Gluvit or equivalent should solve that issue? The grunge from the wash water all settled to the bottom for this pic. It's since been shop vac'd out, and looks pretty decent.
WP_20211108_16_38_14_Pro.jpg

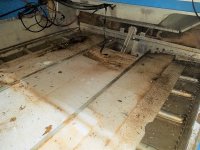
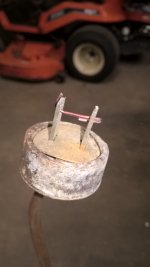
The old fella that owned this boat prior was a 'handy' guy, particularly with wiring. Three different sections of wire connected the bow lights, with joints completed via hockey tape and wire nuts. I also found this very unique item under the carpet, no longer connected to anything onboard fortunately!
WP_20211108_16_34_02_Pro.jpg
 
Last edited:

classiccat

"Captain" + Starmada Splash Of The Year 2020
Joined
Dec 20, 2010
Messages
3,412
end of an extension cord to see if your circuit breakers are working :ROFLMAO:

i was wrong about the seam...it looks like it's single-rivet. If the leaks are isolated, you can try rebucking the rivets in the area. Then sealing with Gluvit, coatit or the one I really like is West System's G-Flex. Did you plan on flipping the boat? If so, you can get that problematic seam from the outside and inside.
 

renns

Petty Officer 1st Class
Joined
Dec 20, 2017
Messages
316
Those familiar with the SS16, how does it compare foam-wise? This boat had foam-filled bays under the floors except for a ~6" channel down the middle. Also up each side is spray foamed, then under the gunnels on each side is a big block of the white eps foam the full length. Also white eps foam panels under each bow seat, and under the bow trim where the light is located. Seems like a huge volume of floatation, but this is all new to me.
 

Michigan Lakes

Petty Officer 3rd Class
Joined
Dec 20, 2018
Messages
86
Those familiar with the SS16, how does it compare foam-wise?
IIRC, my 1975 SS16 had what appeared to be white polystyrene (similar to normal packaging material) underneath most of the floor, including the center. I am certain that I had no flotation material above the floor
 

renns

Petty Officer 1st Class
Joined
Dec 20, 2017
Messages
316
ML, that's interesting. In this hull white polystyrene is only up high in the hull, under seats and gunnels. Everything else is spray-foamed. The floor foam was pretty wet near the stern, probably soaked for the bottom inch or more. Up near the bow, there was still water present in the foam, but only in a thin layer up against the aluminum. Our local dump scale said the total weight of carpet and wet foam was about 255 lb.
I suppose the extra foam high up under the gunnels would assist in keeping the hull upright, rather than 'going turtle'? I hope I never need to find out!
 

Michigan Lakes

Petty Officer 3rd Class
Joined
Dec 20, 2018
Messages
86
Those familiar with the SS16, how does it compare foam-wise?
Managed to find a few photos of mine just after the old floor came out. This was all the foam I had. 99% sure that my floor, foam etc were original to the boat.
Foam Bow.jpg
Foam Stern.jpg
 

renns

Petty Officer 1st Class
Joined
Dec 20, 2017
Messages
316
Thanks for the pics. Much different approach to floatation between mine and yours.
 

renns

Petty Officer 1st Class
Joined
Dec 20, 2017
Messages
316
end of an extension cord to see if your circuit breakers are working :ROFLMAO:

i was wrong about the seam...it looks like it's single-rivet. If the leaks are isolated, you can try rebucking the rivets in the area. Then sealing with Gluvit, coatit or the one I really like is West System's G-Flex. Did you plan on flipping the boat? If so, you can get that problematic seam from the outside and inside.
OK, I'm researching these sealing options, as that seems to be on the critical path for this project. Would you be able to expand on why you prefer the G-Flex? I'm looking at all three now, and wondering about sealing abilities, low temperature application, etc. Also, what's the recommended order of operations if re-bucking any rivets? I'm thinking re-buck first, then apply the epoxy sealant?
 

renns

Petty Officer 1st Class
Joined
Dec 20, 2017
Messages
316
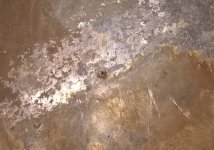
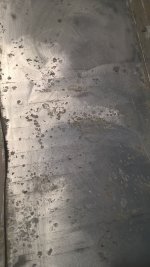
Here's the source of that leak in the floor near the transom. There is some pitting spots under where the battery was located. This one pit has penetrated the hull completely. The whole crater looks to be about 3/16" diameter. I'm thinking I'll drill it out and put a closed-end pop-rivet in there with a bit of sealant for insurance. What to do with the other pitted areas? Clean and butter with JB weld? Rivet a sealing patch over the entire area? The affected area looked to be less than 1 ft^2.WP_20211111_13_04_08_Prom.jpg
 

racerone

Supreme Mariner
Joined
Dec 28, 2013
Messages
37,972
Exactly why I do not like foam under the floor of a boat.-----It hold moisture and that leads to corrosion.----There are other alternatives.
 

renns

Petty Officer 1st Class
Joined
Dec 20, 2017
Messages
316
Alternatives to the foam, or to my proposed repair techniques?
 

racerone

Supreme Mariner
Joined
Dec 28, 2013
Messages
37,972
Alternative to foam----And I would go with a patch riveted in.----Aircraft have been repaired with engineered patches , riveted in place.
 

classiccat

"Captain" + Starmada Splash Of The Year 2020
Joined
Dec 20, 2010
Messages
3,412
OK, I'm researching these sealing options, as that seems to be on the critical path for this project. Would you be able to expand on why you prefer the G-Flex? I'm looking at all three now, and wondering about sealing abilities, low temperature application, etc. Also, what's the recommended order of operations if re-bucking any rivets? I'm thinking re-buck first, then apply the epoxy sealant?
I haven't used Coat-it however the Gflex is more "flexible" than Gluv-it once cured. I don't have empirical evidence but adhesion to aluminum appears to be a bit better with the Gflex as well. Yes, definitely re-buck before final sealing.

If you have 1 hole and the rest is shallow corrosion, see if you can plug the hole with a solid aluminum Rivet by drilling it out starting with the 3/16 but you may need to go up to 1/4". You need to clean that entire area really well to assess the surrounding aluminum. if you have pits that are questionable (more than half of the aluminum thickness has been consumed), you should consider external patches.

Regarding foam, look for XPS foam board (not to be confused with EPS!). May claim to be closed-cell but you have to look at how densely packed the closed cells actually are.

Gflex vs 105 (obviously not Gluvit but you get the point):

xps vs eps:
 

renns

Petty Officer 1st Class
Joined
Dec 20, 2017
Messages
316
cc - very interesting videos! I've put an order in for the G-Flex. Hope to get to that job some time next week. BTW, amazing restoration thread you have going there. I'm trying to work through a number of related threads here on iboats, and the amount of information is overwhelming!
 

renns

Petty Officer 1st Class
Joined
Dec 20, 2017
Messages
316
OK, so I've got the transom stripped of paint, and have found a few small corrosion spots, but nothing major. I also put on the reading glasses, and sanded between ribs inside the hull, where the foam was extracted. There are numerous small shallow spots of corrosion. I thought at first these spots were just staining from the foam.

Are there any guidelines out there for what's acceptable, and what needs patching or further repair? If spots are shallow, I'm thinking cleaning with 50/50 vinegar solution, rinse, and etching primer would be a suitable repair? More severe areas will get a riveted patch buttered with 5200. The cell phone battery was dead, so I'll have to follow up with some pics for more info. Thx as always for any info.

I'm continuing through classiccat's thread, and both amazed and terrified at the level of work performed! Here's hoping this old hull can be returned to the water without
 

classiccat

"Captain" + Starmada Splash Of The Year 2020
Joined
Dec 20, 2010
Messages
3,412
OK, so I've got the transom stripped of paint, and have found a few small corrosion spots, but nothing major. I also put on the reading glasses, and sanded between ribs inside the hull, where the foam was extracted. There are numerous small shallow spots of corrosion. I thought at first these spots were just staining from the foam.

Are there any guidelines out there for what's acceptable, and what needs patching or further repair? If spots are shallow, I'm thinking cleaning with 50/50 vinegar solution, rinse, and etching primer would be a suitable repair? More severe areas will get a riveted patch buttered with 5200. The cell phone battery was dead, so I'll have to follow up with some pics for more info. Thx as always for any info.

I'm continuing through classiccat's thread, and both amazed and terrified at the level of work performed! Here's hoping this old hull can be returned to the water without
i'm glad that my thread didn't scare you away :ROFLMAO: .

after the SE primer, you may want to backfill any shallow pitting with either JBWeld or MarineTex to avoid water collecting in those pits in the future.
 

renns

Petty Officer 1st Class
Joined
Dec 20, 2017
Messages
316
OK, so I've got the transom stripped of paint, and have found a few small corrosion spots, but nothing major. I also put on the reading glasses, and sanded between ribs inside the hull, where the foam was extracted. There are numerous small shallow spots of corrosion. I thought at first these spots were just staining from the foam.

Are there any guidelines out there for what's acceptable, and what needs patching or further repair? If spots are shallow, I'm thinking cleaning with 50/50 vinegar solution, rinse, and etching primer would be a suitable repair? More severe areas will get a riveted patch buttered with 5200. The cell phone battery was dead, so I'll have to follow up with some pics for more info. Thx as always for any info.

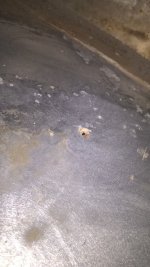
I'm continuing through classiccat's thread, and both amazed and terrified at the level of work performed! Here's hoping this old hull can be returned to the water without too much effort...WP_20211114_17_15_46_Pro.jpg
Above is that hole mentioned earlier, after sanding the area a bit. There are some very minor spots in the area, but nothing else of this size.


WP_20211114_17_14_26_Pro.jpg
Each bay between ribs has spots of discolouration that appear to be corrosion in the initial stages. I've scraped at them with a pick, and all appear very shallow so far. However, how does one inspect the area beneath the ribs???
 

classiccat

"Captain" + Starmada Splash Of The Year 2020
Joined
Dec 20, 2010
Messages
3,412
Above is that hole mentioned earlier, after sanding the area a bit. There are some very minor spots in the area, but nothing else of this size.


View attachment 352709
Each bay between ribs has spots of discolouration that appear to be corrosion in the initial stages. I've scraped at them with a pick, and all appear very shallow so far. However, how does one inspect the area beneath the ribs???
Yeah that doesn't look bad at all.

I pulled a few ribs and it was the cleanest aluminum in my boat :ROFLMAO:

however the same couldn't be said for the kneebrace...it was a horror show under there.
 

Watermann

Starmada Splash of the Year 2014
Joined
Jan 12, 2013
Messages
13,794
You want to use a solid rivet to repair the hole rather than a blind rivet to seal a hole in the bottom, one small impact or just routine trailer loading and unloading can snap the head off a blind.

For the under deck ferrous metal, replace bracing with AL and use AL fasteners, blind or solid rivets.
 

renns

Petty Officer 1st Class
Joined
Dec 20, 2017
Messages
316
Thanks for the advice! I'm sure these questions must get repetitious, as I continue to uncover similar discussions in the other project threads.
I'll take a close look behind the knee brace. It was bolted through the transom with mild steel 1/4" bolts, so there may be surprises waiting. I am pleased to say I see no cracking that I've read about with genuine SC models.
For a bit of background, I bought this boat from a fellow in his 90's. It hadn't been in the water in 3-4 years. It was repowered with fuel injected Yamaha 60hp back in 2007. Hooking up my computer, the engine showed 372 hrs, with 337 of them at idle! Not a lot of hull stress at those speeds. If it was used in similar fashion with the previous engine, it's basically been used for trolling and sightseeing around their cottage lake.
 
Top