Got a pic of your “crimped” rib ends? Mine a stamped and rounded.SSM - no worries, hijack away! More traffic on my thread is always welcome.
One issue I found yesterday while working the floor, is that the rib ends on the port side are low by about 1/4". I'm not sure what's caused that, but it does seem consistent across the half dozen ribs I checked. Those longitudinal members (do they have a name?) were loose in my boat due to wet foam freezing and pulling the pop rivets. I re-riveted back into the original location, so I don't know what the cause is, but I'm tempted to just put a 1/4" strip of shim material of some type along the underside of the floor on port side, and call it day. That does screw up rivet length though... 1/4" shim + 5/8" ply + .080 rib = nearly 1"! Or maybe those crimped ends of the ribs could be 'tweaked' back up a bit? Thoughts and recommendations welcome here.
I see what you mean now. Are your stringers the same height on both sides?Here's a couple pics of the rib-ends I referred to in previous post. Starboard side is pretty much bang on, +- 1/16". Port side is consistently low 3/16" to 1/4"View attachment 354295View attachment 354296
Yeah, I suppose that could be the case. I was kind of thinking to have the deck more concave, with low section down the center to run water straight back to the bilge. I'll take another look once the Coat-it exercise is complete. It also ties in somewhat to the vinyl flooring install option I choose, and I see you have a reply for me in my other thread. Off I go to read that one. Thanks for taking the time to share your thoughts!I personally wouldn't worry too much about the rib ends with that small of a difference. The plywood decking will flex a bit and get pulled tight with the rivets. Might have even been done intentionally to shed water and prevent standing water from pooling in the center of the deck??
Something @classiccat (I think) said about coatings on aluminum concerns me and my repaint plans. This thread is something you might want to see if you are thinking about using coat-it. https://forums.iboats.com/threads/1974-starcraft-21’-holiday.752987/#post-5731831Yeah, I suppose that could be the case. I was kind of thinking to have the deck more concave, with low section down the center to run water straight back to the bilge. I'll take another look once the Coat-it exercise is complete. It also ties in somewhat to the vinyl flooring install option I choose, and I see you have a reply for me in my other thread. Off I go to read that one. Thanks for taking the time to share your thoughts!
I hope I’m not trying to sour your plans. Just trying to help. Product might be just fine. (I hear “coat” and automatically think thick coatingI've seen similar discussions about the bedliner products. The Coat-It is epoxy-based, so I'm thinking it's more like Gluvit or G-Flex and hopefully isn't susceptible to those issues. (fingers crossed now!!).


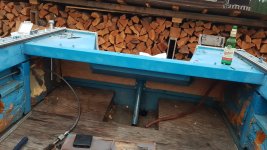
I'm not sure if it shows well in the pics due to the glossy black paint, but two holes of the six mounting holes in each pedestal actually pass right through the stringer. Those black painted pieces in the pictures are the 5/8 ply doublers with those 4-pronged tee-nuts embedded in the underside. The plan is to position the deck panel in place over the doubler, and then use the pedestal machine screws to pull the double up from the bottom, and the deck board down from the top, pinching the flange of the stringer. That should give a very rigid pedestal, as it will be integrally tied to the stringer, rather than just the deck board itself.
Hey! Super cool to see. I own exact same boat. Tried to find info about these and not much on the internet. Want to restore it as well just did transom and few things to get it on the water. Mine came as total project boat. So far I love this boat. It's very stable and fast too. Mine has Mercury 85hp. Will post some more pictures once I get to it as it's parked in the shop right now. I'm in BC.So... after searching for a while for my first real 'project' boat, I ended up with this:
View attachment 352313
View attachment 352317
View attachment 352318
View attachment 352319
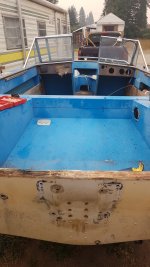
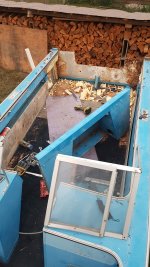
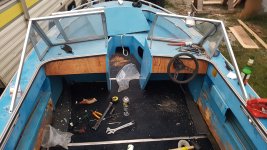
I purchased it from the estate of a couple in their 90's, who'd had the boat at their cottage for a very long time. In 2007 it was re-powered with a new fuel injected 4-stroke Yamaha 60, so I figured I was worst-case buying a modern engine with a boat-shaped engine stand. We took it out on the lake numerous times, and have decided the size, configuration, and performance are near perfect for our needs. Surprisingly it will haul 5 big guys and some gear up on plane, which is an extreme loading case for us. However, the wiring is a mess, windshield crazed, paint (multiple layers of what appears to be latex house paint??) and interior need work. Oh, and the transom is soft as well, reinforced to survive the season. I've tackled many other mechanical projects in the past, and I have a shop to work in. I do not, however, have much nautical experience, and am looking for advice on how to evaluate and proceed.
As for my post title... This boat is an 'Aluminum Goods Company' model 1687 boat, likely from the 70's. From my research, that company was purchased by Princecraft, and the previous owner applied his own decals to that effect. I can find almost no info about this model, although from sniffing around iboats, it looks to be very similar to the SS16 Starcraft. So...where do my questions related to this boat belong? If I'm allowed to hang here, I'll carry on with this thread, but if that's not appropriate, an alternate sub-forum, or other site would be most appreciated!

Are you able to find dek-master elsewhere then?Storm Grey Nautolex arrived for the deck covering. Now - what adhesive to use... My deck is 5/8" exterior grade plywood, which has some surface imperfections. I wish I'd gone with better quality ply, perhaps Arauco or similar at least, given the time I've ended up putting into this project. In any case, it's been coated with 4+ coats of OldTimersFormula, all sides and edges. I put a coat of oil-based paint on the underside, but thought from an adhesion standpoint, perhaps it'd be better to let the vinyl adhesive grab on the rougher wood surface left after the drying of the OTF.
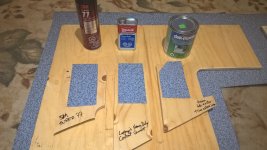
I ran a quick experiment last night with three different contact cement products. In each case both the fabric underside and the plywood sample were coated, and let to set per the instructions on the container:
1.) 3M 77 Spray Adhesive - readily available at Home Depot. This product soaks in a fair bit, and a second coat was applied to get what looked like an appropriate build-up.
2.) ducan Dek-Master Trim Adhesive - used to be available in Cdn Home Depot but most no longer stock it. This product is fairly thick, and applied with a brush. Only one coat was used.
3.) Lepage's Heavy Duty Contact Cement - available at most every hardware retailer in Canada at the moment. This stuff is thin, and smells much nastier than the other two. I'm not up on chemical identification by aroma, but this stuff definitely seems to use a different solvent than the first two. After waiting a couple minutes, this product had virtually disappeared from the surface of the ply and the fabric underside. A second coat was applied.
The vinyl samples were about 3" wide, and I left a tail hanging past the plywood so I could grab and peel it off after for testing. After bonding, each was immediately rolled a couple times with an piece of ABS pipe.
Results:
1.) Lepage's was the strongest bond. Using full effort I was just barely able to peel the vinyl free from the surface. In sections, the adhesive pulled away from the wood, and in others it pulled away from the vinyl. I'm thinking the thinning consistency allowed better penetration and bonding, but also required a second coat on application.
2.) ducan Dek-Master - second strongest. The bond was consistent throughout, and took considerable effort to peel back. Good consistent adhesion overall. I'm impressed with the performance here, and the consistency and single-coat are advantages.
3.) 3M 77 - third place - very poor bond that peeled back easily. I suspect this product might be better suited for bonding to well-sealed wood, or to aluminum directly. Even with the spray of a couple coats, it must have soaked in too much into the substrate to get a good bond.
I did not have any water-based adhesives at hand for testing. I'm a bit hesitant to even try them given the air bubbling issues some have reported in the past.
Based on this extremely limited test, I'm going to proceed with ducan Dek-Master trim adhesive for the deck section under the splashwell to start with, and see how that works. I like the thicker consistency, and it doesn't bother my nose as much as that Lepage's stuff does. The vinyl will be wrapped around the fore and aft edges, and the sides will be left to extend up into the spray rail. I may screw/rivet a small aluminum angle on the un-wrapped sides just to give the vinyl some mechanical incentive to stay put.