Nautolex Vinyl on Deck - Aluminum Hull

renns

Petty Officer 1st Class
Joined
Dec 20, 2017
Messages
316
I've been reviewing various restoration threads, and there seems to be two different strategies for install:
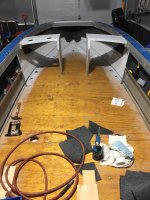
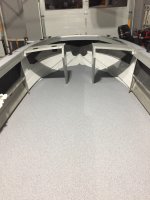
1.) Screw or rivet new plywood in place in the hull, apply vinyl in one piece, wrapping up side of hull a few inches.
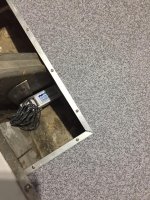
2.) Apply flooring to individual plywood pieces, wrapping vinyl around, and stapling along backside. Then floor is attached with exposed fasteners sitting on top of the vinyl.

I'd appreciate pros/cons and recommendations from anyone that has done this type of job before.
 

MNhunter1

Ensign
Joined
May 12, 2014
Messages
981
I've laid mine in one piece after countersinking the rivet deck fasteners and filling the countersink with 3M5200 or some other sealant/filler to keep a smooth surface. I have done it without countersinking as well, and although you can feel the bumps of the rivet heads under the Nautolex, it's not really all that noticeable. I've always wrapped the edges on pieces like the bow casting deck and used exposed fasteners for those.

I believe the most noticeable difference is in the aesthetics with the exposed v hidden fasteners and any edge joints. Some argue that the one piece method will also seal the deck better by not allowing for any water intrusion between seams or at the fasteners. However, the wrapped edges will also help protect the edges as well.

Personally, I'm still torn on which direction to go on my current build. I guess I generally lean towards the one piece method, but I have some side supports and joints that that could benefit from the wrapped edges.

Additionally, if you ever plan to/or foresee a need to pull up the deck again in the future, by all means, go the wrapped individual pieces with exposed fasteners.

I'll be following along:)
 

renns

Petty Officer 1st Class
Joined
Dec 20, 2017
Messages
316
Thanks for the detailed reply. So many things to consider! This hull appears to have had pressure-treated ply used on the deck, as the stringers are heavily corroded, as are some of the rib ends that were in contact with the wood. There is also some corrosion spots on the hull skin also, one that was patched, a couple others that were drilled and riveted shut. Those, along with the other minor spots and seams were sealed with Coat-it tonight. I've water-tested the hull a couple times, and think all areas are addressed at this point. However, I do have to wonder if some future leak might appear at a corrosion area hidden by the ribs.
All that long-winded detail is to say that I suppose access below deck in the future might be required. I need to weigh that against the ability to nicely shed water on-deck all the way to the bilge drain at the back. Maybe that's really not so important? I guess pulling all that soaked foam out of the floor has me mentally trying to avoid water ingress below deck if at all possible!
 

MNhunter1

Ensign
Joined
May 12, 2014
Messages
981
It's inevitable you'll get some water inside the boat, rain, splash, waves, etc. Most damage is done by improper storage by letting it sit out in the elements uncovered over time. I'm going through the same issues with my MR180 from the saturated foam and use of treated ply for decking. Unfortunately, the efforts aimed at keeping water out(from topside) also prevent things from drying out when they do get wet - deck vents or other openings will allows air to circulate, but also provide an access point for water to get in. I feel the goal is to protect the deck as best as you can by treating the wood with a spar or epoxy and covering with vinyl rather than with something like carpet that will hold water. You'll have water in your hull, but as long as it can drain, dry out, and not get trapped against the hull, you shouldn't really have any issues. Address/stop any existing corrosion and hull concerns, prep and apply Coat-it/Gluvit to the inside seams/rivets, stay away from the pour-in foam, and do your due diligence on sealing and protecting your decking - both on and off the water, add a bilge pump and float switch, and enjoy your time on the water.

Regarding any corrosion concerns under the ribs. Most of what I have seen from those that have actually pulled them has been of little concern or non-existent. The foam doesn't sit against the hull and water can freely drain from under the ribs. I had the same concerns about mine, but ultimately left them in place. My lower hull will remain unpainted, so I figured I can keep on eye on things from the outside over time, and punch in a solid blind smothered with 3M5200 down the road if something actually does present itself, but I'm not really expecting it will.
 

renns

Petty Officer 1st Class
Joined
Dec 20, 2017
Messages
316
I like how you think! I'm following what you've described above closely, but planning to have two bilge pumps for redundancy.

As for the bare hull, will you be treating with Sharkhide or equivalent? My thought is to do the same, and I've ordered a can on Sharkhide to treat the bare aluminum in the hopes it stays 'fresher' looking over time. I've read jasoutside's threads, and he seemed to use the stuff successfully in a variety of applications.
 

MNhunter1

Ensign
Joined
May 12, 2014
Messages
981
I will not be applying anything to the bare hull below the chines. It will be painted above, but as a fishing boat, I'm not too concerned about making the bare aluminum shine.

I debated the redundant pumps, but decided to stick with the one. I'll have a float switch direct wired to the battery, as well as a manual switch at the console I can kick on if needed. If I was going to be spending a lot of time on bigger water or leaving it docked for extended periods of time, I'd be more apt to install a 2nd pump.
 

renns

Petty Officer 1st Class
Joined
Dec 20, 2017
Messages
316
OK, I've been mulling this over, and am leaning towards wrapping the ply panels separately, and then fastening to the floor. Here's a couple more questions to throw out there:
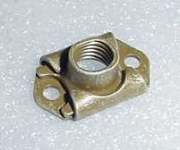
1.) Has anyone fastened nutplates under the stringers, and used machine screws to fasten the deck in place, rather than sheet metal screws? That would allow for I think a more secure method of fastening, as well as easy removal in future if needed. I'm thinking something like this floating nutplate would be slick.
1641735001515.png
2.) What tricks are used to properly locate the holes in the decking over the rib ends? I'm thinking of using a strip of sacrificial material layed over the rib ends, marked for hole locations and indexed to the hull somehow. Then re-install deck, and lay this marked material back over the decking, and drill? Seems tricky, and hazardous given how little clearance there is between the crimped rib end and the hull material below. I'm sure tricks abound for this issue, but I don't recall seeing any so far in my forum reading.
 

ShoestringMariner

Lieutenant Commander
Joined
Apr 18, 2015
Messages
1,563
Like you, I’m torn on the one piece vs. Multiple floor panels. I’m likely going with the latter as that’s how I started. (I did my transom and the rearmost floor (directly under the splashwell at the sliding doors) as a means to have some use that season. I could do a one piece from the sliding doors to the bow but I ask myself which is easier.
Seamless flooring looks neat and there’s no crevices to collect crap, but one piece means you cannot pull up sections to do repairs should you have broken rivets or hit a rock and we certainly have a plethora of rocks in our waters!

As for fastening, I’m thinking of the wide flange rivets. They can be drilled out to pull up boards should it be required. Water is getting underneath regardless, so I don’t care about the joints.

And how do you roll the nautolex ends over the sides to protect the edges with a one piece? Does it matter? Do your side panels end at the helm? Will your bow benches have large hatches allowing you to see the floor to bow transition? And does that fit up matter?

So many questions.

As for the floating nuts;
a) are they zinc plated or can you get stainless?
b) will the bolts or machine screws loosen with the pounding of waves and flex allowing the hull to flex?
Not saying they won’t work…just throwing the questions out there
 

MNhunter1

Ensign
Joined
May 12, 2014
Messages
981
I'd skip the nuts and stick with wide flange aluminum rivets. You're not going to be able to reuse the existing holes and will frustrate the hell out of yourself if you try to get everything lined up with those nuts. The dissimilar metal composition as also a concern as noted by Shoestring.

Mark each rib end just above where the deck will finish with a piece of tape. You should be able to locate your center stringers rather easily with the separate deck pieces. Put some sort of depth guide/stop on your drill bit to get you through the decking and ribs to avoid punching too far and hitting the actual hull. Even a piece of tape wrapped around the drill bit works. Drill hole, set rivet, move onto next hole. Don't try to drill them all and then go back and expect everything to line back up. I've always coated my rivets with 3m5200 to seal up the hole when setting them, but this was always done when setting through deck and before the vinyl was laid on top. Not sure what a mess it might cause with the finished vinyl??

Per Shoestrings comment - when laying in one piece, the ends don't get wrapped and either the vinyl gets trimmed right at the edge(not always ideal and keeps the deck edges exposed) or run up the side a bit(preferred). I always like to ensure I have some sort of mechanical fasteners in place as well to keep the edges from curling down the road. Side panels and supports, consoles, etc., often do the trick. Stainless staples or some aluminum trim pieces can work as well. This is where I am torn on my MR build with the short section of decking between the side supports and bow deck where the deck to hull side transition remains exposed. I'd ideally want my edges wrapped here, but no real means to wrap just that section. If I end up going with one piece of vinyl, I'll fabricate some sort of trim piece for that area.

Only way to wrap edges and lay in one piece is to do the entire deck as one section.
 

renns

Petty Officer 1st Class
Joined
Dec 20, 2017
Messages
316
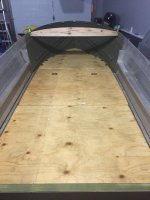
Thanks, those pics are awesome!

Now about the drilling and aligning holes... If you use rivets, you drill through deck plywood and then through stringer. Those shavings fall down into hull. Don't you pull up the deck after to clean that crap out so it doesn't plug things up? If the deck is coming back up for vacuuming, then the alignment issue is back in play... Sorry for what might be stupid question. I'm just trying to think through the steps involved.
 

renns

Petty Officer 1st Class
Joined
Dec 20, 2017
Messages
316
As for the floating nuts;
a) are they zinc plated or can you get stainless?
b) will the bolts or machine screws loosen with the pounding of waves and flex allowing the hull to flex?
Not saying they won’t work…just throwing the questions out there
a.) different versions are available - zinc, or some black chromate (I think?) I have from an aircraft application. That's actually where I got the idea, as they are commonly riveted to aluminum structure in aircraft.
b.) I suppose it's possible, but the 'good' ones I have are crimped slightly oval to provide mechanical locking as well.

I'm still trying to think this all through, and I guess as I said in previous reply to MN, I'm imagining drilling the deck, then pulling it up to vacuum all the swarf out prior to closing it up for good. I'm hoping I can drop an alignment pin in each hole as it's drilled, to keep the whole deck board fixed in position so the holes all match in the structure below. Or maybe I'm overthinking things??? Wouldn't be the first time!
 

MNhunter1

Ensign
Joined
May 12, 2014
Messages
981
Thanks, those pics are awesome!

Now about the drilling and aligning holes... If you use rivets, you drill through deck plywood and then through stringer. Those shavings fall down into hull. Don't you pull up the deck after to clean that crap out so it doesn't plug things up? If the deck is coming back up for vacuuming, then the alignment issue is back in play... Sorry for what might be stupid question. I'm just trying to think through the steps involved.
The shavings stay that fall below deck. Drill and rivet.
 

ShoestringMariner

Lieutenant Commander
Joined
Apr 18, 2015
Messages
1,563
Thanks, those pics are awesome!

Now about the drilling and aligning holes... If you use rivets, you drill through deck plywood and then through stringer. Those shavings fall down into hull. Don't you pull up the deck after to clean that crap out so it doesn't plug things up? If the deck is coming back up for vacuuming, then the alignment issue is back in play... Sorry for what might be stupid question. I'm just trying to think through the steps involved.
Shavings will fall into rib ends and onto your foam insulation everywhere else if you use styrofoam sm floatation.
I can’t see those fine shavings clogging anything up, even if they vibrate or wash down to the bilge and into the limber hole area
 

renns

Petty Officer 1st Class
Joined
Dec 20, 2017
Messages
316
The shavings stay that fall below deck. Drill and rivet.
After all that scraping, scrubbing, sanding, pressure washing, and vacuuming...it just seems so wrong!
SSM - you and MN are right, that crap should end up eventually in the bilge. I did spend some time making sure those limber hole areas were clear. Many of them had old rafter tails from the blind rivets of prior deck installs in them. With a bit of work with a butter knife and vacuum I was able to get them cleaned out. I'm just picturing a birds nest of aluminum curlies and sawdust plugging one of those after all that hard work!
 

ShoestringMariner

Lieutenant Commander
Joined
Apr 18, 2015
Messages
1,563
After all that scraping, scrubbing, sanding, pressure washing, and vacuuming...it just seems so wrong!
SSM - you and MN are right, that crap should end up eventually in the bilge. I did spend some time making sure those limber hole areas were clear. Many of them had old rafter tails from the blind rivets of prior deck installs in them. With a bit of work with a butter knife and vacuum I was able to get them cleaned out. I'm just picturing a birds nest of aluminum curlies and sawdust plugging one of those after all that hard work!
I totally get it but keep in mind that your aluminum curlies will be on top side of the board. Only fine crumbs will fall through from the final breakthrough of the drill.
 

renns

Petty Officer 1st Class
Joined
Dec 20, 2017
Messages
316
MN - thanks yet again for those pics! I keep going back to look at other details. I was wondering just now about how to handle the rub relief cutouts as you approach the bow. Looks like you folded the Nautolex back on itself in those areas and just let them ride up on the rib itself? Seems much easier than trying to trim and fit around those relief slots too.
 

renns

Petty Officer 1st Class
Joined
Dec 20, 2017
Messages
316
I totally get it but keep in mind that your aluminum curlies will be on top side of the board. Only fine crumbs will fall through from the final breakthrough of the drill.
Yes, I suppose you're right. Like I said - I'm an expert at over-thinking things. Just trying to plan ahead is all... Now I need to get Nautolex ordered. I've found JT's Outdoor Fabrics in Barrie - $39/yard. Not sure of any other suppliers in the area.
 
Top