Where do I belong? Alum Goods 1687, SS16 Clone?

ShoestringMariner

Lieutenant Commander
Joined
Apr 18, 2015
Messages
1,593
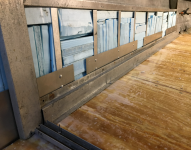
There's really not much flex in the trim piece once everything is tied together. The attachment to that shelf, attachment of the trim, trim secured to the deck, along with the attachment to the vertical supports on both ends really tightens things up. It's amazing to see how much flex you get when you start removing the splashwell, gunnels, bow caps, side panels, consoles, etc. and how it all tightens back up when you reinstall them with new rivets/hardware. It really is engineered as an overall system.

The aluminum angle would work just fine as long as you secure it both to the deck and the side

The only thing I don’t like about this attachment be an angle or a formed Z channel is that it is fastened to the floor with screws. Even with screws drizzled with 4200 or 5200 may still allow water to get down into the plywood over time. My floors were so rotten, the side panels basically pulled right out once the rivets were removed on the upper section.

Do you guys think there’s any value to adding some light, bent aluminum channels from the stringers outwards in a few places and use large flange rivets through the floor into those angle or J members? These angles or J members could be tied in at the rib end. And because my ribbons already have two holes in them, I might just do this on every rib or every other so I’ve got better floor fastening capabilities at the end of the rib location.
Not trying to hijack your post R, thought there might be some value to bringing it up
 

MNhunter1

Lieutenant Junior Grade
Joined
May 12, 2014
Messages
1,053
The only thing I don’t like about this attachment be an angle or a formed Z channel is that it is fastened to the floor with screws. Even with screws drizzled with 4200 or 5200 may still allow water to get down into the plywood over time. My floors were so rotten, the side panels basically pulled right out once the rivets were removed on the upper section.

Do you guys think there’s any value to adding some light, bent aluminum channels from the stringers outwards in a few places and use large flange rivets through the floor into those angle or J members? These angles or J members could be tied in at the rib end. And because my ribbons already have two holes in them, I might just do this on every rib or every other so I’ve got better floor fastening capabilities at the end of the rib location.
Not trying to hijack your post R, thought there might be some value to bringing it up
With a new sealed and protected(vinyl flooring) deck, stainless hardware and 5200, I'm not sure it's really going to be an issue. I've experienced the rotten decks and easily pulled fastener as well, but taking into consideration the age of the likely unprotected/unsealed material and some of the improper storage these boats have likely seen over the years, I'd expect things to last a lot longer after a mindful rebuild and future storage considerations.

If I was going to look at additional support, I'd probably look at doubling up with another layer/strip of ply underneath to leverage longer screws or a strip of aluminum flat stock to rivet into under the deck. Likely not necessary however.
 

renns

Petty Officer 1st Class
Joined
Dec 20, 2017
Messages
316
There's really not much flex in the trim piece once everything is tied together. The attachment to that shelf, attachment of the trim, trim secured to the deck, along with the attachment to the vertical supports on both ends really tightens things up. It's amazing to see how much flex you get when you start removing the splashwell, gunnels, bow caps, side panels, consoles, etc. and how it all tightens back up when you reinstall them with new rivets/hardware. It really is engineered as an overall system.

The aluminum angle would work just fine as long as you secure it both to the deck and the side panel.
That shelf in my hull is riveted to the vertical member at console and splashwell, and is 'floating' between those two points. I thought at first it had a leg bent down and riveted via the rivets retaining the rub rail, but it doesn't look like it. I'm hesitant to yank that spray foam out of there to expore further as it's in good shape, and saves me scabbing more xps in there afterwards.

My plan currently is to use 1/4-20 rivet nuts inserted into the verticals at console and splashwell. Then after transferring location over to the side panel, the panel will be drilled, and aluminum bushings epoxied in place at those mounting locations. That should give a very solid attachment technique fore and aft at least. Along the deck, my plan was to 5200 and screw an aluminum angle in place with leg aiming outboards. The side panel would then drop in between the spray foamed hull size and the vertical leg of this angle, and get screwed in place with machine screws into T-nuts mounted in the outboard side of the panel.
 

renns

Petty Officer 1st Class
Joined
Dec 20, 2017
Messages
316
The only thing I don’t like about this attachment be an angle or a formed Z channel is that it is fastened to the floor with screws. Even with screws drizzled with 4200 or 5200 may still allow water to get down into the plywood over time. My floors were so rotten, the side panels basically pulled right out once the rivets were removed on the upper section.

Do you guys think there’s any value to adding some light, bent aluminum channels from the stringers outwards in a few places and use large flange rivets through the floor into those angle or J members? These angles or J members could be tied in at the rib end. And because my ribbons already have two holes in them, I might just do this on every rib or every other so I’ve got better floor fastening capabilities at the end of the rib location.
Not trying to hijack your post R, thought there might be some value to bringing it up
No worries - hijack away! We are on parallel paths here.
My thought as described in prev. post is that my angle on the deck would be sealed and screwed to the vinyl decking. Water on the deck would hopefully flow down the deck to the bilge hole at the back. Now if there was to be a driving rain with boat uncovered, water that enters the storage shelf area would flow down behind the side panel, and potentially cause future grief. I do wonder though if we might be putting more thought and effort into these things than they did when originally manufactured?
 

ShoestringMariner

Lieutenant Commander
Joined
Apr 18, 2015
Messages
1,593
No worries - hijack away! We are on parallel paths here.
My thought as described in prev. post is that my angle on the deck would be sealed and screwed to the vinyl decking. Water on the deck would hopefully flow down the deck to the bilge hole at the back. Now if there was to be a driving rain with boat uncovered, water that enters the storage shelf area would flow down behind the side panel, and potentially cause future grief. I do wonder though if we might be putting more thought and effort into these things than they did when originally manufactured?
We do, absolutely. From what I understand they didn’t use anything special. The transom and floors were just bare plywood, construction grade nothing fancy. I’m sure even with a basic restoration, it will be better than the factory ever did.
 

classiccat

"Captain" + Starmada Splash Of The Year 2020
Joined
Dec 20, 2010
Messages
3,412
SSM - thanks for the further pics and generous offer! Will chat in PM's further.
I've read numerous comments about the side panels offering structural reinforcement for the hull. I'm wondering about that aspect, as perching the plywood up on a somewhat flexible aluminum z-profile would seem to reduce that effect? If I just fixed a 1x1 angle to the deck, and set my ply side panel down into it, that would seem to offer more significant support to the deck and ribs below? I wonder if @classiccat might comment? I saw his posts about hull loadings, reinforcement techniques, and the value of the side panels.

@MNhunter1 is spot on when saying that it all works together; if 1 component fails (rotten deck, busted pop rivets, etc) things start flopping.

that z panel is quite rigid however I think aluminum angle would be fine as well. The outer chine on my SS18 was already compromised so I added quite a bit of extra reinforcement...basically boxing that corner in like an automotive unibody subframe.

1642704554359.png

I believe bad trailer setup is where these hulls really distort. skinny roller-bunks placed too-far from the outer chine and I see alot of hulls where owners throw a big strap over the top of the gunnels and winch down on it (that's how my SS18 & BlueFin were both secured) as opposed to using the transom eye hooks.
 

renns

Petty Officer 1st Class
Joined
Dec 20, 2017
Messages
316
CC - that's a tank you've got there! Beautiful work. Thanks for popping in to share your thoughts.
 

renns

Petty Officer 1st Class
Joined
Dec 20, 2017
Messages
316
A quick update: All Nautolex vinyl is now bonded to the deck panels. I ended up doing each deck piece separately, to allow easier access in the future. I ended up using exclusively the Ducan Trim Adhesive product. Here's the basic process I followed:
  1. Center cut piece of vinyl over deck panel.
  2. Clamp scrap 1x2 across middle of panel.
  3. Fold one side of vinyl up overtop of the 1x2.
  4. Apply adhesive to ply and vinyl.
  5. After flash-off time (~ 15 minutes), together with a helper we slide a piece of pipe into the fold, and then use it to slowly roll the vinyl back down into contact with the ply. This is really a 2-person job, each with one hand on the pipe, and the other holding the vinyl taut to avoid wrinkles or bubbles.
  6. Once down, roll entire surface by hand to ensure good contact, then move 1x2 over on top of bonded side, and repeat bonding of the other half of the panel.
  7. Finally flip panel over, apply adhesive along the fore and aft edges, then after flash-off, wrap and staple in place with stainless staples.
I left the port and stbd sides un-wrapped, and extending about 1-1/2" past the ply. That flap will then sit in the spray rail, and help keep crap out from under the deck. The plan is to fix 1x1 aluminum angle along the deck to support to side panels, so that should prevent any issues with lifting of the vinyl at those edges. For extra measure, I pushed a bead of PL along those edges from the backside as well, creating a nice fillet. Once that PL has cured, I'll be completing one last vacuum, then fitting deck to the hull and riveting it in place. Pics soon!
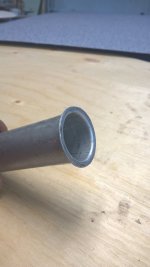
During one of my 15 minute waits for flash-off of the contact cement, I noticed a piece of 1" aluminum tubing in my random metals rack. Sure enough, it's 1" diameter, thin wall, perfect for making those splashwell drain tubes. Too bad I just special ordered and picked up two of them earlier in the week! Hate that when that happens... Here's my experiment with ball-peen hammering the flange on that aluminum tube (from old TV antenna). It folded over very easily with some careful tapping.
 

Attachments

  • WP_20220129_14_16_35_Pro.jpg
    WP_20220129_14_16_35_Pro.jpg
    666.6 KB · Views: 9

ShoestringMariner

Lieutenant Commander
Joined
Apr 18, 2015
Messages
1,593
A quick update: All Nautolex vinyl is now bonded to the deck panels. I ended up doing each deck piece separately, to allow easier access in the future. I ended up using exclusively the Ducan Trim Adhesive product. Here's the basic process I followed:
  1. Center cut piece of vinyl over deck panel.
  2. Clamp scrap 1x2 across middle of panel.
  3. Fold one side of vinyl up overtop of the 1x2.
  4. Apply adhesive to ply and vinyl.
  5. After flash-off time (~ 15 minutes), together with a helper we slide a piece of pipe into the fold, and then use it to slowly roll the vinyl back down into contact with the ply. This is really a 2-person job, each with one hand on the pipe, and the other holding the vinyl taut to avoid wrinkles or bubbles.
  6. Once down, roll entire surface by hand to ensure good contact, then move 1x2 over on top of bonded side, and repeat bonding of the other half of the panel.
  7. Finally flip panel over, apply adhesive along the fore and aft edges, then after flash-off, wrap and staple in place with stainless staples.
I left the port and stbd sides un-wrapped, and extending about 1-1/2" past the ply. That flap will then sit in the spray rail, and help keep crap out from under the deck. The plan is to fix 1x1 aluminum angle along the deck to support to side panels, so that should prevent any issues with lifting of the vinyl at those edges. For extra measure, I pushed a bead of PL along those edges from the backside as well, creating a nice fillet. Once that PL has cured, I'll be completing one last vacuum, then fitting deck to the hull and riveting it in place. Pics soon!
During one of my 15 minute waits for flash-off of the contact cement, I noticed a piece of 1" aluminum tubing in my random metals rack. Sure enough, it's 1" diameter, thin wall, perfect for making those splashwell drain tubes. Too bad I just special ordered and picked up two of them earlier in the week! Hate that when that happens... Here's my experiment with ball-peen hammering the flange on that aluminum tube (from old TV antenna). It folded over very easily with some careful tapping.
Wow That looks machine rolled!
I have the tool if you want to borrow it…but you may not need it.
 

classiccat

"Captain" + Starmada Splash Of The Year 2020
Joined
Dec 20, 2010
Messages
3,412
A quick update: All Nautolex vinyl is now bonded to the deck panels. I ended up doing each deck piece separately, to allow easier access in the future. I ended up using exclusively the Ducan Trim Adhesive product. Here's the basic process I followed:
  1. Center cut piece of vinyl over deck panel.
  2. Clamp scrap 1x2 across middle of panel.
  3. Fold one side of vinyl up overtop of the 1x2.
  4. Apply adhesive to ply and vinyl.
  5. After flash-off time (~ 15 minutes), together with a helper we slide a piece of pipe into the fold, and then use it to slowly roll the vinyl back down into contact with the ply. This is really a 2-person job, each with one hand on the pipe, and the other holding the vinyl taut to avoid wrinkles or bubbles.
  6. Once down, roll entire surface by hand to ensure good contact, then move 1x2 over on top of bonded side, and repeat bonding of the other half of the panel.
  7. Finally flip panel over, apply adhesive along the fore and aft edges, then after flash-off, wrap and staple in place with stainless staples.
I left the port and stbd sides un-wrapped, and extending about 1-1/2" past the ply. That flap will then sit in the spray rail, and help keep crap out from under the deck. The plan is to fix 1x1 aluminum angle along the deck to support to side panels, so that should prevent any issues with lifting of the vinyl at those edges. For extra measure, I pushed a bead of PL along those edges from the backside as well, creating a nice fillet. Once that PL has cured, I'll be completing one last vacuum, then fitting deck to the hull and riveting it in place. Pics soon!
During one of my 15 minute waits for flash-off of the contact cement, I noticed a piece of 1" aluminum tubing in my random metals rack. Sure enough, it's 1" diameter, thin wall, perfect for making those splashwell drain tubes. Too bad I just special ordered and picked up two of them earlier in the week! Hate that when that happens... Here's my experiment with ball-peen hammering the flange on that aluminum tube (from old TV antenna). It folded over very easily with some careful tapping.
sounds like you're making great progress! now you're just going to have to get another tinnie to restore so those future splashwell drain tubes don't go to waste :ROFLMAO:
 

renns

Petty Officer 1st Class
Joined
Dec 20, 2017
Messages
316
sounds like you're making great progress! now you're just going to have to get another tinnie to restore so those future splashwell drain tubes don't go to waste :ROFLMAO:
Ouch - don't say that. This "transom replacement" project is already much more than I bargained for!
 

renns

Petty Officer 1st Class
Joined
Dec 20, 2017
Messages
316
Wow That looks machine rolled!
I have the tool if you want to borrow it…but you may not need it.
Thanks for the offer, but I think some gentle work with the ball-peen should do it. I slid a snug-fitting socket down the inside to stiffen up the tube. That helped greatly. That old antenna mast is about 8 ft long, so I have enough material for dozens of those drain tubes now!
 

renns

Petty Officer 1st Class
Joined
Dec 20, 2017
Messages
316
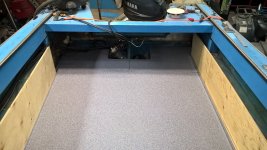
One last trial-fit of deck panels with vinyl installed. Waiting for rivets to arrive in the mail, and then one last vacuum, and time to rivet the deck in place. I will run a wire conduit from port to starboard side under the consoles for audio, and lighting purposes.
One deck panel has taken a bit of a bow, high in the middle. I'm hoping that will be pulled down to the stringers when riveted in place, and the angle I plan to run along the outer edges to support the side panels should force the outer edges into alignment as well.
As the panels are installed the stringer rivet line can easily be found. Those outer rib rivets are trickier though. From looking at my hull, it appears there was original rivets near the end of the ribs, on one of the peaks of the 'crimped' area, whereas a later set of screws was put in about 4" further towards centerline, about where the crimping begins. I plan to go back and shoot for the highest of the two crimped ends of each rib. Using a square, I've Sharpied an alignment mark and offset dimension for each rivet location. I'm hoping that works and I can hit most if not all of the high spots on those ribs.
Transom install might be on the agenda next, while waiting for the deck rivets to arrive. I haven't done much messing about with 5200 yet, so am a bit apprehensive about the gooey and critical steps to come in that department!
 

Attachments

  • WP_20220130_18_53_42_Pro.jpg
    WP_20220130_18_53_42_Pro.jpg
    2.1 MB · Views: 14
  • WP_20220130_18_53_34_Pro.jpg
    WP_20220130_18_53_34_Pro.jpg
    2 MB · Views: 14

renns

Petty Officer 1st Class
Joined
Dec 20, 2017
Messages
316
Just figured out that leaving those edge 'flaps' of vinyl extending out into the spray rail on each side covers up my rivet location marks! Need to figure out something there, as hitting the narrow peak on one side or the other of the rib crimp requires some precision.
Another topic that's come mind now is the splashwell doors. This hull had an ugly thick mudflap of vinyl hanging down from the front of the splashwell. As we're still trying to figure out bench seating options, maybe the bench itself would act as the visual barrier needed. Regular access is needed though, as we're running portable fuel tanks.
 

renns

Petty Officer 1st Class
Joined
Dec 20, 2017
Messages
316
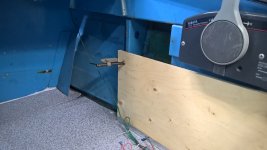
Here's a few better pics. Side panels extend 1" past the vertical support at console and at splashwell.
WP_20220131_15_50_01_Pro.jpg

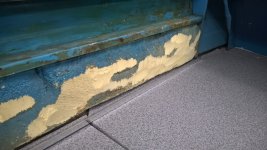
The spray foam used below the shelf was not very even. To get nice vertical side panels, I had to trim as much as 1/2" off in places. The original panels must have been installed at quite an angle to clear. Now, what to do with the inside of the shelves. There is contact cement residue from an older layer of vinyl I ripped out. I'm inclined to clean it up, and put in a fresh layer of the same vinyl that's on the deck. What are the other options? Paint seems too easily scratched.
WP_20220131_15_51_59_Pro.jpg

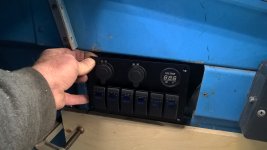
The original setup had a dog's breakfast of electrical switches on a steel bracket screwed to the hull just forward of the controls. I'm planning to fabricate an aluminum bracket to go in it's place, with the e-bay switch assembly. The fuse and distribution block will go up under the console somewhere - haven't sorted that out yet.
WP_20220131_15_50_42_Pro.jpg

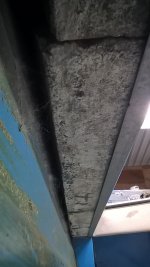
Now for deck lighting - how are people mounting those strip lights under the gunnels? My under-gunnel area has a rather loose-fitting eps foam strips in there, as can be seen below. The gunnel side has a nice return leg about 1" wide for support, but on the hull side there is nothing unless I drill and rivet through.
WP_20220131_15_53_54_Pro.jpg
 

ShoestringMariner

Lieutenant Commander
Joined
Apr 18, 2015
Messages
1,593
Here's a few better pics. Side panels extend 1" past the vertical support at console and at splashwell.
View attachment 355291

The spray foam used below the shelf was not very even. To get nice vertical side panels, I had to trim as much as 1/2" off in places. The original panels must have been installed at quite an angle to clear. Now, what to do with the inside of the shelves. There is contact cement residue from an older layer of vinyl I ripped out. I'm inclined to clean it up, and put in a fresh layer of the same vinyl that's on the deck. What are the other options? Paint seems too easily scratched.
View attachment 355292

The original setup had a dog's breakfast of electrical switches on a steel bracket screwed to the hull just forward of the controls. I'm planning to fabricate an aluminum bracket to go in it's place, with the e-bay switch assembly. The fuse and distribution block will go up under the console somewhere - haven't sorted that out yet.
View attachment 355293

Now for deck lighting - how are people mounting those strip lights under the gunnels? My under-gunnel area has a rather loose-fitting eps foam strips in there, as can be seen below. The gunnel side has a nice return leg about 1" wide for support, but on the hull side there is nothing unless I drill and rivet through.
View attachment 355294
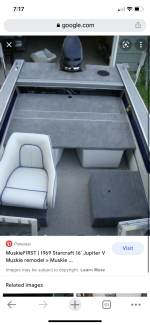
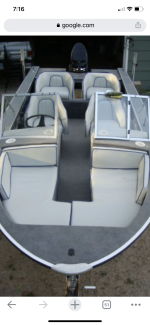
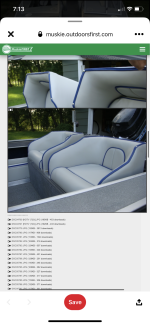
Looking awesome. Can’t wait to see your switch layout. I’ve got the same one to install. I’m going to try and upload some pictures of a star craft project I saw a while back. (15 foot Jupiter to a SS conversion I believe) It’s a pair a short bucket seats on a plywood platform. These fold over to create a casting platform. Kind of neat. Not sure if it’ll fit your intended use (can’t recall if you were going sleeper seats or individual pedestal)
In any case, the concept could be applied to a simple bench, or fold up jumpseats. Much like the newer boats do nowadays.
 

Attachments

  • 7599724A-90E4-4B32-BE25-9D81267D13E9.png
    7599724A-90E4-4B32-BE25-9D81267D13E9.png
    3.2 MB · Views: 10
  • B0116685-DACD-4867-AC08-90EC45A78DD2.png
    B0116685-DACD-4867-AC08-90EC45A78DD2.png
    3.9 MB · Views: 10
  • 57073DEC-E5CF-491E-B50D-539E0BD19515.png
    57073DEC-E5CF-491E-B50D-539E0BD19515.png
    3 MB · Views: 10

renns

Petty Officer 1st Class
Joined
Dec 20, 2017
Messages
316
That's a cool set-up for sure. If I had more of a fishing focus (and didn't need to access fuel tank under splashwell), that'd be great option. I'm hoping to set up a simpler bench seat that can fold down to give maximum cargo volume behind the front seats. The bench would need to be pretty shallow to fold as I'm imagining, making it more utilitarian in nature. We are water-access, so we're always hauling people, baggage, food, water, etc back and forth. The trip is relatively short though, so some less luxurious but more compact seats might be in order.
I might try mocking up some options tonight if time allows.
 

ShoestringMariner

Lieutenant Commander
Joined
Apr 18, 2015
Messages
1,593
I’d like to remove my splashwell and do a total redesign so that a pair of small jumpseats or seat/steps are incorporated on either side of a narrow, shallower splashwell. (With room for battery, and fuel cans beneath the seats.) perhaps lift off or hinge up covers under the seats and in front of the splashwell. Not sure about the latter as hinged doors won’t work if you have the boat full of supplies, coolers and gear.

This for me is a project for next year or another phase
 

renns

Petty Officer 1st Class
Joined
Dec 20, 2017
Messages
316
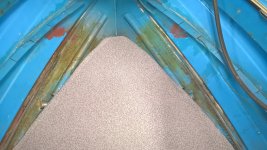
Time and travel has slowed progress on the boat project, but I've move a bit farther along. Bow deck panel, and next one back are now riveted in place. The panel fit is pretty tight, and the lateral crossmembers between the stringers at the seams make for easy alignment.
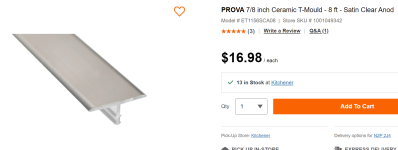
Question: Has anyone tried trimming out the seam with aluminum or other material? I'm thinking about trying this product:
1644704284618.png

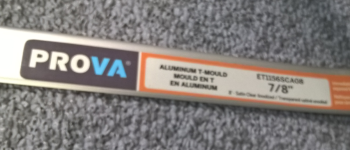
It is a clear anodized aluminum product designed for transitions in ceramic tile floors, so it seems like a good choice. I'm thinking about perhaps bonding and screwing it into the edge of the deck panel, and then sliding the next deck panel underneath it. That would completely cover the seam, and if bonded and sealed at the leading edge would keep surface water from dripping kids or big fish above deck until it reaches the bilge. Thoughts?
 

renns

Petty Officer 1st Class
Joined
Dec 20, 2017
Messages
316
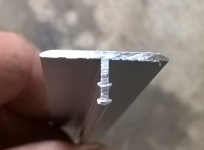
So, I bought one of those trim pieces to try out. Here's what the profile looks like up close. I quickly trimmed it to length, and will fit it permanently tomorrow. Those barbed tangs on the leg of the 'tee' are to embed in mortar when used in ceramic tile applications.
1644714901187.png
1644715001180.png
1644715103310.png

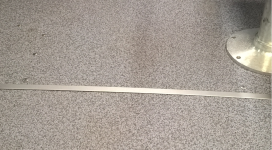
The deck piece with the pedestal is already riveted in place in the hull. My plan is to fit and bond that trim piece into place with 5200 and stainless screws into the edge of the deck panel. Then the aft panel will be slid up underneath, hopefully giving a nice finished and relatively water-tight edge.
 
Top