Tore the transom ...how to repair? (pics)

jigngrub

Fleet Admiral
Joined
Mar 19, 2011
Messages
8,155
Re: Tore the transom ...how to repair? (pics)

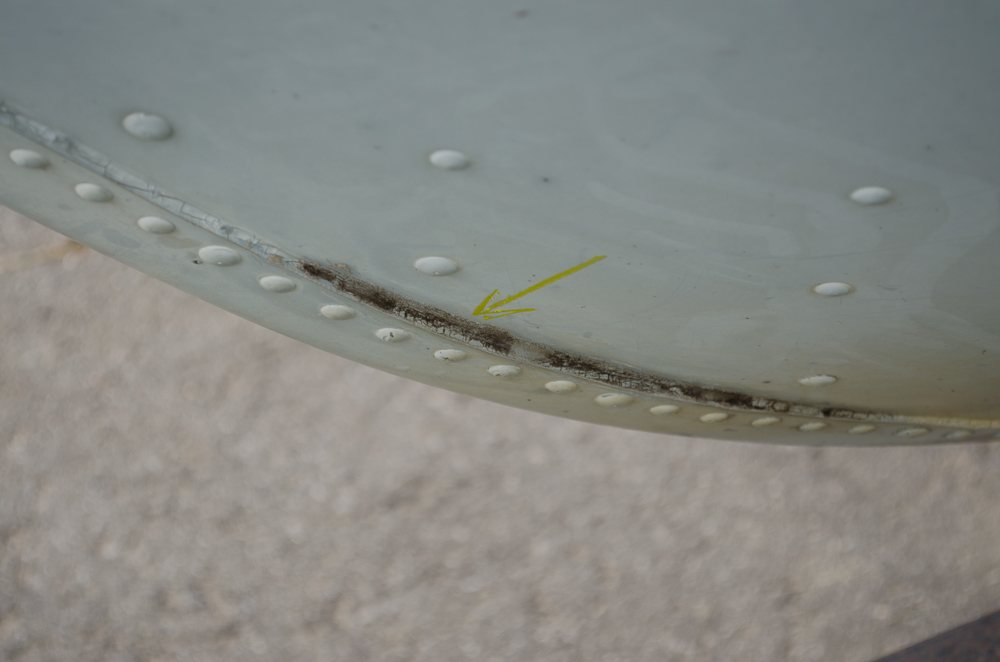
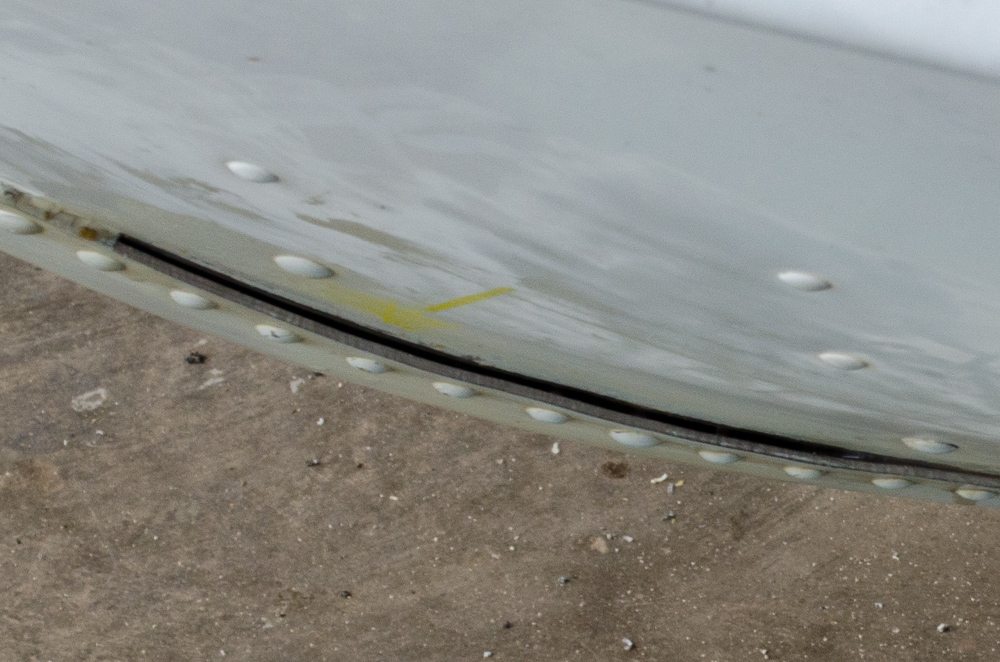
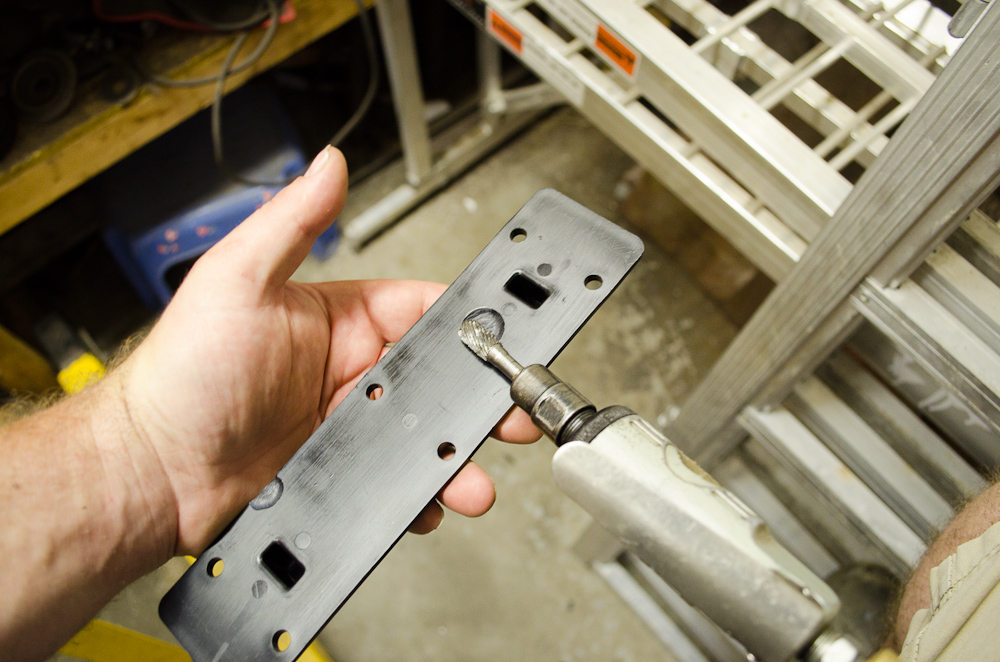
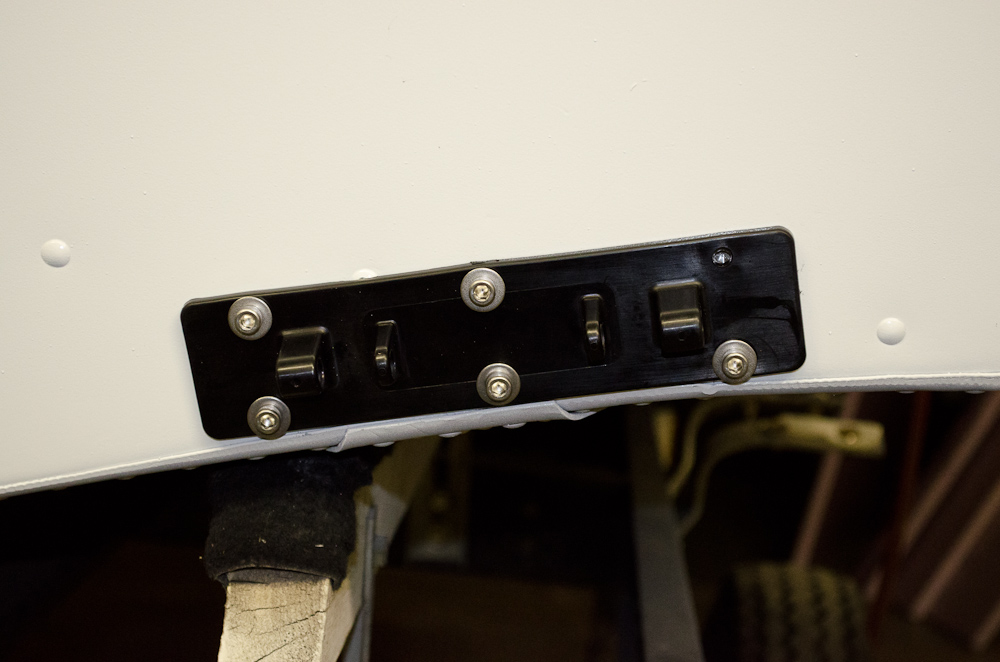
Low: I've discovered my engine-mount bolt pattern is all screwed up. First the pic:

Starcraft-2013-Jul-30-5894m.jpg


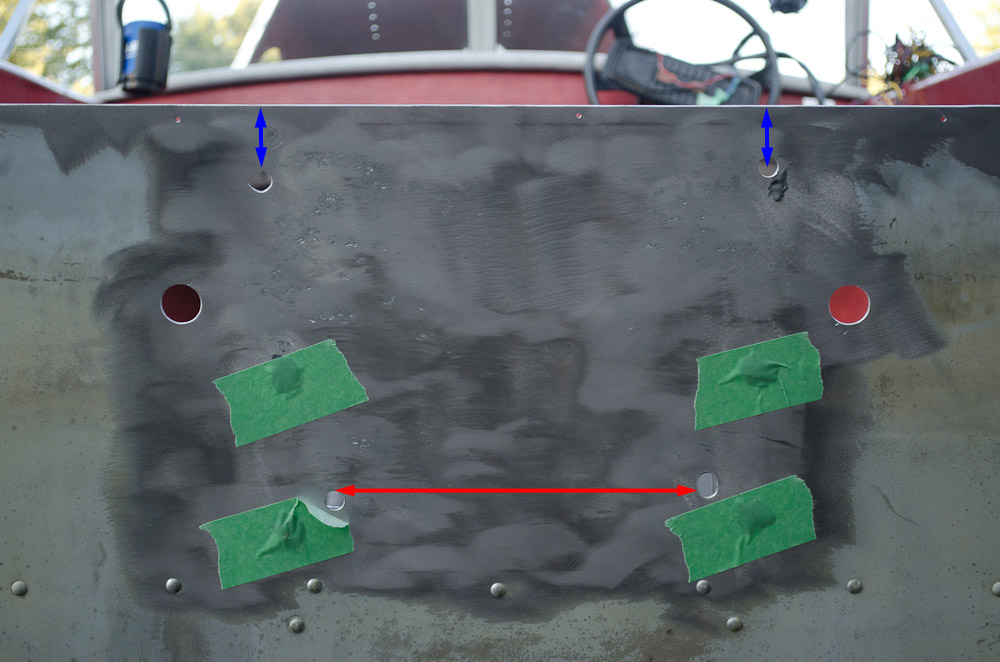
The top holes - the Stbd is 3/8" higher on the transom than the port (the blue arrows in the pic are exactly the same length). This means the motor was installed with a permanent list to port. The lower holes are similarly asker (the red arrow is horizontal), and you can see the lower stbd hole is badly ovaled.

I assume there's no valid reason to install the motor with a list to port? Therefore, I'm going to have to correct this.

I'm thinking someone used a hand level to lay out the bolt holes without leveling the boat first. The only thing a level is good for on a boat is to use it for a straight edge. Never use a level for anything on a boat... measure, measure, and measure instead!


I was talking to an elevator installer on the job site a while back and he was telling me about installing an escalator on a river boat casino. He said he was using a 4' level to layout with and everything kept getting screwed up. His boss finally realized what was going on and asked if he could borrow the guys level for a minute, the guy said sure and handed him the level and his boss took a hammer and busted out all 3 vials in it and handed it back to him and said "now you can use it".:lol:

The thing was that even though the boat was huge, the people on it never stayed in one place. As the people would walk around on the boat the weight would shift from port to starboard and fore to aft so the boat was never exactly level in any position.
 

BillaVista

Petty Officer 1st Class
Joined
Jul 1, 2013
Messages
204
Re: Tore the transom ...how to repair? (pics)

The transom is done and ready for install!

Lookin' pretty shiny too!

In one of the pics, it looks like a camera blur - but it's the reflection of the aluminum stand it's sitting on.

Pics:

Starcraft-2013-Aug-01-5902.jpg


Starcraft-2013-Aug-01-5903.jpg


Starcraft-2013-Aug-01-5906.jpg


Starcraft-2013-Aug-01-5911.jpg


Floors are done too.

Starcraft-2013-Aug-01-5912.jpg


Starcraft-2013-Aug-01-5913.jpg
 

BillaVista

Petty Officer 1st Class
Joined
Jul 1, 2013
Messages
204
Re: Tore the transom ...how to repair? (pics)

Question time!

I am left with just one small leak.

It's coming from the area indicated by the yellow lumber-crayon arrow I drew on the hull.

Starcraft-2013-Aug-01-5914.jpg


Starcraft-2013-Aug-01-5917.jpg


Starcraft-2013-Aug-01-5916.jpg


Starcraft-2013-Aug-01-5918.jpg


It looks pretty obviously like it's some old sealant no longer working (it doesn't appear to be a loose rivet).

Should I:

a) Dig this stuff out from the outside as best as possible and re-caulk with 5200, or

b) Gluvit the snot out of the area from the inside, or

c) Both, or

d) something else?

Thanks
 

SigSaurP229

Commander
Joined
Oct 1, 2008
Messages
2,123
Re: Tore the transom ...how to repair? (pics)

Bill it depends on how u want it to look cosmetically id probably do both and rebuck all the rivets as well.

Bill DONT forget u need to coat all the epoxy with something else as well i.e. Spar or exterior paint as epoxy has no uv protection to it and it will begin to break down looking good keep up the good work
 

jigngrub

Fleet Admiral
Joined
Mar 19, 2011
Messages
8,155
Re: Tore the transom ...how to repair? (pics)

Question time!

I am left with just one small leak.
It looks pretty obviously like it's some old sealant no longer working (it doesn't appear to be a loose rivet).

Should I:

a) Dig this stuff out from the outside as best as possible and re-caulk with 5200, or

b) Gluvit the snot out of the area from the inside, or

c) Both, or

d) something else?

Thanks

I'd dig that old crapola out and clean it up the best I could and remove and replace the dozen rivets in that bad spot installing new 5200 after the old rivets came out and before the new ones went in. Then Gluvit the snot out of the inside.

Your boat is going to be much happier with all of the leaks fixed. She'll also be a lot lighter and dryer increasing her performance too.
 

BillaVista

Petty Officer 1st Class
Joined
Jul 1, 2013
Messages
204
Re: Tore the transom ...how to repair? (pics)

Hi guys,

Not a lot of progress this weekend - needed to take the family camping.

But a few things came in the mail:

Gunwale corners from MikeP via E-bay. These things are awesome!

Starcraft-2013-Aug-05-5946.jpg


Starcraft-2013-Aug-05-5947.jpg


Starcraft-2013-Aug-05-5948.jpg


A tach from Teleflex.

Starcraft-2013-Aug-05-5949.jpg


Starcraft-2013-Aug-05-5952.jpg


Starcraft-2013-Aug-05-5956.jpg
 

jigngrub

Fleet Admiral
Joined
Mar 19, 2011
Messages
8,155
Re: Tore the transom ...how to repair? (pics)

Well, I gotta say Bill... you're buying all the good stuff to put that boat back together with and it should be better than it was when brand new. *big thumbs emoticon here*

I'm looking forward to seeing that boat back on the water to see what she looks like when finished.
 

BillaVista

Petty Officer 1st Class
Joined
Jul 1, 2013
Messages
204
Re: Tore the transom ...how to repair? (pics)

And I picked up some paint:

Starcraft-2013-Aug-05-5967.jpg


The can of Marine Finish I am going to use on the Transom for the UV protection. I actually went to Lowes looking for floor and porch paint but they had non in a quart can and I didn't want to buy a gallon.

The spray bombs are for the outside of the transom aluminum after I get all the holes patched and filled. Going to get some self-etching primer for the bare aluminum spots (actually, I might strip it all back to bare aluminum).

This won't be fancy paint job - but should at least tide me over until I pint the whole boat - which may be later this year (after the season) or sometime next year.
 

BillaVista

Petty Officer 1st Class
Joined
Jul 1, 2013
Messages
204
Re: Tore the transom ...how to repair? (pics)

Well, I gotta say Bill... you're buying all the good stuff to put that boat back together with and it should be better than it was when brand new. *big thumbs emoticon here*

I'm looking forward to seeing that boat back on the water to see what she looks like when finished.

Thanks Jig...spendin' money is something I'm good at! I hope I can do the rebuild justice. I'm pretty confidant it's going to be pretty solid and dry underneath everything, but it will be some time before I can really giver her the paint she needs. I did spend some time looking at her today and wondering the best way to re-create the "swoosh" when painting. I'm pretty set on keeping that and the planned colours are going to be bright gloss white and bright red...but now I'm getting way ahead of myself.
 

Woodonglass

Supreme Mariner
Joined
Dec 29, 2009
Messages
25,924
Re: Tore the transom ...how to repair? (pics)

You can save yourself some money and take that topside paint back and get the Rustoleum Pro Oil Based paint. No real need for the Marine paint. The Pro paint is basically the same paint and prolly a bit cheaper.
 

BillaVista

Petty Officer 1st Class
Joined
Jul 1, 2013
Messages
204
Re: Tore the transom ...how to repair? (pics)

The transom is painted:

Starcraft-2013-Aug-06-6029.jpg


And the stern has all the holes patched and filled and one coat of primer:

Starcraft-2013-Aug-06-6030.jpg
 

BillaVista

Petty Officer 1st Class
Joined
Jul 1, 2013
Messages
204
Re: Tore the transom ...how to repair? (pics)

The buck-babe carefully dug out the rotten and crumbling sealant from my last remaining leak area. I then squeezed some Gluvit down in there. I am also going to fill the remaining gap with a nice 5200 bead. I have decided not to try and re-buck the rivets as the two closest to the leak have their back sides hidden under one of the ribs in the bow and I don't want to buck some near the leak but not those immediately adjacent as that might make things worse by pulling things out of alignment. Besides, it was a very small weep and the sealant had clearly failed / dried out so I am confidant the Gluvit / 5200 combo will improve things.

If I am wrong - well that's what the bilge pump is for, I guess!

Besides, if I don't reach the "stop messing around and start physically putting things back together" stage very, very soon I am going to reach max frustration point.

Starcraft-2013-Aug-08-6035.jpg


Starcraft-2013-Aug-08-6039.jpg


The stern is top-coated in gloss white Rustoleum spray-bomb (which isn't very glossy):

Starcraft-2013-Aug-08-6045.jpg


Final Gluvit coat done:

Starcraft-2013-Aug-08-6047.jpg


Have to say - scrubbing around on hands and knees up under the bow cover slopping Gluvit around, banging knees, sweating into the Gluvit can, and trying not to make a big mess or step too hard on any of the areas where there aren't ribs was, perhaps, my least favourite part so far.

Hopefully foam down and floor/deck/sole back in soon!
 

BillaVista

Petty Officer 1st Class
Joined
Jul 1, 2013
Messages
204
Re: Tore the transom ...how to repair? (pics)

So, before starting on laying the foam in, I decided to do a final check of the drainage passageway under the ribs (what's the proper word for that again?).

Anyway, good thing I did. One was completely blocked. Huh? I cleared them all out a while ago - what's going on? It felt like a really solid blockage - bent a hacksaw blade and a nail trying to punch it clear.

Here's what I eventually worked loose and removed:

Starcraft-2013-Aug-08-6048.jpg


Some Gluvit had pooled under there and stuck together with the ends of some of the old floor rivets, forming a really solid blockage!

So a few tips I learned:

1) Be careful with the Gluvit in the area of the drainage passageway under the ribs

2) Take the time to clear out the drainage passageway under the ribs - it's very important that water not be able to pool and not drain.

3) I found it very useful to blow out the ribs with compressed air - all sorts of crap came out including rivet ends and old bits of foam and rotted floor slivers and chunks.

4) If you used a wire wheel on a grinder to clean up any part of the inside of the boat, be extra vigilant for the little twisted wire bits that come off the wheel during use. They are steel and if left will corrode and make a mess.
 

jbcurt00

Moderator
Staff member
Joined
Oct 25, 2011
Messages
24,945
Re: Tore the transom ...how to repair? (pics)

Drainage gap under the rib: limber hole

GREAT catch on the Gluvit & debris blocking the limber holes.
 

BillaVista

Petty Officer 1st Class
Joined
Jul 1, 2013
Messages
204
Re: Tore the transom ...how to repair? (pics)

Got to work on the foam.

Table saw works pretty well for cutting it:

Starcraft-2013-Aug-08-6052.jpg


Making a start:

Starcraft-2013-Aug-08-6053.jpg


Starting to get fuller:

Starcraft-2013-Aug-08-6058.jpg
 

BillaVista

Petty Officer 1st Class
Joined
Jul 1, 2013
Messages
204
Re: Tore the transom ...how to repair? (pics)

Drainage gap under the rib: limber hole

GREAT catch on the Gluvit & debris blocking the limber holes.

Thanks jb.

Note to self: Limber hole, limber hole, limber hold...must remember...limber hole.
 

BillaVista

Petty Officer 1st Class
Joined
Jul 1, 2013
Messages
204
Re: Tore the transom ...how to repair? (pics)

Worked on installing the Smart Tabs this evening as I need to get the lower brackets installed before I can finish the foam and install the floor.

First thing I had to do was grind a couple of small reliefs in the back of the plastic lower brackets so that they will clear the rivets and sit flush against the stern when installed

Starcraft-2013-Aug-09-6064.jpg


Starcraft-2013-Aug-09-6061.jpg


Starcraft-2013-Aug-09-6062.jpg


Starcraft-2013-Aug-09-6063.jpg


Here's the Stbd side test-installed (no sealant used yet)

Starcraft-2013-Aug-09-6070.jpg


Starcraft-2013-Aug-09-6069.jpg
 
Last edited:

BillaVista

Petty Officer 1st Class
Joined
Jul 1, 2013
Messages
204
Re: Tore the transom ...how to repair? (pics)

You might reasonably ask..."What's with the missing top bolt?"


Wellllllllll


It turns out that hole goes through the stern and into the area of the pocket where the transom will go - so not good for a nut and bolt which I am using for the other holes.

Starcraft-2013-Aug-09-6071.jpg


Starcraft-2013-Aug-09-6072.jpg


I learned though - so I may be one of the smartest monkeys in the garage.

On the port side I didn't drill this hole, and will wait until the transom is in, drill a small pilot hole, and use a screw into the transom.

Starcraft-2013-Aug-09-6067.jpg


Starcraft-2013-Aug-09-6066.jpg


I will have to use a screw and a bunch of sealant in the stbd side as well.
 
Top