Tore the transom ...how to repair? (pics)

BillaVista

Petty Officer 1st Class
Joined
Jul 1, 2013
Messages
204
Re: Tore the transom ...how to repair? (pics)

Watermann,

So I've been looking at Attwoods site and am bewildered by the options for "Swivl-Eze Pedestal SystemsLock'N-Pin 3/4" Pin Products".

Perhaps I should explain my goals before I get to my questions.

I would like to construct a portable fishing seat for my wife. The goal is to be able to install it either at the end of the dock or in the boat, depending on where she is fishing from. I plan to use the same Wise seat as you (had actually picked it out on Amazon before seeing yours, so seeing yours was a nice confirmation).

The project is a surprise, so I can't measure things and ask her her preferece, so I'm thinking an adjustable post might be a good idea.

So I figure I need two bases - one in the boat and one on the dock, an adjustable post, a seat mount (if not built into the post), and the seat.

My questions are:

1) What is the difference between a post labelled as "14"-17" Hgt., 1.77" Dia., Brushed Alum., Non-Thread, Steel Pin" and one labelled "14"-17" Hgt., 1.77" Dia., Brushed Alum.,Threaded, Steel Pin". i.e. - what is the threaded / non-threaded about?

2) I guess the advantage to a seat mount seperate from the post is that you can install the seat with or without the pso (as I think you were describing). But isn't the seat without the post really close to the deck / dock? About how high? Is it actually useable like that?

3) Will any/all of the posts allow the seat to swivel, or would I have to get a seperate swivelling component to go between the seat and the mount or post?

4) How easy is it to remove / install the post in the base? Is it a simple drop in or a push and turn? Are any tools needed?


I would call Attwood - but they don't list a "contact us" number!
 

Watermann

Starmada Splash of the Year 2014
Joined
Jan 12, 2013
Messages
13,769
Re: Tore the transom ...how to repair? (pics)

1. I use the threaded which refers to the post and deck base which screw together.
2. Seat isn't usable sitting on the floor. I remove the posts for travel and storage so the cover doesn't wear on the seats.
3. The top of the post has a nylon bushing and the seat base has a pin that drops into it. The seat base attaches to the bottom of the seat using 4 screws.
4. Very easy, that's the main reason I went with the pin and post set up. The post drops in and then a few turns, it screws tight into the deck base by hand. Drop the seat with the seat base pin into the top of the post and your ready to fish.

Found you a video on the install...


I'm heading out to do some more paint scraping on the Chief.
 

BillaVista

Petty Officer 1st Class
Joined
Jul 1, 2013
Messages
204
Re: Tore the transom ...how to repair? (pics)

Thanks for info Watermann.

For interest, here are the answers I got back from Attwood.

Hi Bill

1) What is the difference between a post labelled as "14"-17" Hgt., 1.77" Dia., Brushed Alum., Non-Thread, Steel Pin" and one labelled "14"-17" Hgt., 1.77" Dia., Brushed Alum.,Threaded, Steel Pin". i.e. - what is the threaded / non-threaded about? One of the post have a threaded pin on the bottom to thread into a threaded base, which secures it thigher then the non-threaded post.

2) I guess the advantage to a seat mount separate from the post is that you can install the seat with or without the post. But isn't the seat without the post really close to the deck / dock? About how high? Is it actually useable like that? You are correct, the advantage is, you can just pull the seat out an move it to different post i.e. different height post or to set the seat in the base without it sticking up in the air when your driving your boat.

3) Will any/all of the posts allow the seat to swivel, or would I have to get a separate swivelling component to go between the seat and the mount or post? The 3/4" pin series allows all seat mounts to swivel in the post or floor base.

4) How easy is it to remove / install the post in the base? Is it a simple drop in or a push and turn? Are any tools needed? No tools are needed you simply push it into the post of base, they have a detent feature that adds some resistance so a little force is required to put them in or remove them.

5) What is the purpose / function of the spring on part # 1002: Lock'N-Pin 3/4" Pin Seat Mount, Zinc Plated Steel, 3? Tilt, 2-3/4" Steel Pin, w/ Spring. The spring is to add some comfort from bouncing from waves. The 3 degree tilt is to allow you to lean back a little making it more comfortable then sitting straight up.

Regards

Steve
 
Last edited:

BillaVista

Petty Officer 1st Class
Joined
Jul 1, 2013
Messages
204
Re: Tore the transom ...how to repair? (pics)

So I have ordered the Wise seat, 13" and 24" fixed-height posts, two of the all-stainless-steel 7x7 bases, and the seat mount with the spring.

The 13" post is for when the seat is installed at the end of the dock.

The 24" post is for installation in the boat, it will place the seat pan above the padded part of the forward end of the splashwell. This will be too tall for my wife as-is, so I am going to fab some kind of footrest to clamp to the 24" post.

I am also going to fab two "arms" that come off the seat pan or seat mount (i.e. that stay with the seat when it is transferred between boat and dock. One arm will have a Scotty rod holder. The other will have a Scotty bait tray / cup holder / ash tray combo.

I will post pics of the project once it gets underway.
 

BillaVista

Petty Officer 1st Class
Joined
Jul 1, 2013
Messages
204
Re: Tore the transom ...how to repair? (pics)

Back to my thoughts on the rebuild / resto.

1) I am jealous of those that painted the hull and topside during their rebuild. I wish I could have too - but the weather is lovely this time of year and so I think I made the right choice to concentrate on structure / mechanicals and get the boat re-splashed ASAP. I will paint sometime in the future.

2) The kids and I have hammered on the tow points already - have burned at least 30 gallons of gas tubing already and everything is tight and solid - awesome!

3) The boat did not end up completely dry. A little disappointing but not completely surprising. Even when not tubing (i.e. when wet gear and people are not getting in and out) she takes on a little water. Hard to say how much, but it pales in comparison to that which is shipped when the kids get in after swimming and tubing so I figure no big deal. That's what the bilge pump and drain plug are for I guess.

4) I still have some more foam to add. I reckon I'm at about 18 cu ft now, but there is empty space left and I have foam left over so why not.

5) Lessons learned:

- The Smart Tabs SX are awesome. The bow never points to the sky, she gets on plane very quickly, and my min. plane speed has dropped at least 5mph (haven't tested the absolute lower limit yet). Might just be the best $100 I ever spent on anything ever. Persoanlly, I think even if you don't think you need them you should get them - you will be amazed.

- The Lowrance Elite-4x DSI also works amazingly well. But the little toothed gears that are used to adjust the angle of the transducer are tiny and maddening to adjust - especially when you are dog tired and your finger tips are beat up from hours of wiring and covered in sticky 5200 residue! IOW installation is a good job for when you are fresh!

- 5200 is not like any other sealant or caulk I have worked with. Damn it is sticky and get all over everything. Works well though. I read somewhere that you;re supposed to use the tube / container within 24-28 hours of opening - but I managed to get at least a week out of a tube with reasonable care in sealing it back up after a day's use.

- I HATED slopping the Gluvit on. It's low viscosity means it runs everywhere. It was very hard to get everything spotlessly clean so some bits flaked off. And two sessions of knee-banging in a bare aluminum hull in summer heat was no fun.

- Doing the solid rivets wasn't too bad - and would be much better if the rivets hadn't been too long. The shorter the better as long as the grip range is sufficient for the panels being rivited. Oh - the bucker in the boat should wear hearing protection - it's LOUD in there.

- The new deck is not as solid as I would have liked - have a bit of a flex / creak at the seam between middle and aft pieces. Next time I think I would go to 5/8" or maybe even 3/4". Possibly fab some kind of additional bracing at the seams too.

- Spray glue makes installing carpet / vinyl fairly easy - but the over-spray (which you may not notice at the time) goes everywhere. I would try something spreadable next time.

- A pneumatic rivet gun for the many blind rivets would have been a godsend. My hands were pretty blistered after using the manual one for so many.

- I wish I had ordered 2 gallons of epoxy for the deck / transom (for my 14-footer). Would have been a nicer and easier job had I had enough to have been confident really laying on that first coat that the wood absorbs.

More thoughts later as I think of them.
 

BillaVista

Petty Officer 1st Class
Joined
Jul 1, 2013
Messages
204
Re: Tore the transom ...how to repair? (pics)

Just thought of another one...

Those cheap SS screws from Lowes are NO bargain. They are soft as...well, you know, really soft and the Phillips heads strip very easily. Horrible junk. The original 35 year old screws were much better!
 

Watermann

Starmada Splash of the Year 2014
Joined
Jan 12, 2013
Messages
13,769
Re: Tore the transom ...how to repair? (pics)

Good purchase, I really enjoy the post and pin set up and I think you will too.

A little bit of water isn't a problem, I keep expecting seeps with my boat after the restore but so far the bilge is bone dry.

I will be shopping around one day for a nice depth sounder for the chief and maybe even a VHF radio to boot.

Yeah I can't wait to get to the 5200 and gluvit stage of the operation, all the bases are covered there from sticky goo to runny glop. For my decking I plan on using spar rather than resin. Not just the cost but the ease of application. Will most likely go with the nice looking marine vinyl for flooring too.

I will take your advice on the pneumatic rivet gun and will have it on hand prior to the rivet marathon I have ahead of me. Over 100 blind rivets just for the cabin top.
 

BillaVista

Petty Officer 1st Class
Joined
Jul 1, 2013
Messages
204
Re: Tore the transom ...how to repair? (pics)

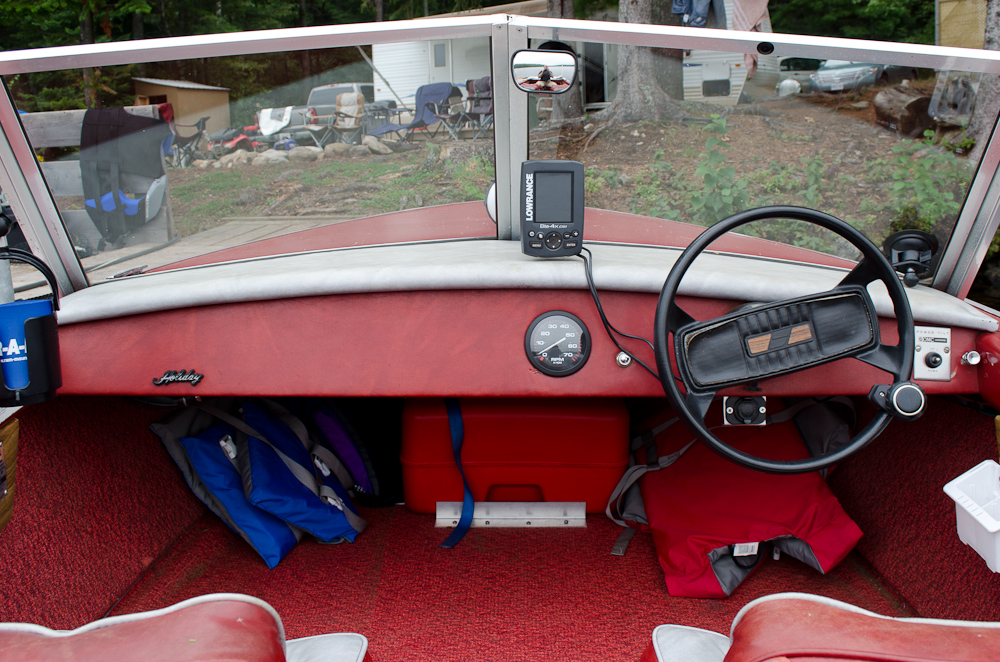
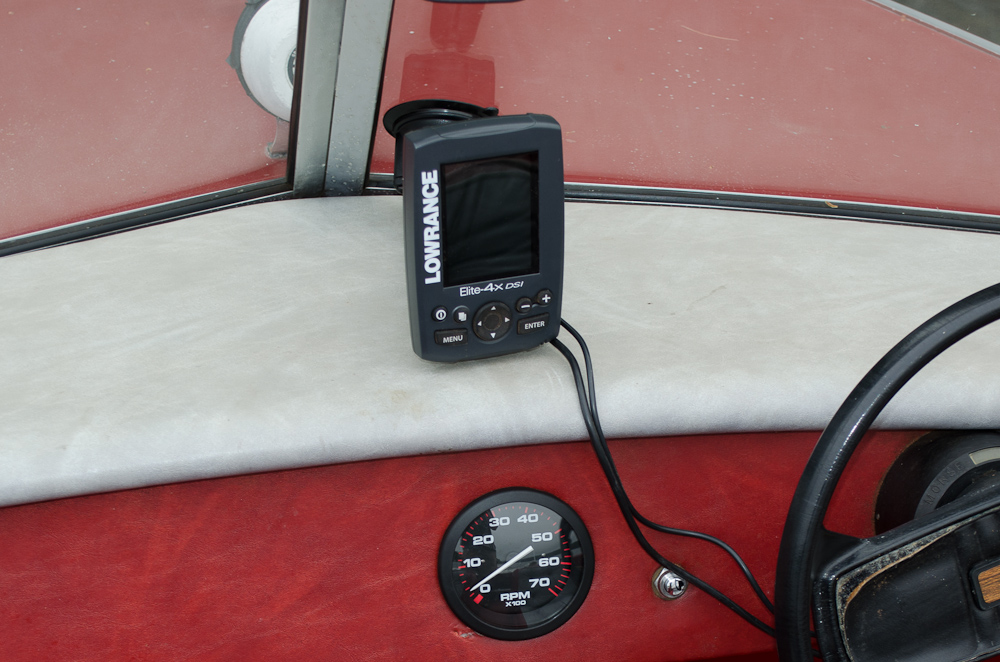
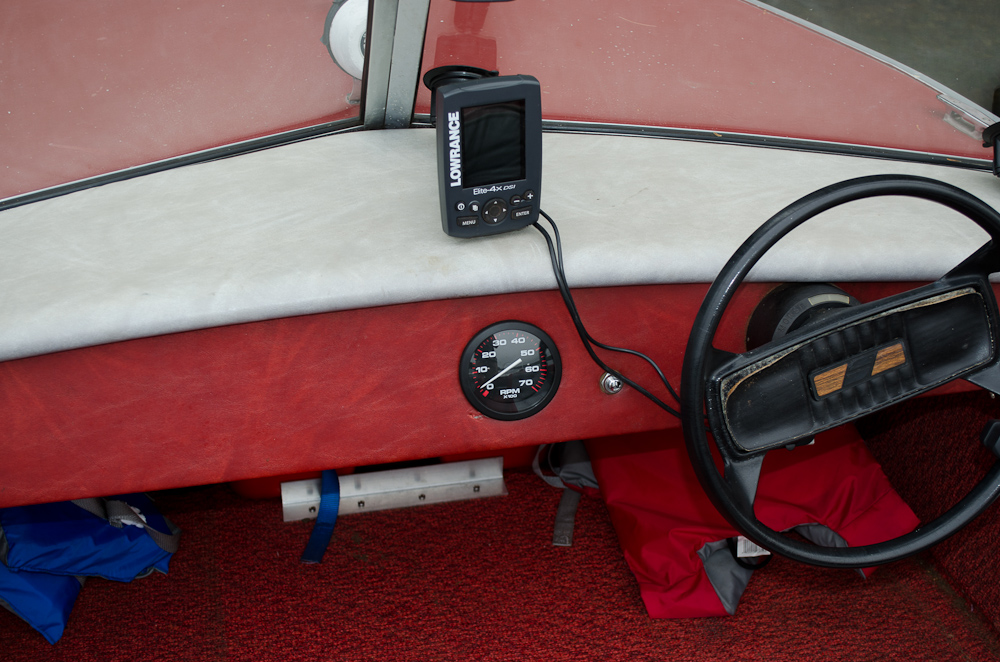
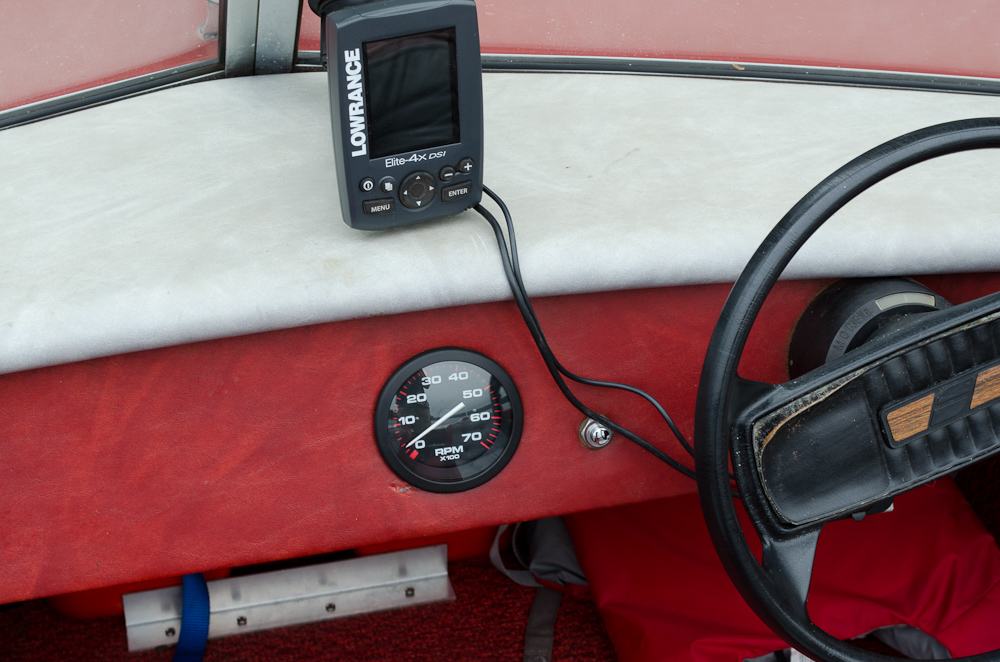
Finally got my tach installed.

Wired up fine. Correct setting was 6P.

Made one little boo-boo. The first small pilot hole I drilled through from the back of the dash.

I went from the back side to make sure the tach would fit without interfering with any brackets or wiring on the back side.

Unfortunately, when the bit broke through I couldn't stop it before it grabbed the padding and vinyl of the dash and tore it up a bit.

I might make a small trim ring to cover the wound, or I may learn to live with it.

Here are some pics:

Starcraft-2013-Sep-02-6420.jpg


Starcraft-2013-Sep-02-6423-2.jpg


Starcraft-2013-Sep-02-6423.jpg


Starcraft-2013-Sep-02-6424.jpg
 

BillaVista

Petty Officer 1st Class
Joined
Jul 1, 2013
Messages
204
Re: Tore the transom ...how to repair? (pics)

I like that the tach doesn't look totally out of place (style / era) on the boat.
 

djpeters

Lieutenant Commander
Joined
Jun 9, 2010
Messages
1,824
Re: Tore the transom ...how to repair? (pics)

I like that the tach doesn't look totally out of place (style / era) on the boat.

I have that exact same tach along with all the other matching gauges. Yours looks nice.
 

classiccat

"Captain" + Starmada Splash Of The Year 2020
Joined
Dec 20, 2010
Messages
3,410
Re: Tore the transom ...how to repair? (pics)

Geeze Bill...don't know how I missed your resto thread! Just read start-to-finish.

Incredible work in such a short amount of time...and superb job documenting everything.

I'm hoping that my Admiral will be as adventurous when it comes to holding the bucking bar :lol: :fish:
 
Last edited:

dozerII

Admiral
Joined
Oct 25, 2009
Messages
6,527
Re: Tore the transom ...how to repair? (pics)

Real nice job Bill, seems the learning process on these rebuilds goes on forever. With so many great guys with great ideas everything keeps evolving.
 

BillaVista

Petty Officer 1st Class
Joined
Jul 1, 2013
Messages
204
Re: Tore the transom ...how to repair? (pics)

I have that exact same tach along with all the other matching gauges. Yours looks nice.

Thanks dj. I checked out your boat threads - that's my dream boat - a big 22' V5 SS. Nice!
 

BillaVista

Petty Officer 1st Class
Joined
Jul 1, 2013
Messages
204
Re: Tore the transom ...how to repair? (pics)

Geeze Bill...don't know how I missed your resto thread! Just read start-to-finish.

Incredible work in such a short amount of time...and superb job documenting everything.

I'm hoping that my Admiral will be as adventurous when it comes to holding the bucking bar :lol: :fish:

Thanks Bluefin. Just scanned through your thread - great looking boat. Sorry to see your crack problems. If it's not too late to offer an idea - I'd look into the large panel bonding adhesive I posted about. It's meant for exactly what you're trying to do - and no heat stress and no holes providing new stress risers. They make entire semi-trailer bodies out of it these days instead of welding or riveting them. 3M also have a similar product, may be even better (I'm a big fan of 3M products), but it requires a special caulking gun to apply.
 

BillaVista

Petty Officer 1st Class
Joined
Jul 1, 2013
Messages
204
Re: Tore the transom ...how to repair? (pics)

Real nice job Bill, seems the learning process on these rebuilds goes on forever. With so many great guys with great ideas everything keeps evolving.

Thanks Glen.

I feel ok for it being a first effort. One day I would like to aspire to the level and quality of work you do - truly inspirational. I'd like to try an 18-22' V5 Super-Sport as my next project! :)
 

bigmcgiv

Petty Officer 3rd Class
Joined
Sep 4, 2013
Messages
95
Re: Tore the transom ...how to repair? (pics)

im planning to do the same on my project, looking good
 
Top