Tore the transom ...how to repair? (pics)

BillaVista

Petty Officer 1st Class
Joined
Jul 1, 2013
Messages
204
Re: Tore the transom ...how to repair? (pics)

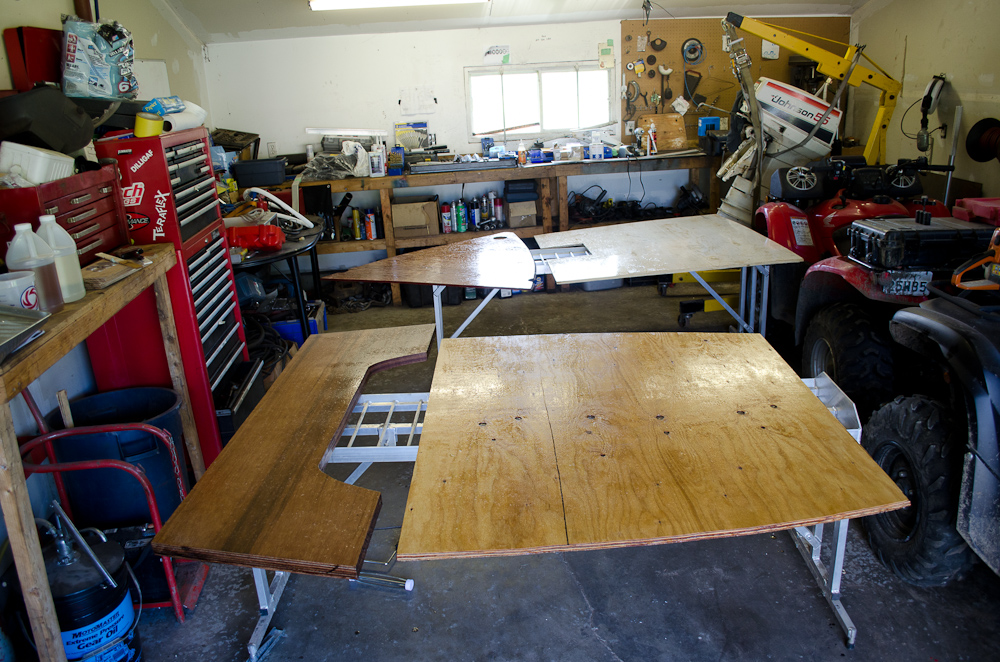
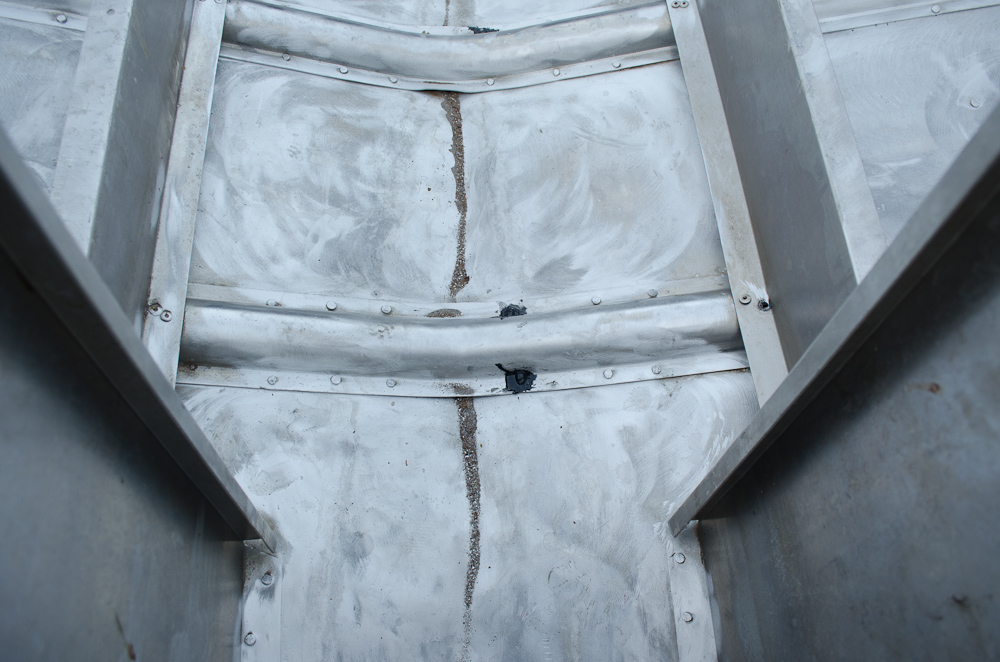
Epoxy going on the wood:

Starcraft-2013-Jul-25-5861.jpg


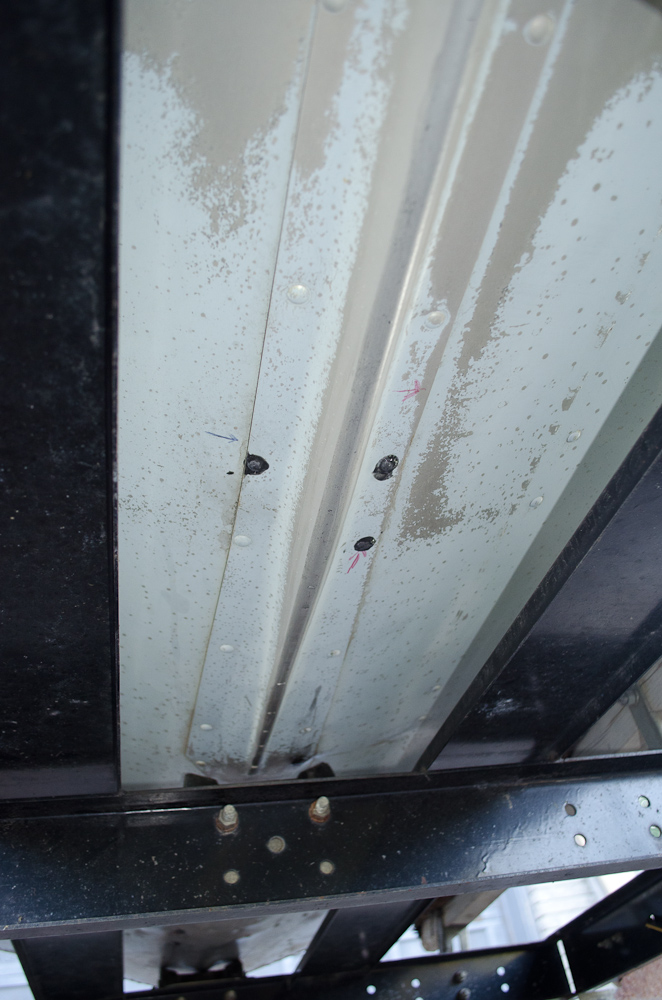
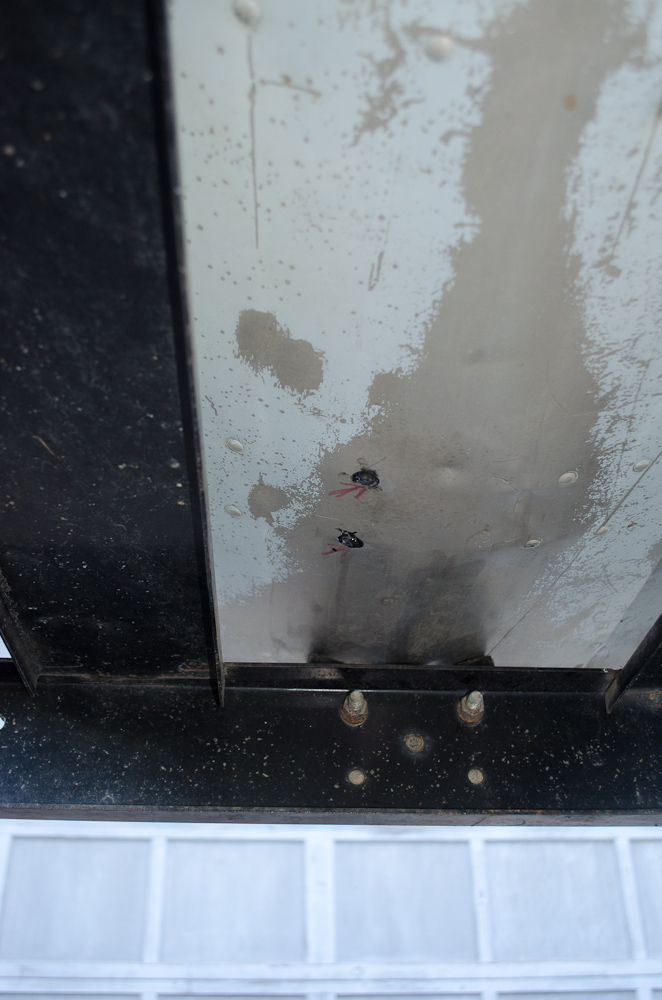
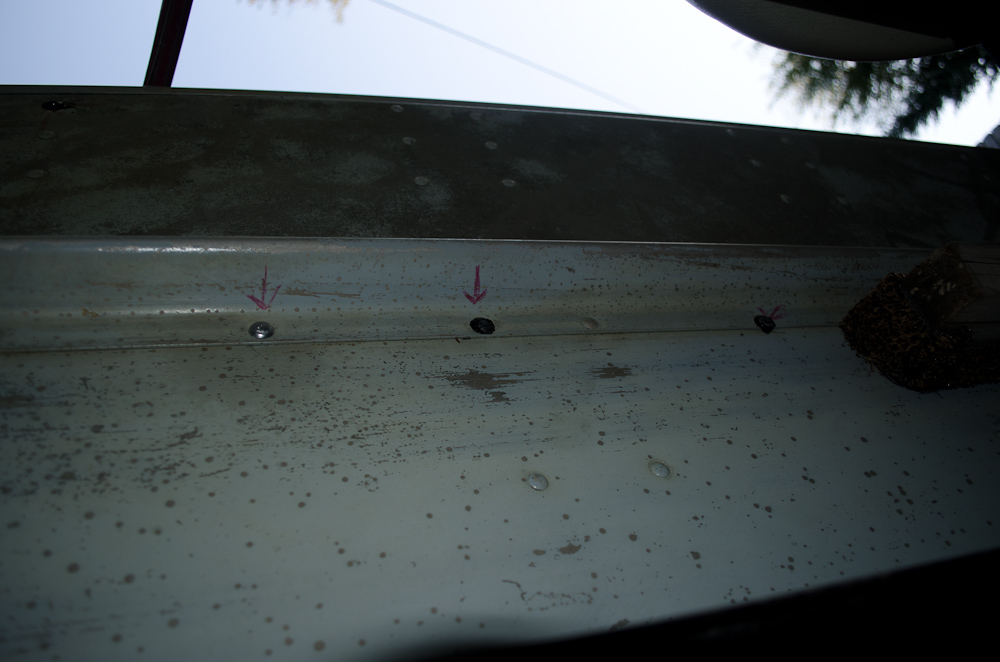
Rivets done. The home-made rivet gun worked well, as did the Evercoat bonding adhesive. The Admiral was a trooper in the boat with the sledge hammer (bucking bar)...but I should have given her hearing protection...the air hammer is loud when you are in the boat on hands and knees. We did an OK job - not great, but I think it'll do. The biggest problem was I bought rivets that were way too long. Second problem was getting the bucking bar (sledge) in place, especially on the rivets on the rib flanges, and double-especially on those where Starcraft had originally drilled the hole right up next to (and sometimes slightly into) the rib. Interestingly, I was worried about the air hammer being too hard-hitting, and installed an small inline reg. to limit the pressure...but ended up using it on full pressure anyway.

Starcraft-2013-Jul-25-5864.jpg


Starcraft-2013-Jul-25-5865.jpg


Starcraft-2013-Jul-25-5866.jpg


Starcraft-2013-Jul-25-5870.jpg
 

BillaVista

Petty Officer 1st Class
Joined
Jul 1, 2013
Messages
204
Re: Tore the transom ...how to repair? (pics)

Here the small patch discs are clamped in place while the panel bonding epoxy adhesive cures:

Starcraft-2013-Jul-25-5869.jpg


From the back, note the little cardboard templates masking-taped on right at the bottom of the hull. These are mock-ups of the Smart Tabs I want to add one day (but won't be able to before the boat is back together).

Starcraft-2013-Jul-25-5872.jpg


While the boat is apart, by placing the mock ups, I could see how they would be attached. Most, if not all of the screws would not hit the transom wood. I wasn't really comfortable with this, as the aluminum is pretty thin and I can see screws working loose over time if they have only a little thin aluminum for the threads to bite into.

So I made these:

Starcraft-2013-Jul-25-5853.jpg


They're made from a leftover chunk of 1" thick UHMWPE (Ultra High Molecular Weight Polyethylene). We use it to make skidplates for off-road trucks. It's tough, slippery, quiet, waterproof, and is fairly easily cut, machined, and worked.

I'm going to glue them into the space below the transom channel with 5200. They will provide a good place for screws for tabs, transducers, and the like to bite.

Starcraft-2013-Jul-25-5857.jpg


Starcraft-2013-Jul-25-5858.jpg


If you look closely, you can see that they will also help keep the longitudinal floor supports vertical.

Starcraft-2013-Jul-25-5855.jpg


If it weren't so darn expensive I'd be sorely tempted to try making a floor and even a whole transom out of it...no epoxy to fool with and obviously will never, ever rot or corrode.
 

GA_Boater

Honorary Moderator Emeritus
Joined
May 24, 2011
Messages
49,038
Re: Tore the transom ...how to repair? (pics)

Your rivets look just as good or better than Starcrafts. The Admiral deserves some reward for putting up with the racket. :)

I totally agree about the trim tab screws. I would not use screws at all. Rather bolts through the UHMWPE. Then you know the tabs won't be coming off.
 

dozerII

Admiral
Joined
Oct 25, 2009
Messages
6,527
Re: Tore the transom ...how to repair? (pics)

Nice job on the rivet attachment hope it works, I guess the pictures will tell how you made out. Great progress so far Bill.
 

oldjeep

Admiral
Joined
May 17, 2010
Messages
6,455
Re: Tore the transom ...how to repair? (pics)

Just saw this thread. Sure enough, another standard BillaVista super tech thread.

Great looking work as usual
 

Woodonglass

Supreme Mariner
Joined
Dec 29, 2009
Messages
25,924
Re: Tore the transom ...how to repair? (pics)

Please let us know how using 5200 to glue the Plastic to the hull works out. I've yet to find anything that will glue that stuff.
 

GT1000000

Rear Admiral
Joined
Jul 13, 2011
Messages
4,916
Re: Tore the transom ...how to repair? (pics)

Please let us know how using 5200 to glue the Plastic to the hull works out. I've yet to find anything that will glue that stuff.
Hi Wood,
My best guess is that he is not actually relying on the 5200 to keep them attached forever, but hopefully long enough until he gets his trim tabs and bolts them through the hull into the Plastic pieces...effectively securing them in place.
Hopefully when he goes to drill into them to attach the tabs, they don't pop loose...but as long as he has access to them, that may not be too terrible...
At least that is how I interpreted it...could be wrong, wouldn't be the first or the last...:rolleyes::facepalm::D
 

BillaVista

Petty Officer 1st Class
Joined
Jul 1, 2013
Messages
204

BillaVista

Petty Officer 1st Class
Joined
Jul 1, 2013
Messages
204
Re: Tore the transom ...how to repair? (pics)

Your rivets look just as good or better than Starcrafts. The Admiral deserves some reward for putting up with the racket. :)

I totally agree about the trim tab screws. I would not use screws at all. Rather bolts through the UHMWPE. Then you know the tabs won't be coming off.

Please let us know how using 5200 to glue the Plastic to the hull works out. I've yet to find anything that will glue that stuff.

Hi Wood,
My best guess is that he is not actually relying on the 5200 to keep them attached forever, but hopefully long enough until he gets his trim tabs and bolts them through the hull into the Plastic pieces...effectively securing them in place.
Hopefully when he goes to drill into them to attach the tabs, they don't pop loose...but as long as he has access to them, that may not be too terrible...
At least that is how I interpreted it...could be wrong, wouldn't be the first or the last...:D

GA - yea, I can understand why they are marketed the way they are and why the instructions say what they do...if they said you have to remove the floor and/or transom to install them I doubt they'd sell very many. I also understand that most of the force on them will be compressive...but still! Looking at it now, those screws will have only a thin sheet of aluminum to bite into, and screw threads are big and sloppy to boot - I just can't see them staying tight and leak-free for very long.

Please let us know how using 5200 to glue the Plastic to the hull works out. I've yet to find anything that will glue that stuff.

Hi Wood,
My best guess is that he is not actually relying on the 5200 to keep them attached forever, but hopefully long enough until he gets his trim tabs and bolts them through the hull into the Plastic pieces...effectively securing them in place.
Hopefully when he goes to drill into them to attach the tabs, they don't pop loose...but as long as he has access to them, that may not be too terrible...
At least that is how I interpreted it...could be wrong, wouldn't be the first or the last...:rolleyes::facepalm::D

Well, the original plan had been to use 5200 (or something) to glue/epoxy the plastic in place with the intent to hold them there (with no load on them) long enough until I could get the trim tabs and screw them in place as per the directions, just that the UHMWPE would give the screws some meat to bite.

But, thinking on it some more, I just don't like screws for this application and the loads I imagine are possible. So, even if I have to delay re-splash buy a week or tow, I'm going to do it with bolts. So I may not need any adhesive and I may be able to get away with a helper keeping them in place while the bolts holes are drilled. Then they will be held in place by the trim tab mounting bolts, and able to provide some meat for any later additions (like a transducer) that aren't structural and wont see much force. That's the plan as of right now, anyway.
 

BillaVista

Petty Officer 1st Class
Joined
Jul 1, 2013
Messages
204
Re: Tore the transom ...how to repair? (pics)

Friday I got the first coat of Epoxy-Plus on the other side of the floors and transom. And I got the first coat of Gluvit on the rivets.

Then I took off for the lake to go camping - needed a break and stuff had to dry / cure anyway.

Returned home today to find the Gluvit looks okay - and mother nature was providing an impromptu leak test. I hope it didn't rain too early in the curing process. I will re-do the leak test with the hose once things dry up and I can actually see / follow any water trails or drips.

Starcraft-2013-Jul-28-5873.jpg


Starcraft-2013-Jul-28-5875.jpg


You can see I started by (stupidly) doing all the seams of the ribs until I stopped and thought: "Wait a minute - this is a stupid waste of time - there's a great big hole in each of these seams down the centre of the bilge for drainage. No point trying to seal them.

Couple of interesting notes on (Canadian) Gluvit. I recall reading how the product was difficult to get in Canada for a while. The obvious reason was probably a lack of bilingual labels. But it occurred to me that it may also have to do with mandatory metric and possibly Cdn weights and measures rules.

The can is labelled 1L, but there's nowhere near 1L in it (Gluvit folks say the can is packed by weight). But the Gluvit website says to mix the resin and hardener by volume (5:1). The Canadian can just says "put the whole bottle of hardener in the can". The hardener comes in a seperate little bottle labeled "120ml". That's just great - but what if I want to make it in two batches - either for pot-life concerns or to two coats at separate times? And I'm no math genious, but I can tell that 120ml will not do 1L at a 5:1 ratio by volume.

So I carefully measured the volume of the resin - it came out at a little over 500ml - maybe as much as 600ml (which, hey, just happens to be the 5:1 equivalent of 120ml). So I just split the resin into two equal batches using my mixing / measuring cups. Then I measured the hardener - it is exactly 120ml like the label says. So I put 60ml in half the resin and then mixed for 4 mins.

Going on, especially early in the pot life, it's a bit of the pain in the ***** as its viscosity is very low and it runs all over the place. I guess the point is it runs into cracks and crevices for sealing - but half the time it sure appears to be running away from where you think you want it to be!


When I got back today, the wood looked good.....from a distance!

Starcraft-2013-Jul-28-5877.jpg


BUT - when I flipped the transom over I discovered that my liberal treatment of the edges (trying to get them to soak up all the epoxy they can, as per the instructions) had led to drips on the underside:

Starcraft-2013-Jul-28-5879.jpg


These will have to be sanded down before the second and final coat.

The other disappointment is that the cheap roller I used left all sorts of fluff in the epoxy and the result looks and feels terrible.

Starcraft-2013-Jul-28-5881.jpg


Fortunately, nobody will ever see it on the transom or floors so I just very carefully knocked down the highest globs with an orbital sander and got to work putting on the second and final coat - this time with a brush.

I must say, working with the Epoxy-Plus is not my favourite thing to do. (Or it's just that the learning curve is steep for me?!) It goes on fairly thick and sticky, and does not spread or roll very easily. Also, when doing the second coat, if the first was done properly, the wood will have a wet shiny look already - so it can pretty tough to see where you've re-covered and where you haven't. I found the best way to tell was by the feel / sound of the brush. If it dragged and sounded dry, you needed more stuff.

I ordered 1 Gallon of the Epoxy-Plus, which should be enough to do my 14' floors and transom, according to the calculations given on the Clark Craft website. But it will only just be enough, and my advice would be to go ahead and get 2 gallons so you can slap it on liberally and not be stressed about coverage or whether you're using enough.

Getting closer to putting stuff back together!
 
Last edited:

GA_Boater

Honorary Moderator Emeritus
Joined
May 24, 2011
Messages
49,038
Re: Tore the transom ...how to repair? (pics)

I think the through bolts are the way to go. Every time you holeshot or bounce on a wave or wake the tab will have upwards force trying to pull the screws out. Not to mention the possible banging when launching or loading on the trailer.

Helper? If she will buck rivets, holding a wrench is a piece of cake. :joyous:
 

BillaVista

Petty Officer 1st Class
Joined
Jul 1, 2013
Messages
204
Re: Tore the transom ...how to repair? (pics)

Well, today was a day of highs and lows...

High: Redid the leak test to discover I had only one remaining leaky rivet...so the buck-babe and I whipped the old one out and drove in a new one, and it was the best one we've done so far. Cool!

Low: Putting the final coat of epoxy-plus on the wood - I mixed a little more than usual in a batch, and I guess maybe the temps were a little warmer, because the pot life was dramatically reduced. In a desperate bid to save the product, I poured it out on the floor section I was working on and tried to quickly spread it around with the brush, but it literally went from thick liquid to a semi-solid glue-like substance almost instantly. When it sets, it sets! So the result looked like this mess:

Starcraft-2013-Jul-30-5887.jpg


High: A buddy made some cool pieces for me. Here we have a piece of black plastic for my anti-scratch motor pad on the stern; motor-mount brackets for inside, against the transom; some cool 1/4" thick, 3" diameter stainless steel backing pads for the stern U-bolts so we can tube with confidence (thanks to SigSaur for the idea!)

Starcraft-2013-Jul-30-5886.jpg


Low: I've discovered my engine-mount bolt pattern is all screwed up. First the pic:

Starcraft-2013-Jul-30-5894m.jpg


The top holes - the Stbd is 3/8" higher on the transom than the port (the blue arrows in the pic are exactly the same length). This means the motor was installed with a permanent list to port. The lower holes are similarly asker (the red arrow is horizontal), and you can see the lower stbd hole is badly ovaled.

I assume there's no valid reason to install the motor with a list to port? Therefore, I'm going to have to correct this.

This pic shows the original mount holes used on the motor bracket (note the lower stbd hole has also been ovaled)

Starcraft-2013-Jul-30-5897m1.jpg


I would like to patch and fill the original holes in the transom, and use these mounting holes instead (blue arrows):

Starcraft-2013-Jul-30-5897m2.jpg


Is there any reason I shouldn't do this or any major drawbacks to doing so? Obviously, the bolt "spread" will be less, which isn't ideal - but will it be ok?

Finally - to do an accurate and neat job I'd really prefer to take the bracket off the motor and clamp it to the transom to drill the new holes (rather than transfer the pattern from bracket to a template then from template to transom - too much chance for error). But in order to do what I want and get the bracket off - I have to remove the steering tube thing (blue arrow) - any easy way to do this?

Starcraft-2013-Jul-30-5898m.jpg


Thanks all for you help.
 

BillaVista

Petty Officer 1st Class
Joined
Jul 1, 2013
Messages
204
Re: Tore the transom ...how to repair? (pics)

Question Summary (to make quoting for a reply easier):

1) Is there any valid reason the motor should be mounted with a port list?

2) Can I use the new blue arrow mounting holes without too much drawback?

3) Is there an easy way to get the steering tube thing off easily so I can use the bracket to drill the new holes?
 

GA_Boater

Honorary Moderator Emeritus
Joined
May 24, 2011
Messages
49,038
Re: Tore the transom ...how to repair? (pics)

1) No, whoever mounted the motor drank too much before finishing the job.. :facepalm:


2 & 3) I would try the outboard forums. Too technical for me. Actually the wrong kind of motor.
 

jasoutside

Supreme Mariner
Joined
Dec 20, 2009
Messages
13,269
Re: Tore the transom ...how to repair? (pics)

Hey Bill! I just spotted this project, man what a sweet boat, I love it!!!!:thumb:

That first post you had, I pooped myself a little. I can't believe your engine didn't go for a swim, yikes!!!:eek:

You no doubt have this project well in hand now, well done man:joyous:
 

GA_Boater

Honorary Moderator Emeritus
Joined
May 24, 2011
Messages
49,038
Re: Tore the transom ...how to repair? (pics)

I saw you got some answers and link to a manual for measuring the holes. Probably a better idea than tearing the bracket off. The measuring from the bottom is a good idea.
 

BillaVista

Petty Officer 1st Class
Joined
Jul 1, 2013
Messages
204
Re: Tore the transom ...how to repair? (pics)

GA, yea, I decided to duplicate the original bolt pattern (i.e. use the same holes as original (which are also those recommended in the manual)). So I have patched and filled the holes in the transom aluminum, then I cut out a new scuff pad from the piece of black plastic seen above, clamped it to the motor bracket and used a transfer punch to put the pattern on it. Then I removed it and drilled the pattern in it carefully in the drill press.

So now I have a perfect template, and when the patch and fill is dry I will clamp it on and position it by measuring as per the manual. Then I'll install the transom and and drill through the aluminum and transom wood in one shot. Hopefully the bit won't catch in the patch-and-fill repairs and I'll get four nice round holes in the proper pattern all nice and level and square.

Meanwhile the final coat of epoxy dries on the wood.
 

SigSaurP229

Commander
Joined
Oct 1, 2008
Messages
2,123
Re: Tore the transom ...how to repair? (pics)

Way to bill she is looking good man. Great progress and I know it feels good to be putting her back together and much stronger than original.
 

colbyt

Master Chief Petty Officer
Joined
Aug 9, 2012
Messages
824
Re: Tore the transom ...how to repair? (pics)

Then I'll install the transom and and drill through the aluminum and transom wood in one shot. Hopefully the bit won't catch in the patch-and-fill repairs and I'll get four nice round holes in the proper pattern all nice and level and square.

This came up in another thread here or some where else so just in case I thought I would mention it.

Keep in mid that the holes need to be perpendicular to the transom and not to the floor. Some type of jig can be made to match the transom angle.
 
Top