Shoestring Starcraft SS160 Resto-mod - let the long slow road begin

ShoestringMariner

Lieutenant Commander
Joined
Apr 18, 2015
Messages
1,593
How much you want to spend? lol

You can go either route, but if you think they could get hit you want to make sure they have some cover to protect them. Also, if water could get to them screw is better then glue.

SHSU
Thanks. I know my username implies a lot, but I will shell out when the situation dictates. These won’t be hit by anything but they could be submerged unintentionally, so I will definitely be looking for screw type.
 

ShoestringMariner

Lieutenant Commander
Joined
Apr 18, 2015
Messages
1,593
Mini update, g/flex is done save for some runs I have to clean up.

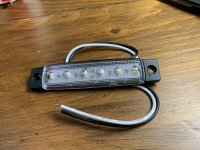
I also picked up some waterproof led lights for the front V storage compartment. If these are bright enough, I might install one of these under the splashwell so I can see in the sump pit, battery system etc. Maybe one under the console so I can see fuses and electrical.
pic attached so this thread isn’t totally sleepy…
 

Attachments

  • DEE7B1B9-1DD8-4755-BA68-8ADA7DA17DE8.jpeg
    DEE7B1B9-1DD8-4755-BA68-8ADA7DA17DE8.jpeg
    2.6 MB · Views: 6

ShoestringMariner

Lieutenant Commander
Joined
Apr 18, 2015
Messages
1,593
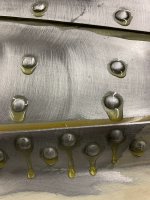
Just checked on how the g/flex cured. It’s been sitting in about 15deg C and looks like it’s all cured. I was a little liberal with the syringe dispensing, but I wonder if the epoxy actually expanded as it cured. The build looks a lot higher.

It files down easy enough, but aside from heavy runs and drips, I’m wondering if I need to smooth down the sags around the rivets or if the drag/friction will be minimal? This isn’t a performance hull so I’m wondering if it will make any impact to performance/economy. There’s the “Shoestring” surfacing. Well not entirely…my grown kids want to go tubing. I’ll only have a 50hp triple Evinrude on it for a season until I can re build my 70hp. I have to do a final 80 grit sand before priming, so some of it will be feathered but not enough to breech the coating build.
 

Attachments

  • BD42BB9B-3409-4D7C-AC9C-42B6C331BB70.jpeg
    BD42BB9B-3409-4D7C-AC9C-42B6C331BB70.jpeg
    2.4 MB · Views: 11

renns

Petty Officer 1st Class
Joined
Dec 20, 2017
Messages
316
Looks like mine. I only treated the rivet heads below the waterline, so they aren't visible. I doubt the drag will be affected in any measurable way.
 

Watermann

Starmada Splash of the Year 2014
Joined
Jan 12, 2013
Messages
13,787
I wouldn't worry about what the epoxy runs look like on the bottom, be more worried about causing them to leak by trying to make them look better. There won't be an issue with increased drag in the water from the runs.
 

ShoestringMariner

Lieutenant Commander
Joined
Apr 18, 2015
Messages
1,593
Thanks guys. I too only did below the waterline.

I think I may file down just the heavy pronounced drips only. That way I don’t have to worry about a glob around a rivet getting knocked off on a roller wheel or accidental abrasion against something. Which I’m probably way over thinking…. it’s pretty tough stuff. I’ve gone at a few accidental drips with a cold chisel and it takes a bit of work to knock them off.
 

ShoestringMariner

Lieutenant Commander
Joined
Apr 18, 2015
Messages
1,593
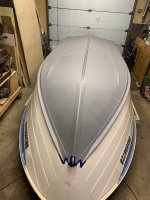
Moving forward a bit. Final sand and 1st round interlux 2000E primer. Not sure if 1 quart will get me 3 coats but I’ll know tomorrow.

I sure hope the interlux VC performance rolls on a lot smoother than this primer. The primer dries so fast, it doesn’t settle out well. I’m going to see if adding reducer will help. (I’m rolling this on with a 3/8” nap mini roller so I’m assuming this is partially to blame)

The g/flex sure looks ugly underneath.
 

Attachments

  • 47DD9691-CFE9-47D4-880F-2AF844FCBE7E.jpeg
    47DD9691-CFE9-47D4-880F-2AF844FCBE7E.jpeg
    1.1 MB · Views: 20

ShoestringMariner

Lieutenant Commander
Joined
Apr 18, 2015
Messages
1,593
Second coat today and did some touch ups with some foam brushes. I think I found the way to do a smooth application with this stuff. Will likely use more paint but a nicer laid coat
 

SHSU

Lieutenant Junior+Starmada Splash Of The Year 2019
Joined
Mar 8, 2017
Messages
1,724
Looking good!!!

We are our own worst critics. Most people won't even notice, let alone know that its an imperfection.

SHSU
 

renns

Petty Officer 1st Class
Joined
Dec 20, 2017
Messages
316
Looks good from here! Those G-flex lumps look like they're below the waterline mostly? Only the fish will see them.
Would you mind describing the prep process? Sanding/acid wash/acid etch?
 

ShoestringMariner

Lieutenant Commander
Joined
Apr 18, 2015
Messages
1,593
Looks good from here! Those G-flex lumps look like they're below the waterline mostly? Only the fish will see them.
Would you mind describing the prep process? Sanding/acid wash/acid etch?
Mostly except for the handful above the waterline on the bow.
The Interlux tech rep said to sand The aluminum with at least 80 grit and prime with the 2000E Primer. No acid wash needed.
He said if I wanted to clean it denatured alcohol was about all it needed. I asked and I double checked. Same story, no acid etch needed. And he was aware it was an aluminum, riveted boat.

I sure hope this paint system doesn’t peel off. I guess I’ll find out.
 

classiccat

"Captain" + Starmada Splash Of The Year 2020
Joined
Dec 20, 2010
Messages
3,412
Mostly except for the handful above the waterline on the bow.
The Interlux tech rep said to sand The aluminum with at least 80 grit and prime with the 2000E Primer. No acid wash needed.
He said if I wanted to clean it denatured alcohol was about all it needed. I asked and I double checked. Same story, no acid etch needed. And he was aware it was an aluminum, riveted boat.

I sure hope this paint system doesn’t peel off. I guess I’ll find out.
I had the same conversation with Interlux...no acid wash, self-etching primer, alodine...nothing. Sand only (and remove residue).

I haven't had 1 single instance of adhesion failure...granted all of my paint is above the waterline (except for the transom skin of course) but I have not been gentle with it...esp around river docks at max tidal flow :D.
 

renns

Petty Officer 1st Class
Joined
Dec 20, 2017
Messages
316
I had the same conversation with Interlux...no acid wash, self-etching primer, alodine...nothing. Sand only (and remove residue).

I haven't had 1 single instance of adhesion failure...granted all of my paint is above the waterline (except for the transom skin of course) but I have not been gentle with it...esp around river docks at max tidal flow :D.
Is your boat in the water for longer periods of time? I think SSM and I are in the same boat (sorry, bad pun), in that we both plan to leave our boats in freshwater lakes for the season.
 

classiccat

"Captain" + Starmada Splash Of The Year 2020
Joined
Dec 20, 2010
Messages
3,412
Is your boat in the water for longer periods of time? I think SSM and I are in the same boat (sorry, bad pun), in that we both plan to leave our boats in freshwater lakes for the season.
mine is a bare bottomed trailer queen.
 

ShoestringMariner

Lieutenant Commander
Joined
Apr 18, 2015
Messages
1,593
Hmmm. 3 coats of primer and a test sand tonight and I feel that the primer is now way smoother. It’s levelled off the highs or raised orange peel. I only did primer with rollers. I did not roll and tip and I wonder if that was a mistake as it appears that I’m just sanding off much of the primer I put on

Even though the interlux rep told me to sand it before Applying the VC performance, I fear that they’ll be less tooth for adhesion. Thoughts?

Going to have to be careful sanding. It didn’t take much to knock the paint off of a rivet head. One stray motion and it burned through
 

SHSU

Lieutenant Junior+Starmada Splash Of The Year 2019
Joined
Mar 8, 2017
Messages
1,724
Should just be a light scuff, not a sanding in the traditional sense. So just enough to break the top layer/film.

SHSU
 

ShoestringMariner

Lieutenant Commander
Joined
Apr 18, 2015
Messages
1,593
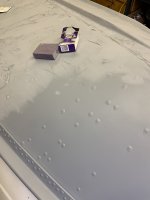
well I’m impressed with the 3M sanding block I picked up. I got a 60 grit one (assuming 60 is grit) and it did so much better than 80 grit sandpaper did.

High stock removal and minimal burn through. The liberal g flex made sanding around rivets a breeze. Virtually no paint clogging. I will never use sandpaper again.
I did the whole boat with one $5 block.

Next step, epoxy topcoat (or bottom coat in this case.)
I have to be careful how I approach this. I have to do recoats within 24 hours or I have to sand it again and this is very hard Epoxy.
 

Attachments

  • 612D9538-80AF-49F9-9AFA-2B26F61CDE97.jpeg
    612D9538-80AF-49F9-9AFA-2B26F61CDE97.jpeg
    1.1 MB · Views: 13

ShoestringMariner

Lieutenant Commander
Joined
Apr 18, 2015
Messages
1,593
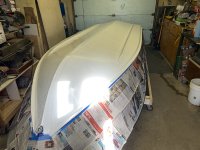
milestone achieved. 4 coats of white epoxy and I think it’s good to cure for 3-4 days. It’s going back on the trailer on Friday. I hope that’s long enough to cure good and hard. It’s in a 60 deg F shop, so it should be pretty decent by then.

This epoxy was very thin, and some poor reviews given by people who didn’t like rolling & brushing, but I will say that I found it went on fairly well with a rolling and tipping technique. 3/16” velour small diameter roller, tipped by wetted foam brush. Im sure it may have been more difficult and messy if I had been working on my back, overhead.

Next up, floatation foam and floors. Getting excited. This painting business has taken a long time.
 

Attachments

  • E3AA59BD-58C7-4320-B891-957F40B27F48.jpeg
    E3AA59BD-58C7-4320-B891-957F40B27F48.jpeg
    2.9 MB · Views: 20
Last edited:

BWR1953

Admiral
Joined
Jan 23, 2009
Messages
6,178
milestone achieved. 4 coats of white epoxy and I think it’s good to cure for 3-4 days. It’s going back on the trailer on Friday. I hope that’s long enough to cure good and hard. It’s in a 60 deg F shop, so it should be pretty decent by then.

This epoxy was very thin, and some poor reviews given by people who didn’t like rolling & brushing, but I will say that I found it went on fairly well with a rolling and tipping technique. 3/16” velour small diameter roller, tipped by wetted foam brush. Im sure it may have been more difficult and messy if I had been working on my back, overhead.

Next up, floatation foam and floors. Getting excited. This painting business has taken a long time.
Looks great! (y)
 

renns

Petty Officer 1st Class
Joined
Dec 20, 2017
Messages
316
milestone achieved. 4 coats of white epoxy and I think it’s good to cure for 3-4 days. It’s going back on the trailer on Friday. I hope that’s long enough to cure good and hard. It’s in a 60 deg F shop, so it should be pretty decent by then.

This epoxy was very thin, and some poor reviews given by people who didn’t like rolling & brushing, but I will say that I found it went on fairly well with a rolling and tipping technique. 3/16” velour small diameter roller, tipped by wetted foam brush. Im sure it may have been more difficult and messy if I had been working on my back, overhead.

Next up, floatation foam and floors. Getting excited. This painting business has taken a long time.
That's awesome! We're in opposite order, with my foam and floor just completed, working on side panels next. If there's time, maybe I should flip it over again, and paint rather than leave bare with sharkhide. How much primer/paint was needed for that bottom section? Did you prime the whole hull, and just tape off and finish paint the bottom? I need to go back and check your earlier posts....
 
Top