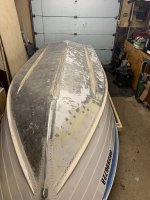
Shoestring Starcraft SS160 Resto-mod - let the long slow road begin

BWR1953

Admiral
Joined
Jan 23, 2009
Messages
6,235
I have XPS foam under the deck in my Kingfisher. We originally put it in there under the old deck when I first did the fixup so that we could repair some leaks below deck. Then we put new foam sections in and reinstalled the old deck and used the boat that way for a couple of years.

Then when I started the full restoration later on, we pulled the old deck out and there was no corrosion of any kind where the foam was sitting on the inside of the hull. So, we installed the foam again and covered with the new deck. It's been almost 2 years since the restoration and there's no sign of corrosion in the bilge area.

YMMV. :cool:
 

ShoestringMariner

Lieutenant Commander
Joined
Apr 18, 2015
Messages
1,605
I have XPS foam under the deck in my Kingfisher. We originally put it in there under the old deck when I first did the fixup so that we could repair some leaks below deck. Then we put new foam sections in and reinstalled the old deck and used the boat that way for a couple of years.

Then when I started the full restoration later on, we pulled the old deck out and there was no corrosion of any kind where the foam was sitting on the inside of the hull. So, we installed the foam again and covered with the new deck. It's been almost 2 years since the restoration and there's no sign of corrosion in the bilge area.

YMMV. :cool:
The very words I was hoping to hear! Thank you
 

ShoestringMariner

Lieutenant Commander
Joined
Apr 18, 2015
Messages
1,605
Hey guys, starting to think through my dash layout and getting my list together on the last electrical materials I need.

I have already grabbed fuse blocks, switch panels, kill switches, horn button etc but I need wire & cables connectors and such.
Have any of you got any good pics in your threads or remember any threads that show any nice layouts? There’s so many build threads that it’s a massive rabbit hole.

I want to do a nice clean, pro job instead of the rats nest it used to be.

Also, how do you guys label your wire ends? I don’t want to buy 10 different spools of wire colour and like the neat look of one colour. I have to wire my nav lights, interior & compartment lights, bilge pumps, aux power circuits, gauges etc.

thanks in advance
 

VanPelt

Recruit
Joined
Apr 16, 2019
Messages
1
Alright folks, It's time to dig into the 1975 SS that i dragged home a year ago. Some of you may recall my "New to the Starcraft Club" thread in which I dragged home a tired boat and motor. I've decided to forge ahead and restore/mod this boat to my liking. This is probably going to be a long, drawn out project over the next 3-5 years, in stages so that I can use it every summer. My version is going to be a little different than the phenomenal resto's that many of you have done. As much as I'm envious of the level of builds I've seen here, I just don't have the time or funds to pull out all the stops. I will focus on value added methods but I realise that will by the end of the project have spent a significant amount of money on this, but spread out along the way and likely by upgrade over upgrade over...you get he idea.

So for this spring, I'm replacing the transom and adding a CMC tilt unit. I've picked up a few things along the way and will add them as I go. Photos to come....
let me know how you did the transom, I have some rot in my 1974 starcraft that I have to fix. In case I have to srap it I have a airly new canvas canopy on it that goes from the winshield to the transom with windows all around
 

ShoestringMariner

Lieutenant Commander
Joined
Apr 18, 2015
Messages
1,605
let me know how you did the transom, I have some rot in my 1974 starcraft that I have to fix. In case I have to srap it I have a airly new canvas canopy on it that goes from the winshield to the transom with windows all around
Transom is done. I can’t recall what page it is in this thread but there’s a few photos. Transom was probably the easiest thing to do on this boat so far.
 

ShoestringMariner

Lieutenant Commander
Joined
Apr 18, 2015
Messages
1,605
Progress has been slow this week. Was a 55 hour work week. I didn’t touch it until today. One side scratches and pitting buttered with Marine tex. I’m going to try and get out one or two nights this week and do the other side.

Ordered new decals for my motor hood.
Got a stainless steering wheel coming in this week. Still a few more things to acquire. I was going to omit a tach and speedometer. But the speed is covered on my helix seven’s GPS, I think I’ll find room for a tach somewhere. Even if I have to make a box for it to sit on top of the dash. My motor is too old to hook up to the helix 7 I think (my 3 motor choices are 1986 60hp, 1990 70 hp and 1993 50 hp, All of which are too early I believe)
 

Attachments

  • 31253A80-17D6-44B1-B0D0-E16C72215376.jpeg
    31253A80-17D6-44B1-B0D0-E16C72215376.jpeg
    1.5 MB · Views: 10
Last edited:

SHSU

Lieutenant Junior+Starmada Splash Of The Year 2019
Joined
Mar 8, 2017
Messages
1,749
Hey guys, starting to think through my dash layout and getting my list together on the last electrical materials I need.

I have already grabbed fuse blocks, switch panels, kill switches, horn button etc but I need wire & cables connectors and such.
Have any of you got any good pics in your threads or remember any threads that show any nice layouts? There’s so many build threads that it’s a massive rabbit hole.

I want to do a nice clean, pro job instead of the rats nest it used to be.

Also, how do you guys label your wire ends? I don’t want to buy 10 different spools of wire colour and like the neat look of one colour. I have to wire my nav lights, interior & compartment lights, bilge pumps, aux power circuits, gauges etc.

thanks in advance

I used a label maker wrapped around the wire end. Haven't had the labels fall off yet. You can add some clear packing tape over it if you want to make sure it stays. Since its underneath and out of the sun, no UV concerns.

SHSU
 

ShoestringMariner

Lieutenant Commander
Joined
Apr 18, 2015
Messages
1,605
Well it’s been a bit of a slow go lightly. All the MarineTex butter that I put on the bottom has not cured 100%. It’s hard to the touch, but still slightly sticky. I’m going to go at with a heat gun. Not sure if warming it gently for a short period time will make it kick it all. Thinking about hooking up an infrared heater or heat lamps mounted above and at a safe distance away. I wonder if halogen lights on workstand would provide enough heat to gently warm it.
I have a second heater in the garage. Electric forced air. I’m going to run it for 2 to 3 hours in the evenings. Get the temperature way up in the shop. Then let it settle back down to 20° C. about 65°F I think. My wall thermometer might not be the greatest so I’m going to pick up another tomorrow. I might even order a cheap temperature gun from Amazon. If I’m not mistaken metal temperatures in a workshop are 10° cooler than ambient air.

I’m also thinking about picking up a cheap heater to put underneath the boat so it creates a warm pocket inside… Trials and tribulations
 
Last edited:

renns

Petty Officer 1st Class
Joined
Dec 20, 2017
Messages
316
I bought a couple of those infrared heaters from PrincessAuto when they were on for $40. They work quite nicely. I had them set under the hull to warm it while I was doing some of the seam sealing. From a 3 ft distance, the aluminum would get just warm to the touch, while air temp was single digits C.
 

ShoestringMariner

Lieutenant Commander
Joined
Apr 18, 2015
Messages
1,605
Finally moving forward. I bought 2 infrared heaters at PA for $44 each. I also picked up a digital infrared temp gun. Played around with it some.
I roll back the 220v heaters at night (one off completely) so starting temp in shop was 59F.
The boat hull was the same temp. I always thought that surface temps were always colder than air temps but this didn’t seem the case.

I then tried the one micro heater I had under the boat (not the infrared ones I bought today) and it brought the hull temps up to 71F in places.
So I think I should be able to warm this hull up nicely to finish the Marine Tex and epoxy primer with just one more $25 micro heater. (Worried the infrared heaters below will be too hot for the Gluvit. Might install them on the ceiling over the boat as curing lamps.
 

ShoestringMariner

Lieutenant Commander
Joined
Apr 18, 2015
Messages
1,605
I bought a couple of those infrared heaters from PrincessAuto when they were on for $40. They work quite nicely. I had them set under the hull to warm it while I was doing some of the seam sealing.
I took your idea and did the same. Works beautifully. I’m getting temperatures of 75 to 82° F throughout the hull surface. Marine tex says 72°F and up.

Got the other side buttered with Marine Tex.
Hopefully this heater trick means I can send it tomorrow.

Then onto the G flex treatment. Man this is taking forever.

Minus 23C this am and a 5 hour power outage sure put a dent in the start of the morning :(

Aside for a little bit a heat gun warming at the cold end (By garage door), it’s time for a bevvy.
 
Last edited:

renns

Petty Officer 1st Class
Joined
Dec 20, 2017
Messages
316
I took your idea and did the same. Works beautifully. I’m getting temperatures of 75 to 82° F throughout the hull surface. Marine tex says 72°F and up.

Got the other side buttered with Marine Tex.
Hopefully this heater trick means I can send it tomorrow.

Then onto the G flex treatment. Man this is taking forever.

Minus 23C this am and a 5 hour power outage sure put a dent in the start of the morning :(

Aside for a little bit a heat gun warming at the cold end (By garage door), it’s time for a bevvy.
Glad that worked out. I'm a fan of radiant heaters. Get the warmth without the draft of a fan blowing. No power outage here, but I was busy with other work for most of the day today. Will post up some Nautolex adhesive test results in my thread soon.
 

ShoestringMariner

Lieutenant Commander
Joined
Apr 18, 2015
Messages
1,605
Learned that infrared temp guns read aluminum and shiny metals differently. Noticed about 10deg F cooler reading on bare aluminum vs painted or coated aluminum. The infrared heaters work much better than I initially thought. The boat is now effectively acting as a radiant heater. Impressed
 

ShoestringMariner

Lieutenant Commander
Joined
Apr 18, 2015
Messages
1,605
Well not much progress to report this weekend. I hate going backwards but it happened. I really didn’t feel right not leak testing this thing when I had a chance earlier this year. So we flipped it over and put it back on the trailer. No boat launches are open and they’re all frozen closed. Filled it up with water and lo and behold I had a leak at the keel. So got that fixed. G flex works beautifully with the heat gun. I did the perimeter of the keel plate that comes up the front. It flowed right in with a syringe. Heat gun really thins it out and lets it creep right in to where it needs to be. I think a hot plate and a pot of water with a ceramic plate in the bottom will help warm up the epoxy.
The syringes were hard to fill. Had to warm up the mini Dixie cup with the gun to pour it into the syringe. Forget sucking it up with a syringe for anybody looking to try it.
One thing I noticed, trying to make small batches with a digital scale; forget it it’s surprising how much epoxy goes into a mini Dixie cup before it registers. I ended up just squeezing both bottles at the same time so they came out equally 1:1

Replaced a few more rivets. And did some more bedding with 3M 5200. One more leak test this week and it’s turtle time again to get the bottom finished out and painted. Got to make some serious hay. This is taking far, far too long.
 

classiccat

"Captain" + Starmada Splash Of The Year 2020
Joined
Dec 20, 2010
Messages
3,412
Well not much progress to report this weekend. I hate going backwards but it happened. I really didn’t feel right not leak testing this thing when I had a chance earlier this year. So we flipped it over and put it back on the trailer. No boat launches are open and they’re all frozen closed. Filled it up with water and lo and behold I had a leak at the keel. So got that fixed. G flex works beautifully with the heat gun. I did the perimeter of the keel plate that comes up the front. It flowed right in with a syringe. Heat gun really thins it out and lets it creep right in to where it needs to be. I think a hot plate and a pot of water with a ceramic plate in the bottom will help warm up the epoxy.
The syringes were hard to fill. Had to warm up the mini Dixie cup with the gun to pour it into the syringe. Forget sucking it up with a syringe for anybody looking to try it.
One thing I noticed, trying to make small batches with a digital scale; forget it it’s surprising how much epoxy goes into a mini Dixie cup before it registers. I ended up just squeezing both bottles at the same time so they came out equally 1:1

Replaced a few more rivets. And did some more bedding with 3M 5200. One more leak test this week and it’s turtle time again to get the bottom finished out and painted. Got to make some serious hay. This is taking far, far too long.
Finding & repairing a leak sounds like advancement to me! Nice work!
 

ShoestringMariner

Lieutenant Commander
Joined
Apr 18, 2015
Messages
1,605
Finding & repairing a leak sounds like advancement to me! Nice work!
Thanks. I guess you are right. I can’t imagine what a funk I’d be in if I had discovered this AFTER I painted the bottom. So you’re right. The glass is half full and not half empty. I did actually accomplish enough to be ahead of where I was a few days earlier. It’s funny how it takes someone to point out the obvious before I see it. I must stop fixating on the deadline.

At this junction I think I’ll take advantage of the upright position and gflex the transom seam while it’s upright. It’s a bit better of a “ledge” this way. Then one more leak test to be sure I’ve nailed it.

A bit of a topic change, what do you guys recommend for compartment lighting?
I want to add a rod locker and also add lighting under the bow seating and hatches. I also want to add lighting under the gunnels.
Do you think that LED strip lights will cast enough light in these applications?
I’d like to start rounding up these goodies soon.
 

SHSU

Lieutenant Junior+Starmada Splash Of The Year 2019
Joined
Mar 8, 2017
Messages
1,749
Strip lighting should provide more then enough light. Just got to spend the money to get a descent set of strip lights. Otherwise you risk having burnouts and having to replace sooner then one would like.

SHSU
 

ShoestringMariner

Lieutenant Commander
Joined
Apr 18, 2015
Messages
1,605
Strip lighting should provide more then enough light. Just got to spend the money to get a descent set of strip lights. Otherwise you risk having burnouts and having to replace sooner then one would like.

SHSU
Perfect thank you. I’d like to run a strip down either side of the rod locker. So it’s evenly lit.
I bought some smaller LED lights for the storage compartments up front. 20 bucks got me for each one has six LEDs in it.

Regarding the strip lights, are you talking about the type that you cut to size or would these be strip lights that you order to length?
And are they glue on or screw on?
 

SHSU

Lieutenant Junior+Starmada Splash Of The Year 2019
Joined
Mar 8, 2017
Messages
1,749
Perfect thank you. I’d like to run a strip down either side of the rod locker. So it’s evenly lit.
I bought some smaller LED lights for the storage compartments up front. 20 bucks got me for each one has six LEDs in it.

Regarding the strip lights, are you talking about the type that you cut to size or would these be strip lights that you order to length?
And are they glue on or screw on?
How much you want to spend? lol

You can go either route, but if you think they could get hit you want to make sure they have some cover to protect them. Also, if water could get to them screw is better then glue.

SHSU
 

renns

Petty Officer 1st Class
Joined
Dec 20, 2017
Messages
316
If you get those strip-lights on a roll, make sure they have the rubber coating to provide at least some moisture protection. We use these for lighting in our sugar shack (almost that season again!), running off 12V battery, and the unprotected ones fail quickly in presence of moisture. Now maybe the steamy sugar shack is a bit of an extreme test, but for a couple bucks more get the rubberized version.
 
Top