Shoestring Starcraft SS160 Resto-mod - let the long slow road begin

ShoestringMariner

Lieutenant Commander
Joined
Apr 18, 2015
Messages
1,600

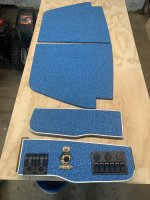
Backboards. The originals were plain white vinyl. They looked like arse. So these will be the blue. Nautolex also. I don’t like the way the originals rotted out at the floor. Double wrapping them causes them to retain moisture. I’m not quite sure how I’m going to treat the bottom edge just yet. Before I close up the wrap I might put a finger swipe of 3M 4600 along the exposed plywood to make sure they can’t suck up water.
 

Watermann

Starmada Splash of the Year 2014
Joined
Jan 12, 2013
Messages
13,792
Oh you caught me in my other boat!!

Is this photo thing looking permanent? I’m getting older but still working 44 a week, and also trying to wrap up many projects. If I don’t have to go to another site and learn that one that would be better however, if this is a permanent deal, I guess I’ll have to.
MS Onedrive comes installed on all windows computers and I use it on my phone to upload pics, it will be around as long as MS is I guess. I went with Onedrive figuring it was the best and not going away. I made a tutorial for it some years back when the forum pics were messed up and photobucket kicked the bucket.
 

Watermann

Starmada Splash of the Year 2014
Joined
Jan 12, 2013
Messages
13,792

Backboards. The originals were plain white vinyl. They looked like arse. So these will be the blue. Nautolex also. I don’t like the way the originals rotted out at the floor. Double wrapping them causes them to retain moisture. I’m not quite sure how I’m going to treat the bottom edge just yet. Before I close up the wrap I might put a finger swipe of 3M 4600 along the exposed plywood to make sure they can’t suck up water.
You can do the same with dropbox pics, just have to copy the link and then add it using the photo link button above.

p.jpeg
 

Watermann

Starmada Splash of the Year 2014
Joined
Jan 12, 2013
Messages
13,792
You can do the same with dropbox pics, just have to copy the link and then add it using the photo link button above.
That is unless the pic gets moved or deleted from it's original location.
 

Rasdiir

Petty Officer 2nd Class
Joined
Jul 18, 2011
Messages
167
Todays progress; Still very slow but moving forward.
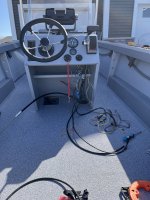
I wired up the rod locker lights, tested it and installed it and tan the leads. Swivel bases were installed on top of some .080” or .100” thick neoprene gaskets That I made. (Which I hope doesn’t react with the vinyl) I have to figure out a quick removal attachment for the sleeper seats so it looks good when the swivel seats are used.

I marked existing rivet hole locations on rib ends using a good idea from @renns and target locations for new ones. I had to do some styro shaving as there was a few high spots but I think the boards are ready for fastening once I lay out the rivet pattern.

I mocked up a few items. Wondering about making the side board longer to hide the gap at the floor to hull. Maybe terminating the side board into the console front wall. I’m also thinking about adding a board above it under the console so I can mount fuse blocks and bus bars. Thoughts on this? Anyone else do this?

Also considering re-cladding and reusing the sliding doors at the splashwell. I don’t particularly like this set up or design, but it looks like a mess left wide open, so until I re-work the splashwell, it will have to do. The track was petty rough. I straightened it out. Some work with some files and nylon wire wheels will clean it up enough so it’s not offensive. Again, it’s probably temporary.

Tomorrow I’ll have the floor riveted and then I can wrap the last piece. I’m going to mock up the consoles and figure out the V-bench new configuration. The footwell is going to be smaller to create more storage beneath. I’m concerned with the footwell size being to tight. Anyone reconfigure this for the same reason and find it either worked well or was too cramped?
I see in the pics here: https://forums.iboats.com/threads/s...-the-long-slow-road-begin.721077/post-5752612 that you did the same thing I'm planning on, having a pedestal and removable B2B seat on the passenger side. I was measuring out my seat placement today and it doesn't look like I can unfold a B2B because they only unfold from one end and that would mean the base basically has to butt up against the splashwell at the rear. The original B2B in mine unfolded from both ends so the base could still be centered between the console and the splashwell. Did you have to do any adjustments to your seat location to accommodate it unfolding?

Also, I think I asked you this sometime in the past, but what are you using to mount the B2B? I was just going to use t-nuts and bolts the same as the pedestal mounts, and then put the bolt back in to cover the hole when the seat is removed.
 

ShoestringMariner

Lieutenant Commander
Joined
Apr 18, 2015
Messages
1,600
Finally got some time to pick away at this project again. Still struggling from ongoing health setbacks, but trucking through it. The positive of it is that it has afforded me time to play in the shop, a luxury I haven had for some time.

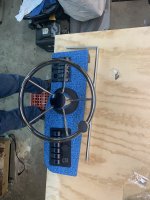
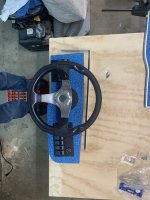
I finished building and cladding the helm fronts and dash faces with nautolex. I think I’m going with the stainless wheel because its shiny and I can see through it better. The other is 90’s dated, dark and chunky (though has a great feel to it) Any thoughts welcome regarding your experience and dislikes of either/both type. I’ve not used these before.

I went a little switch heavy. I was going to use only the 6 switch panel, but then found the auto bilge switches which I preferred more. I may move these to the side panel next to the driver seat and use that spot for a tach. Still time to make that decision. I will have 2 toggles left for something else down the road which is better than none.

Next up; making new side panels, cladding the aluminum V-tub/upstand and making/cladding the rod locker door. Then in to the V bench boards and lift out casting floor-filler panel. (Will convert V-bow bench seat to full casting floor)
Stay tuned, the Tortoise journey continues….
 

Attachments

  • IMG_5113.jpeg
    IMG_5113.jpeg
    2.7 MB · Views: 9
  • IMG_5108.jpeg
    IMG_5108.jpeg
    1.7 MB · Views: 9
  • IMG_5107.jpeg
    IMG_5107.jpeg
    2 MB · Views: 9

BWR1953

Admiral
Joined
Jan 23, 2009
Messages
6,193
The stainless wheel is definitely easier to maintain. Down here in Florida, they can get pretty hot, but up where you are there should be no problem.

Gotta love a Brodie knob. I have one on my tractor. (y)😁
 

SHSU

Lieutenant Junior+Starmada Splash Of The Year 2019
Joined
Mar 8, 2017
Messages
1,741
+1 for stainless too

I do 95% of my steering via the brodie knob.

SHSU
 

ShoestringMariner

Lieutenant Commander
Joined
Apr 18, 2015
Messages
1,600
Thanks guys, going with the stainless wheel.

Anyone do something different with the side panels? I’m about to start mine. I don’t like the unfinished area under the helm. I understand why they stop short, and are mitred on a slight angle (to avoid at curve of the bow).
I’d like to close this in but making a filler piece that meets the original board on a compound angle, and a tight butt up to the helm front panel may be tricky for me to get cleanly.

Wondering if anyone has done something nice looking here. I may want to add a foot board later too.

Lastly, this board tapers in height from 13” to 11” towards the stern, assumingly for easier storage access. Anyone change this for deeper storage? If so, how do you like the results?
 

ShoestringMariner

Lieutenant Commander
Joined
Apr 18, 2015
Messages
1,600
Ok so the stainless wheel gets the final nod!

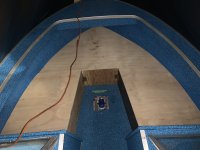
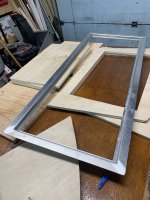
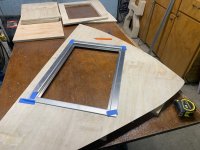
Spent some time working on the front bow bench. I didn’t like the too-small sized aluminum upstand support I made, so while I’m waiting to make another, I cobbled one up in scrap plywood in order to do a mock up. The top panels have been made to suit a better sized opening (but smaller than the factory original) and now off to figure out the hatch openings.
There will be a trolling motor battery under each seat, tight to the bulkhead. Future lithium batteries will be going in. Should still be lots of room for storage up there.
 

Attachments

  • IMG_5186.jpeg
    IMG_5186.jpeg
    2.8 MB · Views: 7

SHSU

Lieutenant Junior+Starmada Splash Of The Year 2019
Joined
Mar 8, 2017
Messages
1,741
I wish I had thought of future expansion for Trolling motor batteries a little better. Planning for access now is the best thing.

Any reason for the bilge pump up at the front?

SHSU
 

ShoestringMariner

Lieutenant Commander
Joined
Apr 18, 2015
Messages
1,600
I wish I had thought of future expansion for Trolling motor batteries a little better. Planning for access now is the best thing.

Any reason for the bilge pump up at the front?

SHSU
Thanks, I hope it wasn’t a dumb idea. I have one front and back. This boat sits more level with the front troller, 2 batts and an anchor up front. Because the hull can hold a lot of water in the front with heavy rains or a swamping, I wanted to pump water from wherever it collects in unpredicted event if the engine failed. There’s a lot of foam under the floor, so I’m not sure how well the rear pump would work alone in a severe swamping
 

SHSU

Lieutenant Junior+Starmada Splash Of The Year 2019
Joined
Mar 8, 2017
Messages
1,741
Two is better than one. Mine is a little back heavy. But that might change as I start shifting batteries around with addition of trolling motor.

SHSU
 
Top