Here I go again!! 1995 Sea Ray 220 Signature Deck and Stringer Restoration SPLASHED!

Friscoboater

Captain
Joined
Jul 3, 2009
Messages
3,095
Re: Here I go again!! 1995 Sea Ray 220 Signature Deck and Stringer Restoration

Re: Here I go again!! 1995 Sea Ray 220 Signature Deck and Stringer Restoration

Jay.....somewhere deep down it appears that you enjoy this stuff.....AND you are pretty darn good at it. While this boat wasn't meant to be a project when you bought it - I wouldn't be surprised to see you rebuilding another boat in the future.......you have a talent!

I do enjoy working on things for sure, but I promised to build a craft room for the wife this winter. So I will always be building, or working on something.

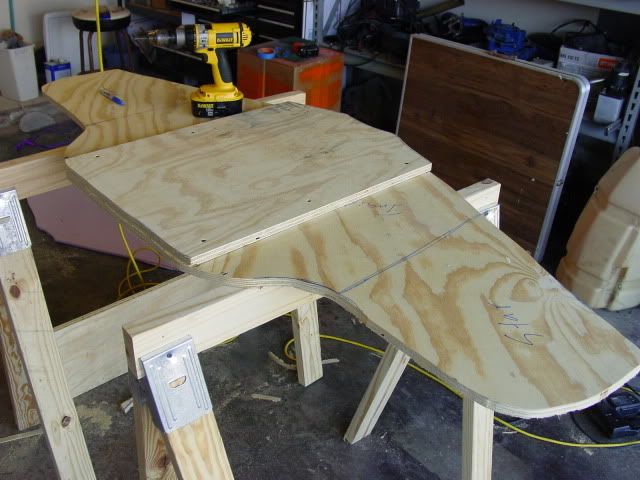
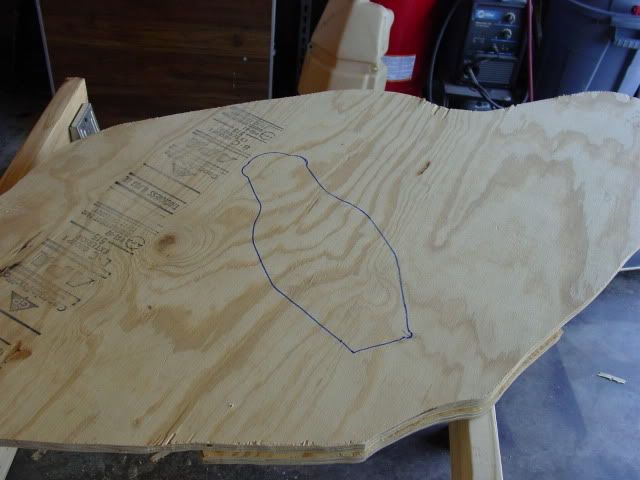
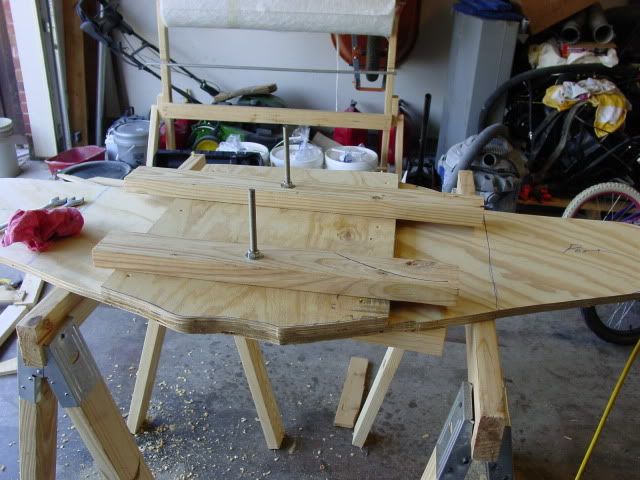
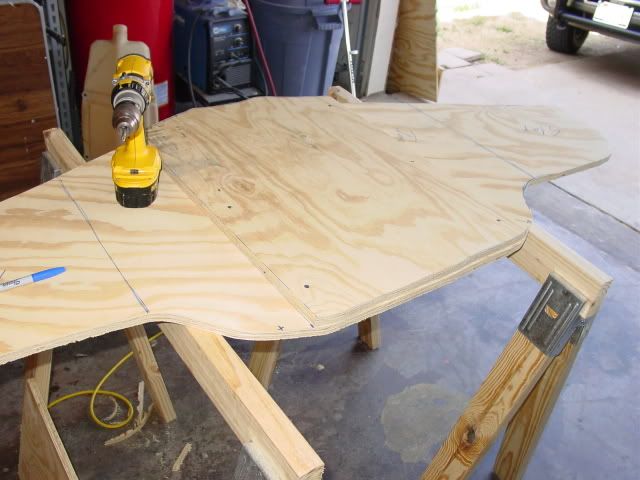
Here is another Video for you guys. This is how to cut the wood and laminate the two layers together.


DSC00604-1.jpg


DSC00605.jpg


DSC00606.jpg


DSC00607.jpg
 

Rellik546

Petty Officer 1st Class
Joined
Feb 5, 2011
Messages
270
Re: Here I go again!! 1995 Sea Ray 220 Signature Deck and Stringer Restoration

Re: Here I go again!! 1995 Sea Ray 220 Signature Deck and Stringer Restoration

wow jay

really comin along! good thing the kid was there to tell you that you put it on wrong...hahaha your camera man has good filming skills i know as a kid i use to bug my dad with a million and one questions whenever he was fixing or workin on anything.

Its all up hill from here. i have the same problem on my wellcraft with the keyhole being thicker at the bottom and narrower at the top...i wonder why that is. and my glass layup isnt inherently bigger at the top anywhere. i believe you are allowed to deviate up to 1/8" if i remember my mercruiser manual correctly. although it could have been 1/16" either way im gonna try to figure out a way to keep it parallel. so let me know what you come up with.
 

LippCJ7

Vice Admiral
Joined
Sep 20, 2010
Messages
5,431
Re: Here I go again!! 1995 Sea Ray 220 Signature Deck and Stringer Restoration

Re: Here I go again!! 1995 Sea Ray 220 Signature Deck and Stringer Restoration

I think the camera man was working on directing also, I think I hear "your putting it on backwards" in there and then you figured that you did put the second piece of plywood on backwards!!


Great work Jay have you thought about rebadging the boat SeaJay? I figure you should since it is likely to be better then a new boat once your done!

Keep up the good work my friend!
 

veritas honus

Lieutenant Commander
Joined
Jun 13, 2010
Messages
1,876
Re: Here I go again!! 1995 Sea Ray 220 Signature Deck and Stringer Restoration

Re: Here I go again!! 1995 Sea Ray 220 Signature Deck and Stringer Restoration

Jay,

You're an inspiration. You're doing some beautiful work. You are truely making lemonade!!! Keep it up!!!
 

Friscoboater

Captain
Joined
Jul 3, 2009
Messages
3,095
Re: Here I go again!! 1995 Sea Ray 220 Signature Deck and Stringer Restoration

Re: Here I go again!! 1995 Sea Ray 220 Signature Deck and Stringer Restoration

Thanks guys. I have another video that I will post tonight.
 

merc850

Commander
Joined
Jul 7, 2010
Messages
2,046
Re: Here I go again!! 1995 Sea Ray 220 Signature Deck and Stringer Restoration

Re: Here I go again!! 1995 Sea Ray 220 Signature Deck and Stringer Restoration

Your work has me so pumped that I started working on my boat seats, I managed to get them out before yesterday's snow storm and found that a squirrel (or squirrels) had chewed the passenger's seat foam and used the boat for a toilet.
You are the Norm Abrams of boatwork and you should produce a "This Old Boat" show on DVD with all your methods and sell it on ebay!
 

rickryder

Commander
Joined
Jun 24, 2010
Messages
2,722
Re: Here I go again!! 1995 Sea Ray 220 Signature Deck and Stringer Restoration

Re: Here I go again!! 1995 Sea Ray 220 Signature Deck and Stringer Restoration

Real nice work Jay! Love the video's.
 

Friscoboater

Captain
Joined
Jul 3, 2009
Messages
3,095
Re: Here I go again!! 1995 Sea Ray 220 Signature Deck and Stringer Restoration

Re: Here I go again!! 1995 Sea Ray 220 Signature Deck and Stringer Restoration

Ok, here is another video for you guys. I got the transom soaked with resin and applied a coat of 1.5oz CSM to the inside section. I did this to just water proof it.

I test fit it last night and it looks like I will need to fare the transom a bit to get the thing to fit flush.


ezmobee

Supreme Mariner
Joined
Mar 26, 2007
Messages
23,767
Re: Here I go again!! 1995 Sea Ray 220 Signature Deck and Stringer Restoration

Re: Here I go again!! 1995 Sea Ray 220 Signature Deck and Stringer Restoration

I enjoy your keen disregard for your garage floor. Mine is also ruined with epoxy drippings (which I will not be able to chisel off).
 

Texas Parrothead

Petty Officer 2nd Class
Joined
Sep 9, 2009
Messages
149
Re: Here I go again!! 1995 Sea Ray 220 Signature Deck and Stringer Restoration

Re: Here I go again!! 1995 Sea Ray 220 Signature Deck and Stringer Restoration

Thanks for the new vid!!:D

What are you plans for the Glastron? Are you keeping it or selling the first masterpiece?
 

wingmastr23

Petty Officer 1st Class
Joined
Oct 26, 2009
Messages
211
Re: Here I go again!! 1995 Sea Ray 220 Signature Deck and Stringer Restoration

Re: Here I go again!! 1995 Sea Ray 220 Signature Deck and Stringer Restoration

I enjoy your keen disregard for your garage floor. Mine is also ruined with epoxy drippings (which I will not be able to chisel off).

Hahahaha! Same here.....Does chiseling work? I never tried it - I used acetone and scrubbed like crazy.....if chiseling works I am gonna be very annoyed with myself that I did not try it...
 

clockwatcher

Petty Officer 1st Class
Joined
Nov 8, 2009
Messages
289
Re: Here I go again!! 1995 Sea Ray 220 Signature Deck and Stringer Restoration

Re: Here I go again!! 1995 Sea Ray 220 Signature Deck and Stringer Restoration

I wack the cured resin on top with a hammer and it pops right off floor.

Looks good Jay. A couple of things I learned is:
Cut 1/4" off the ends of the chip brush. It makes it stiffer and helps push out the air.
Cut the glass off the role and role it up and label if needed with a sharpie. Do this before you mix resin.
Pumps on the resin pale are a good thing especially when you're working in the boat.

One thing I wish I would have done is cover up the back and sides of the boat with cardboard or a drop cloth. I have resin drops and hand prints on the gelcoat that are going to be a pain to remove.
 

scipper77

Commander
Joined
Sep 30, 2008
Messages
2,106
Re: Here I go again!! 1995 Sea Ray 220 Signature Deck and Stringer Restoration

Re: Here I go again!! 1995 Sea Ray 220 Signature Deck and Stringer Restoration

Getting that resin off of the floor may be as big a task as the work you did with the resin.

I am really impressed by all the work you do. I's hard for me to tell if it's your level of skill or your work ethic that impresses me the most.

My floor is curling in a few spots where there are seams next to the dog house. It's not soft, I just think that 26 years of the top occasionally getting wet is starting to rot the top. If the foam underneath was wet it would rot from the bottom up and would be soft. I'm terrified to investigate further because I know I am not prepared to do what you are doing to your boat. Although watching your work makes me feel like I could if I had too.

Anyways, watching your videos is such a great tool for learning. I just wanted you to know what a great resource your video's really are.That boat is going to be better than new!! It's like doing a frame off restoration on a car.
 

Rellik546

Petty Officer 1st Class
Joined
Feb 5, 2011
Messages
270
Re: Here I go again!! 1995 Sea Ray 220 Signature Deck and Stringer Restoration

Re: Here I go again!! 1995 Sea Ray 220 Signature Deck and Stringer Restoration

jay

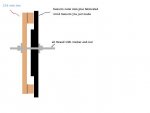
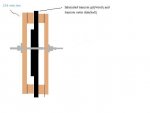
not sure how much space you have in the key hole to use another all thread and 2x4...but if there is room i think i devised a way you can clamp the outer wings as u call them. take a small piece of 2x4 maybe 6" long and attach it to the 2x4 that runs the width of the transom on the inside of the boat. its almost like adding feet to the 2x4 of coarse when you attach it all the pressure will be asserted over the 6" feet on each wing. the only thing i forgot to add in my picture was the 2x4 that will be used on the outside of the transom (outside the boat where the gimbal housing mounts up.)


I think this would work better than bags of concrete. or you can use both. just thought i would try to help
 

Attachments

  • clamp idea.jpg
    clamp idea.jpg
    11.3 KB · Views: 0

wallybme

Petty Officer 2nd Class
Joined
Dec 21, 2008
Messages
161
Re: Here I go again!! 1995 Sea Ray 220 Signature Deck and Stringer Restoration

Re: Here I go again!! 1995 Sea Ray 220 Signature Deck and Stringer Restoration

Thanks for building my confidence.
You can repeat the same procedure as you did to attach the two pieces of ply. This time arrange the holes for the threaded rods at distances where you plan to put the cement bags or at points that will clamp the transom to the skin. Drill the holes in the skin and transom then clamp with the rod and 2X6 (the length of the 2X6 should be about the width of the transom, and depending you may want to drill 3 holes) and the threaded rods as you did on the transom. Wrap the rods with tape to avoid the glue attaching to the rods...Remove rods and fill the holes after bonding. You can use one piece of 2X6 at the top and another at the bottom
 

Rellik546

Petty Officer 1st Class
Joined
Feb 5, 2011
Messages
270
Re: Here I go again!! 1995 Sea Ray 220 Signature Deck and Stringer Restoration

Re: Here I go again!! 1995 Sea Ray 220 Signature Deck and Stringer Restoration

wallybme i plan on using ur idea on my boat where i have the eye bolts for trailer/tow straps but jays transom doesnt appear to have any eyebolts or ubolts or whatever there called where wood part of the transom is, in his pictures they appear to be off the part of the swim deck. IMO id rather not drill anymore holes in the transom outer skin then i have too. fortunately on my boat i have required through hull bolts that i can use threaded thru. if Jay does too then i also recommend this method. if not then its up to jay if he wants to drill new hulls through the outer skin or not
 

jayboy76

Cadet
Joined
Mar 6, 2011
Messages
27
Re: Here I go again!! 1995 Sea Ray 220 Signature Deck and Stringer Restoration

Re: Here I go again!! 1995 Sea Ray 220 Signature Deck and Stringer Restoration

What a fantastic job and educational process. I have been following your progress reports since early Jan. 2011 and am amazed at your drive and skills.
I did have a question on what PL was until I saw the video of your material purchases. I looked it up on the Loctite site and they said "not recommended for water submersion applications". I realize you will seal it with glass and resin but will that be 100% waterproof? Would epoxy be more water proof?
Keep up the good work. I'm a Jay too and live in North TX also. Sure would like to know where you got your materials at a good discount to save me some research when I get to that point.
 

69rrvert

Petty Officer 1st Class
Joined
May 9, 2010
Messages
211
Re: Here I go again!! 1995 Sea Ray 220 Signature Deck and Stringer Restoration

Re: Here I go again!! 1995 Sea Ray 220 Signature Deck and Stringer Restoration

Thanks for the fiberglass schoolin' Jay. You really make it look easy. I have to get motivated on mine pretty quick before it gets too hot to grind. As for the garage floor, maybe you could make a trip to Wal-Mart and buy one of those cheap 8'x8' blue tarps to put over the floor. Then put the saw horses on top of the tarp and let it catch the excess glue. Thanks, Steven
 

Rellik546

Petty Officer 1st Class
Joined
Feb 5, 2011
Messages
270
Re: Here I go again!! 1995 Sea Ray 220 Signature Deck and Stringer Restoration

Re: Here I go again!! 1995 Sea Ray 220 Signature Deck and Stringer Restoration

Hey jay

I just scored at my local home depot...got 3 free 1/10lb tubes of marine 5200. not sure if you used it on your last build or ur current build. but do you think that stuff would be good to use to bond the transom pieces together? i already have a couple tubes to seal screw holes and such. and plan on using PB to bed my stringers. So i was thinking about using it to bond my transom.

After posting a solution to your clamping problem...i got to thinking. you may want to put feet on both sides inner side of transom and outer side of transom that way the backing pressure of the outside 2x4 isnt around the keyhole. like how you disgust in your movie about clamping the 2 transom pieces together....you said it looses clamping force the further away it is from the all thread. well if you put feet on the inner and outer so its raised off the transom on both sides by the all thread. it will localize the pressure onto the wings and you could design feet to get the best clamping coverage.
 

Attachments

  • clamp idea.jpg
    clamp idea.jpg
    11.1 KB · Views: 0

Friscoboater

Captain
Joined
Jul 3, 2009
Messages
3,095
Re: Here I go again!! 1995 Sea Ray 220 Signature Deck and Stringer Restoration

Re: Here I go again!! 1995 Sea Ray 220 Signature Deck and Stringer Restoration

I enjoy your keen disregard for your garage floor. Mine is also ruined with epoxy drippings (which I will not be able to chisel off).

My garage floor is really slick and the stuff does not stuck that bad. A scraper gets it up.

Thanks for the new vid!!:D

What are you plans for the Glastron? Are you keeping it or selling the first masterpiece?

We will be selling it when the weather gets good and hot. I will have it on the lake for buyers to test drive. The feel of the wheel makes the deal.

Hahahaha! Same here.....Does chiseling work? I never tried it - I used acetone and scrubbed like crazy.....if chiseling works I am gonna be very annoyed with myself that I did not try it...

Yes.

I wack the cured resin on top with a hammer and it pops right off floor.

Looks good Jay. A couple of things I learned is:
Cut 1/4" off the ends of the chip brush. It makes it stiffer and helps push out the air.
Cut the glass off the role and role it up and label if needed with a sharpie. Do this before you mix resin.
Pumps on the resin pale are a good thing especially when you're working in the boat.

One thing I wish I would have done is cover up the back and sides of the boat with cardboard or a drop cloth. I have resin drops and hand prints on the gelcoat that are going to be a pain to remove.

That is a great tip. I will wrap the back of the boat in plastic.
Getting that resin off of the floor may be as big a task as the work you did with the resin.

I am really impressed by all the work you do. I's hard for me to tell if it's your level of skill or your work ethic that impresses me the most.

My floor is curling in a few spots where there are seams next to the dog house. It's not soft, I just think that 26 years of the top occasionally getting wet is starting to rot the top. If the foam underneath was wet it would rot from the bottom up and would be soft. I'm terrified to investigate further because I know I am not prepared to do what you are doing to your boat. Although watching your work makes me feel like I could if I had too.

Anyways, watching your videos is such a great tool for learning. I just wanted you to know what a great resource your video's really are.That boat is going to be better than new!! It's like doing a frame off restoration on a car.

I am glad that I could help. It is my intention to make a resource for people to formulate there own plan.

jay

not sure how much space you have in the key hole to use another all thread and 2x4...but if there is room i think i devised a way you can clamp the outer wings as u call them. take a small piece of 2x4 maybe 6" long and attach it to the 2x4 that runs the width of the transom on the inside of the boat. its almost like adding feet to the 2x4 of coarse when you attach it all the pressure will be asserted over the 6" feet on each wing. the only thing i forgot to add in my picture was the 2x4 that will be used on the outside of the transom (outside the boat where the gimbal housing mounts up.)


I think this would work better than bags of concrete. or you can use both. just thought i would try to help

That is another great idea. I think that is a waaaay better idea!

What a fantastic job and educational process. I have been following your progress reports since early Jan. 2011 and am amazed at your drive and skills.
I did have a question on what PL was until I saw the video of your material purchases. I looked it up on the Loctite site and they said "not recommended for water submersion applications". I realize you will seal it with glass and resin but will that be 100% waterproof? Would epoxy be more water proof?
Keep up the good work. I'm a Jay too and live in North TX also. Sure would like to know where you got your materials at a good discount to save me some research when I get to that point.

I got your PM, and I will respond is a bit. You cannot mix epoxy and poly so that is why I used the PL glue.

Thanks for the fiberglass schoolin' Jay. You really make it look easy. I have to get motivated on mine pretty quick before it gets too hot to grind. As for the garage floor, maybe you could make a trip to Wal-Mart and buy one of those cheap 8'x8' blue tarps to put over the floor. Then put the saw horses on top of the tarp and let it catch the excess glue. Thanks, Steven

When I start doing the stringers, I think I might so that. Although the tarps at my home depot are not all that cheap.


Ok now for a little update. Yesterday I was at work on a ladder, and took a bad fall. When I landed I messed up my ankle really bad, and the drill bit on the drill I was holding stabbed into my forearm about 4 inches. I could hardly move my hand yesterday, but the xrays do not show and tendon or bone damage.

Sooooo, I am not sure if I will be able to work on the boat at all this weekend. However, if I improve as much as I did overnight by tomorrow, I should be good to go.

People who know me well, know I will not stay down for long. I cannot stand sitting around!!!!
 
Top