Here I go again!! 1995 Sea Ray 220 Signature Deck and Stringer Restoration SPLASHED!

Rellik546

Petty Officer 1st Class
Joined
Feb 5, 2011
Messages
270
Re: Here I go again!! 1995 Sea Ray 220 Signature Deck and Stringer Restoration

Re: Here I go again!! 1995 Sea Ray 220 Signature Deck and Stringer Restoration

by the way, read the thread on ur glastron, as well as all of this very informative i have learned alot. the videos are very helpful.

I considered using seacast and nida core. i decided on nida core (3M owns the company now) trusted name. but then i ran into budget issues so im back to ply for my stringers and transom

Keep up the good work. you help give us with less skills the motivation to attempt something thats over our heads but manageable with alittle guidance and help
 

69rrvert

Petty Officer 1st Class
Joined
May 9, 2010
Messages
211
Re: Here I go again!! 1995 Sea Ray 220 Signature Deck and Stringer Restoration

Re: Here I go again!! 1995 Sea Ray 220 Signature Deck and Stringer Restoration

Jay,

Get you a piece of 2" or 3" PVC and split it in two down the sides to make a chute. Basically, the same as a chute on a cement truck. If the transom on your boat is like mine, there is plenty of room to do this. I think the PVC would be slick/smooth enough to allow the Seacast to flow down it. Thanks, Steven
 

archbuilder

Vice Admiral
Joined
Sep 12, 2009
Messages
5,697
Re: Here I go again!! 1995 Sea Ray 220 Signature Deck and Stringer Restoration

Re: Here I go again!! 1995 Sea Ray 220 Signature Deck and Stringer Restoration

It doesn't "flow so much"....weird stuff, sort of chunky, but it does start to "flow out" after setting for a while....kind of like peanut butter with hair in it setting in the sun! One key is building a funnel with a big mouth on it, pouring it in, then being able to consolidate the material with a rod or stick. My funnel was about 14" wide by 6".....it tapered down to about 1-1/2" by 12", worked great but still took shoving some of the material in place with at rod.
 

superpop

Master Chief Petty Officer
Joined
Mar 5, 2006
Messages
869
Re: Here I go again!! 1995 Sea Ray 220 Signature Deck and Stringer Restoration

Re: Here I go again!! 1995 Sea Ray 220 Signature Deck and Stringer Restoration

I think if I was doing it I would build a jig and pour it in sections. I would go to Home Depot and buy a piece of 24" wide X 48" tall white melamine shelving and create a template of what the inside face if the transom will look like once poured. Then cut the piece into 6" horizontal strips and create a jig to hold all the pieces together. That way you start at the bottom with the first piece and have tons of room to pour the first 6 inches or so, then add the next section and keep pouring till you reach the top. Once it is cured, remove the pieces and bed that new transom in with fiberglass and it should be solid as a rock and you don't have to jack with trying to get thick gooey material down a funnel and worry about voids in the transom.
 

dorelse

Chief Petty Officer
Joined
Feb 24, 2003
Messages
624
Re: Here I go again!! 1995 Sea Ray 220 Signature Deck and Stringer Restoration

Re: Here I go again!! 1995 Sea Ray 220 Signature Deck and Stringer Restoration

It doesn't "flow so much"....weird stuff, sort of chunky, but it does start to "flow out" after setting for a while....kind of like peanut butter with hair in it setting in the sun! One key is building a funnel with a big mouth on it, pouring it in, then being able to consolidate the material with a rod or stick. My funnel was about 14" wide by 6".....it tapered down to about 1-1/2" by 12", worked great but still took shoving some of the material in place with at rod.

This was my experience with Seacast as well...it doesn't flow all that much (think a little watery playdough), until you want it to say where it is...then it'll 'slump' and flow from supporting its own weight.

I used one of those cheesy neck/back massager's to vibrate against the hull and help get it to settle in, and also used a dowel to help work it in. BUT...I didn't have the huge transom you do, so mine was more manageable.

Good luck!
 

clockwatcher

Petty Officer 1st Class
Joined
Nov 8, 2009
Messages
289
Re: Here I go again!! 1995 Sea Ray 220 Signature Deck and Stringer Restoration

Re: Here I go again!! 1995 Sea Ray 220 Signature Deck and Stringer Restoration

I got a really good compressor, but I think I will get that 7' grinder with the flap wheel. I need to turn on the afterburners.

I used one of these 5"/6" 120v grinders. It went to town. It's an old one I found on the side of the road beside my house (must have fell out of a trailer). You're welcome to it if you're around Grapevine.

D28065_1.jpg
 

LippCJ7

Vice Admiral
Joined
Sep 20, 2010
Messages
5,431
Re: Here I go again!! 1995 Sea Ray 220 Signature Deck and Stringer Restoration

Re: Here I go again!! 1995 Sea Ray 220 Signature Deck and Stringer Restoration

I did not video anything......


NO VIDEO? What the heck are we supposed to do now?
 

Last Mohican

Chief Petty Officer
Joined
Aug 27, 2010
Messages
573
Re: Here I go again!! 1995 Sea Ray 220 Signature Deck and Stringer Restoration

Re: Here I go again!! 1995 Sea Ray 220 Signature Deck and Stringer Restoration

How long is the working time for seacast? Could you not use something like a large grout bag with the end cut off to create a fairly large opening. That way you could put some pressure behind it to get it where you want it. Just a thought.
 

Friscoboater

Captain
Joined
Jul 3, 2009
Messages
3,095
Re: Here I go again!! 1995 Sea Ray 220 Signature Deck and Stringer Restoration

Re: Here I go again!! 1995 Sea Ray 220 Signature Deck and Stringer Restoration

Thanks for all the great ideas guys. I spent all day Monday making different molds to see if the sea cast would work. I am not sure if this will be the way to go. It just is not lending it well to pouring. I have a little while to worry about it, so it is not a big deal now.

I had to take a last minute business trip, and I hope to be back by the weekend to get some more work done.
 

the_mayor

Cadet
Joined
Sep 4, 2007
Messages
19
Re: Here I go again!! 1995 Sea Ray 220 Signature Deck and Stringer Restoration

Re: Here I go again!! 1995 Sea Ray 220 Signature Deck and Stringer Restoration

I tune in every Sunday to get my fix on your videos and pictures of your progress. i'm sad to see no updated posts this weekend. Hope everything is okay.
 

clockwatcher

Petty Officer 1st Class
Joined
Nov 8, 2009
Messages
289
Re: Here I go again!! 1995 Sea Ray 220 Signature Deck and Stringer Restoration

Re: Here I go again!! 1995 Sea Ray 220 Signature Deck and Stringer Restoration

I'd imagine there is a cloud of white dust and one itchy Jay somewhere in Frisco, Texas this evening...Or maybe he's out of town.
 

archbuilder

Vice Admiral
Joined
Sep 12, 2009
Messages
5,697
Re: Here I go again!! 1995 Sea Ray 220 Signature Deck and Stringer Restoration

Re: Here I go again!! 1995 Sea Ray 220 Signature Deck and Stringer Restoration

I keep hearing a grinding noise coming from the south.....I'm sure that is probably him!
 

LippCJ7

Vice Admiral
Joined
Sep 20, 2010
Messages
5,431
Re: Here I go again!! 1995 Sea Ray 220 Signature Deck and Stringer Restoration

Re: Here I go again!! 1995 Sea Ray 220 Signature Deck and Stringer Restoration

Somehow I bet you guys are dead on, I hope the weather were expecting north of him doesn't slow Jay down any....
 

Friscoboater

Captain
Joined
Jul 3, 2009
Messages
3,095
Re: Here I go again!! 1995 Sea Ray 220 Signature Deck and Stringer Restoration

Re: Here I go again!! 1995 Sea Ray 220 Signature Deck and Stringer Restoration

Everything is great here. Business trips have killed me this past week. I was up in Oklahoma last week, and I was in Houston this week, and got back very late last night. I got some grinding done this weekend, but it seems like there is just so much to do. I think I might be over doing it a little with the grinding. I have been doing every square inch from side to side. I realized that I only need to grind what I am going to glass too. The front should go faster. I really cannot video much due to all the dust. It gets everywhere and ruins electronics, so that is why I have not shot any videos. Once all this nasty stuff is done, the videos will start up with a fury when I start putting in new would.
 

MTribe08

Senior Chief Petty Officer
Joined
Oct 25, 2008
Messages
680
Re: Here I go again!! 1995 Sea Ray 220 Signature Deck and Stringer Restoration

Re: Here I go again!! 1995 Sea Ray 220 Signature Deck and Stringer Restoration

So maybe this was a blessing, as I get to make it just the way i like it.
I agree. I like my boat so much more after I finished the project. I feel better about "Wet Kids" getting in my boat, knowing I have everything sealed the way I want it, and I like having the captains chair at the helm so much more. The snap in carpet was a huge upgrade as well.
I haven't seen a picture that I can remember of your seating arrangement. Do you have a captains chair or back to back at the helm?
 

69rrvert

Petty Officer 1st Class
Joined
May 9, 2010
Messages
211
Re: Here I go again!! 1995 Sea Ray 220 Signature Deck and Stringer Restoration

Re: Here I go again!! 1995 Sea Ray 220 Signature Deck and Stringer Restoration

Jay,

Have you decided if you are going to use the SeaCast for the transom yet?
 

Friscoboater

Captain
Joined
Jul 3, 2009
Messages
3,095
Re: Here I go again!! 1995 Sea Ray 220 Signature Deck and Stringer Restoration

Re: Here I go again!! 1995 Sea Ray 220 Signature Deck and Stringer Restoration

Jay,

Have you decided if you are going to use the SeaCast for the transom yet?

Actually, I am going back with wood. The budget just keep growing, and I need to keep focused. I need this boat to last be 10 years, and wood prepared right, will do just fine.

I cannot believe it, I am actually ready to start putting in new wood. It has taken three full weekends to grind all the way to the bow. I ended up having to take the whole deck out along with the bow boxes. Oh well, just a little more wood, right? I left the first 2' of the stingers in the front as a reference, but I might end up taking all of that out. I cannot believe how long it has taken with the deconstruction of the boat, and I hope that the reconstruction does not take as long. February really messed me up with all the snow and ice we had, and it really stopped me from working on the boat.

So here is my plan. I will go out an get all the wood, resin, and glass this week. Next weekend I hope to get the transom at least in the hull ready for tabbing, and maybe get the stringers roughed in. It is a pretty tall order, but I need to hit the afterburners.

I need the help from all the veterans over the next month for sure, as i know I will have alot of questions.

One question so far. How in the heck do we use foam and still allow for drainage? I have lost sleep over this, and i need to hear from you guys.


Here are some pictures and some video. This first video is from last weekend. The new Video is still rendering.


And some pictures

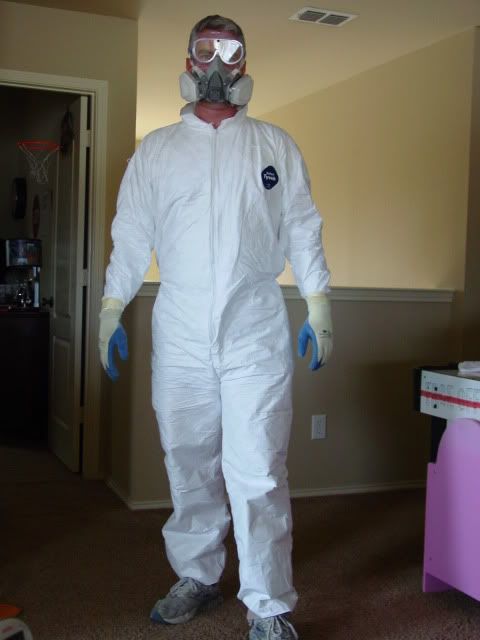
Safety First


DSC00594.jpg


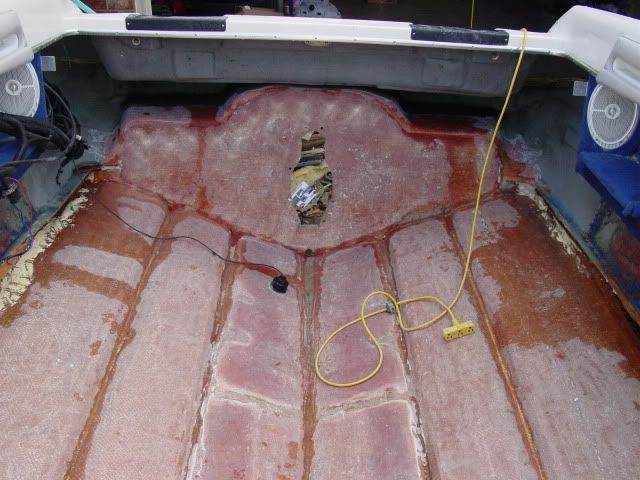
Just washed out the dust for the tenth time

DSC00600.jpg


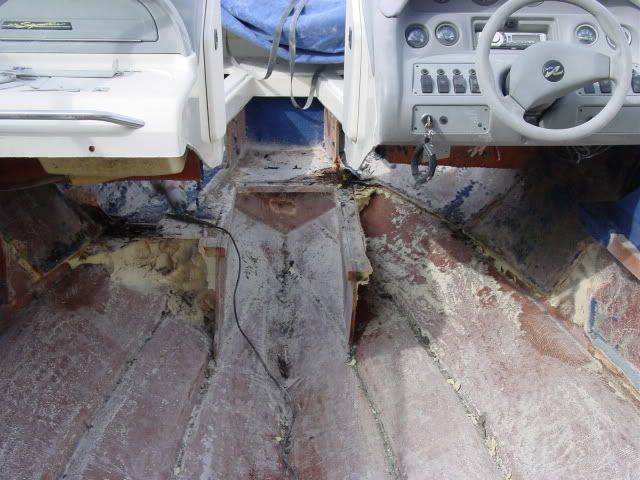
This is a shot from yesterday, the section is actually bare now.

DSC00601.jpg
 

tinkeringwackyone

Chief Petty Officer
Joined
May 2, 2008
Messages
415
Re: Here I go again!! 1995 Sea Ray 220 Signature Deck and Stringer Restoration

Re: Here I go again!! 1995 Sea Ray 220 Signature Deck and Stringer Restoration

looking good Jay, keep up the good work
 

69rrvert

Petty Officer 1st Class
Joined
May 9, 2010
Messages
211
Re: Here I go again!! 1995 Sea Ray 220 Signature Deck and Stringer Restoration

Re: Here I go again!! 1995 Sea Ray 220 Signature Deck and Stringer Restoration

One question so far. How in the heck do we use foam and still allow for drainage? I have lost sleep over this, and i need to hear from you guys.

Jay,

Somewhere on this site is thread talking about drainage. If I remember correctly, they were saying to place a small rope (3/8") against the stringer before adding the foam. Once the foam has cured, pull the rope out and it will leave a channel for the water to drain to the back of the boat and into the bilge. Thanks, Steven
 

clockwatcher

Petty Officer 1st Class
Joined
Nov 8, 2009
Messages
289
Re: Here I go again!! 1995 Sea Ray 220 Signature Deck and Stringer Restoration

Re: Here I go again!! 1995 Sea Ray 220 Signature Deck and Stringer Restoration

Looking good Jay. That grinding seems like it?s never going to end. If you?re using poly, you?ll have this knocked out in no time.

I thought about drainage for while too. I ended up taping soaker hose down where the stringers meet the hull and ran them to drain holes in the bilge. I figure I can use the shop vac to pull any water that may get in. But I don?t expect much water to get in there. Rope might work too, but that foam has a hell of a grip.
 
Top