'96 lund tyee 1850 floor rebuild and foam replacement.

brunolund

Chief Petty Officer
Joined
Jan 26, 2008
Messages
417
colour!!!
 

Attachments

  • photo335467.jpg
    photo335467.jpg
    217.6 KB · Views: 3
  • photo335468.jpg
    photo335468.jpg
    287.8 KB · Views: 3
  • photo335469.jpg
    photo335469.jpg
    272 KB · Views: 3

brunolund

Chief Petty Officer
Joined
Jan 26, 2008
Messages
417
with masking removed
 

Attachments

  • photo335506.jpg
    photo335506.jpg
    307.4 KB · Views: 8
  • photo335507.jpg
    photo335507.jpg
    244.6 KB · Views: 8
  • photo335508.jpg
    photo335508.jpg
    310.4 KB · Views: 8

brunolund

Chief Petty Officer
Joined
Jan 26, 2008
Messages
417
[No message]
 

Attachments

  • photo335509.jpg
    photo335509.jpg
    240 KB · Views: 2
  • photo335510.jpg
    photo335510.jpg
    373.5 KB · Views: 2

brunolund

Chief Petty Officer
Joined
Jan 26, 2008
Messages
417
installed the gimbal ring first as this will lock the transom board location. now i can drill holes for everything else and not worry about them being off a little. will reapply epoxy in the holes before mounting anything of course.
 

Attachments

  • photo337584.jpg
    photo337584.jpg
    250.1 KB · Views: 5

brunolund

Chief Petty Officer
Joined
Jan 26, 2008
Messages
417
i also wetsanded and polished the paint before mounting the gimbal ring. now to do the same on the sides!😖
 

havoc_squad

Senior Chief Petty Officer
Joined
Mar 5, 2011
Messages
705
I've considered getting a decent used or restoring an aluminum I/O open bow bowrider myself a few years ago, but everyone selling them thinks they're made of solid gold whether peak boating season or in the middle of December.

Add to it most of them look like semi-abandoned/neglected boats left to rot and nothing serviced on them, add in probably 30% to 50% of them have engine freeze damage.
 

brunolund

Chief Petty Officer
Joined
Jan 26, 2008
Messages
417
that’s actually how i acquired this boat. got it about 14? years ago with a cracked engine. i knew about it before hand, so i got it cheap. found a rebuilt engine from a jimmy. changed the welsh plugs to brass, head gaskets were good to go. used marine intake, carb, exhaust and accessories. changed the bellows and shift cable and gimbal bearing. a little bit of tuning and a good cleaning, and good to go. or so i thought. then i found the weight, and that’s where this thread originally started!! seems so long ago. but i’ve got lots of good use out of it before this last tear down.
 

brunolund

Chief Petty Officer
Joined
Jan 26, 2008
Messages
417
[No message]
 

Attachments

  • photo338043.jpg
    photo338043.jpg
    257.3 KB · Views: 11
  • photo338044.jpg
    photo338044.jpg
    301.8 KB · Views: 11
  • photo338045.jpg
    photo338045.jpg
    295.7 KB · Views: 11

brunolund

Chief Petty Officer
Joined
Jan 26, 2008
Messages
417
foam from US composites. got their 80 cuft kit. wish both parts came in gallon containers for ease of use, but i just poured from the five gallon pail into a 2 litre oil i had, them both parts into paint mixing containers (separately). this made it easy to keep both parts equal. i then poured both parts into a solo cup to mix. this meant very small batches, but as i’ve never used this stuff before, i’d prefer to take my time.
 

Attachments

  • photo338046.jpg
    photo338046.jpg
    267.3 KB · Views: 4
  • photo338047.jpg
    photo338047.jpg
    346.3 KB · Views: 4

brunolund

Chief Petty Officer
Joined
Jan 26, 2008
Messages
417
this is poured after mixing for exactly 30 seconds. wasn’t sure exactly how it would react, so after watching many videos, i assumed it would start to foam up around the 30 second mark. not so. close, but there was way more time to work with it than i thought. i had probably closer to 90 seconds before the reaction started. i could actually feel the heat start building in the cup just before the foaming started. the next few pours i mixed longer and poured it a bit thicker. either way, this stuff seems very easy to work with.
 

Attachments

  • photo338048.jpg
    photo338048.jpg
    311.7 KB · Views: 10

brunolund

Chief Petty Officer
Joined
Jan 26, 2008
Messages
417
after about ten mins from the first pour, it’s already quite stiff. again, i’m doing this one cup at a time, so gonna be a bit of a task. might get some one litter pails to mix in.
 

Attachments

  • photo338049.jpg
    photo338049.jpg
    275 KB · Views: 12
  • photo338050.jpg
    photo338050.jpg
    325 KB · Views: 12
  • photo338051.jpg
    photo338051.jpg
    304.7 KB · Views: 12

brunolund

Chief Petty Officer
Joined
Jan 26, 2008
Messages
417
even after scraping out the cups as best i could, after the reaction was over, there was about an inch of solid foam in the bottom of the cups.
 

Attachments

  • photo338052.jpg
    photo338052.jpg
    247.8 KB · Views: 2
  • photo338053.jpg
    photo338053.jpg
    221.1 KB · Views: 2

Sparike

Seaman Apprentice
Joined
Aug 29, 2019
Messages
46
That foaming was quite the experience wasn't it?!? I still was concerned about trapping water under the floor. Afterthought is what I've been running into. Are you planning on putting a trolling motor on when you are done? I did & wish I would have made a compartment under the floor towards the front to store the batteries. I did get them tucked up under the front, but took up storage space I would have liked to use otherwise. I need to update my post, I ran into a time issue & had to put some of the old interior back in. Vacation in July & 7 girls were wanting to go tubing!! One thing I did that I think was great is I used a composite for the dash-- wasn't cheap, but it'll never rot & holds the windshield great. Anyways---your restore looks fantastic, can't wait to see the finished product--Thanks a ton for sharing, your project helped me out on mine
 

brunolund

Chief Petty Officer
Joined
Jan 26, 2008
Messages
417
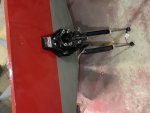
i do have an older bow mount trolling motor that was on it. i had the batteries mounted under the front deck, but didn’t use them very often. i’ll wire it so i can use it again, but will make it so they are easy to remove.

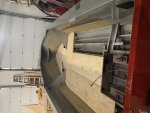
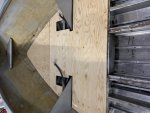
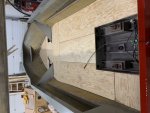
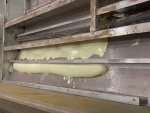
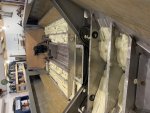
ya, the foam was interesting. pretty easy, but i went slow. still i had some i had to cut out. working on the floor tonight, i left 1/8” gaps for carpet, and found out i need more. going to have 1/4” for single carpet, and 3/8” for where two pieces of carpet come together. so i have to trim the floor wood before i coat it with epoxy.
 
Top