'96 lund tyee 1850 floor rebuild and foam replacement.

Sparike

Seaman Apprentice
Joined
Aug 29, 2019
Messages
46
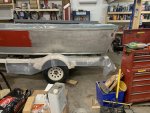
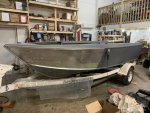
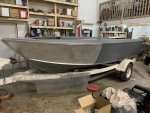
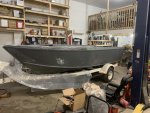
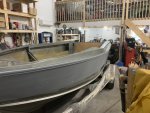
I called US Composites this morning because I was curious if you should try & seal the foam if you pour to much & have to cut it. The lady I talked to said you can seal it with the epoxy resin. I still have the foam to remove from my boat & one piece of floor to epoxy, I see a test coming in the future, I'll let you know how it goes!
 

brunolund

Chief Petty Officer
Joined
Jan 26, 2008
Messages
417
that’s good to know, i’m still working on the paint. stripping about 4-6 feet at a time, so i can get epoxy primer on it before it oxidizes. very slow going with kids home all the time!! but i’m also very pleased that 95% of the scratches in the boat were just in the paint. hopefully we’ll be able to post some pics soon.
 

brunolund

Chief Petty Officer
Joined
Jan 26, 2008
Messages
417
pics of the transom going in. the aluminum lip needs to be bent back into place
 

Attachments

  • photo329805.jpg
    photo329805.jpg
    285.6 KB · Views: 9
  • photo329806.jpg
    photo329806.jpg
    300.2 KB · Views: 9
  • photo329807.jpg
    photo329807.jpg
    323.4 KB · Views: 9

brunolund

Chief Petty Officer
Joined
Jan 26, 2008
Messages
417
mid way through bending. i was able to get it 97% of the way flat against the wood. i will be able to lower the wood a bit, then bend flange down and flat, then lift transom wood back up under it.
 

Attachments

  • photo329809.jpg
    photo329809.jpg
    294.9 KB · Views: 5
  • photo329810.jpg
    photo329810.jpg
    304.3 KB · Views: 5
  • photo329811.jpg
    photo329811.jpg
    294.5 KB · Views: 5

brunolund

Chief Petty Officer
Joined
Jan 26, 2008
Messages
417
installing the rub rail to the cap first. this was held on with blind rivets. the clecos sure helped hold the shape.
 

Attachments

  • photo329812.jpg
    photo329812.jpg
    247.9 KB · Views: 10
  • photo329813.jpg
    photo329813.jpg
    306.4 KB · Views: 10
  • photo329814.jpg
    photo329814.jpg
    337.1 KB · Views: 10

brunolund

Chief Petty Officer
Joined
Jan 26, 2008
Messages
417
it took quite a bit of wiggling and tapping to get the sidewalls to fit the rub rail. there is a grove that the sheet needs to sit in. used lots of clecos here. the side walls were held on with solid rivets, so that’s what i used again. only “smiled” a few of them. think there was around 100 of each rivet holding the cap on.
 

Attachments

  • photo329815.jpg
    photo329815.jpg
    302.3 KB · Views: 6
  • photo329816.jpg
    photo329816.jpg
    294.1 KB · Views: 6
  • photo329817.jpg
    photo329817.jpg
    317.5 KB · Views: 6

brunolund

Chief Petty Officer
Joined
Jan 26, 2008
Messages
417
so after finding out that previous owner painted the boat with i assume lacquer, i’m taking it down to bare aluminum. cleaning up the aluminum with 60 grit on RO sander, and spraying with epoxy primer. then will do a bit of filler on some small dents, urethane primer and then red and grey again.
 

Attachments

  • photo329804.jpg
    photo329804.jpg
    331.8 KB · Views: 8
  • photo329818.jpg
    photo329818.jpg
    328.4 KB · Views: 8
  • photo329819.jpg
    photo329819.jpg
    328.9 KB · Views: 8

brunolund

Chief Petty Officer
Joined
Jan 26, 2008
Messages
417
one side done!! i’m getting much better at spraying the epoxy. i’m issuing a cheap, supposedly hvlp gun, so i don’t expect perfection, but i’m pretty happy with it so far. now to do the other side and bottom.
 

Attachments

  • photo329820.jpg
    photo329820.jpg
    332.3 KB · Views: 11
  • photo329821.jpg
    photo329821.jpg
    321.5 KB · Views: 11
  • photo329822.jpg
    photo329822.jpg
    333.2 KB · Views: 11

brunolund

Chief Petty Officer
Joined
Jan 26, 2008
Messages
417
finally got around to removing the rest of the old paint. had some issues with new paint stripper. doesn’t work worth a damn. ended up getting some aircraft paint remover which i should have done in the first place. it worked amazing.
 

Attachments

  • photo331866.jpg
    photo331866.jpg
    260.6 KB · Views: 3
  • photo331867.jpg
    photo331867.jpg
    293.9 KB · Views: 3

brunolund

Chief Petty Officer
Joined
Jan 26, 2008
Messages
417
this is the stuff i ended up using. i highly recommend it. funny thing, it’s called aircraft paint stripper, but it says “not for use on aircraft!”
 

Attachments

  • photo331868.jpg
    photo331868.jpg
    311.1 KB · Views: 5
  • photo331869.jpg
    photo331869.jpg
    328.5 KB · Views: 5

brunolund

Chief Petty Officer
Joined
Jan 26, 2008
Messages
417
got some high build primer on, more issues, but all my fault. good learning experience. now to sand and spray sealer.
 

Attachments

  • photo333409.jpg
    photo333409.jpg
    264.3 KB · Views: 8

brunolund

Chief Petty Officer
Joined
Jan 26, 2008
Messages
417
finally started taping and masking!!! got the tungsten metallic sprayed tonight, but haven’t taken pics yet. will get some tomorrow.
 

Attachments

  • photo334599.jpg
    photo334599.jpg
    263.7 KB · Views: 6
  • photo334600.jpg
    photo334600.jpg
    310 KB · Views: 6
  • photo334601.jpg
    photo334601.jpg
    327.7 KB · Views: 6

brunolund

Chief Petty Officer
Joined
Jan 26, 2008
Messages
417
finally some colour!! more peel than i’d like, but i’ll see what it looks like in the sun before i decide if i’m going to sand and respray it.
now to wait a couple days and spray the red!
 

Attachments

  • photo334630.jpg
    photo334630.jpg
    253.2 KB · Views: 8
  • photo334631.jpg
    photo334631.jpg
    326.1 KB · Views: 8
  • photo334632.jpg
    photo334632.jpg
    316.1 KB · Views: 8

kcassells

Fleet Admiral
Joined
Oct 16, 2012
Messages
8,668
You may be able to buff out the peel. I'm not a sprayer/painter so maybe someone else will chime in.
 

brunolund

Chief Petty Officer
Joined
Jan 26, 2008
Messages
417
i will definitely try, although it’s a metallic, so i’m not sure if that’s a good idea.
 

brunolund

Chief Petty Officer
Joined
Jan 26, 2008
Messages
417
got some real bad tiger stripping on the first coat. seems like i was holding the gun too close. thought i was about 5” away. but went to what i figure was 8”, and next coats were much better. overlap was the same, seemed to be the air was blowing the stripes in when close.
 

Attachments

  • photo334998.jpg
    photo334998.jpg
    251.9 KB · Views: 3
  • photo334999.jpg
    photo334999.jpg
    242.4 KB · Views: 3
Top