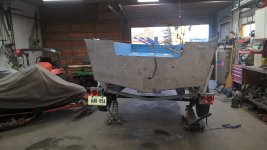
Where do I belong? Alum Goods 1687, SS16 Clone?

renns

Petty Officer 1st Class
Joined
Dec 20, 2017
Messages
316
How do you like the spray foam? It's one of the options I'm considering for my garage too.
It was applied by the previous owner when the place was built. Seems to make a pretty air-tight box, which is good. Of course, two roll-up doors, and three single-pane windows add some leaks to that box. From crawling up in the attic space, it looks like they only sprayed about 2" thick, but at about R5/inch, that's R10.
 

ShoestringMariner

Lieutenant Commander
Joined
Apr 18, 2015
Messages
1,593
Our workshop is about 24x36, with two garage doors on one end, 10' ceiling. There is a layer of spray foam in the walls and ceiling. I've got an old 230v construction heater kicking around. I think I need to wire up a different plug so it will connect to my welder receptacle. Should add that to my list.
Doors insulated? If not clad the inside with styrofoam SM. I don’t think a 230v electric will keep that size very warm. I’m 21x15. If you have the power in the panel, you could add a second heater, but for the cost, you may still be better off with a hot dawg or small gas shop heater. I’m sure your construction heater will keep the chill off at least though?
 

renns

Petty Officer 1st Class
Joined
Dec 20, 2017
Messages
316
The doors are roll-up style, and the spray foam guys shot a layer of foam along the back of each panel. I suppose it's better than nothing!
 

ShoestringMariner

Lieutenant Commander
Joined
Apr 18, 2015
Messages
1,593
The doors are roll-up style, and the spray foam guys shot a layer of foam along the back of each panel. I suppose it's better than nothing!
I bet it makes a difference. I have a 4 panel wooden roll up door. I screwed styrofoam am to it. Going on 20 years
 

BWR1953

Admiral
Joined
Jan 23, 2009
Messages
6,178
It was applied by the previous owner when the place was built. Seems to make a pretty air-tight box, which is good. Of course, two roll-up doors, and three single-pane windows add some leaks to that box. From crawling up in the attic space, it looks like they only sprayed about 2" thick, but at about R5/inch, that's R10.
Thanks. (y) :)
 

renns

Petty Officer 1st Class
Joined
Dec 20, 2017
Messages
316
Looking good!!

One thing to keep in mind, if you tested water leaks prior to removing the paint, you might want to test again since you plan to leave it bare. The paint may have helped "seal" some of the rivets. Might be a worry wort, but something to ponder.

SHSU
Weather is well above freezing for the next couple days, so I hope to get a chance to get the boat outside to leak check again. I have riveted a small patch over the area where the corrosion pinhole was found, and applied G-Flex sparingly around all the rivet heads below the waterline. If any other leaks appear, I have solid rivets and tools to replace them now, so I'll proceed in that fashion prior to G-Flex'ing the inside.
 

ShoestringMariner

Lieutenant Commander
Joined
Apr 18, 2015
Messages
1,593
Weather is well above freezing for the next couple days, so I hope to get a chance to get the boat outside to leak check again. I have riveted a small patch over the area where the corrosion pinhole was found, and applied G-Flex sparingly around all the rivet heads below the waterline. If any other leaks appear, I have solid rivets and tools to replace them now, so I'll proceed in that fashion prior to G-Flex'ing the inside.
Weigh her down!! Crazy winds today
 

renns

Petty Officer 1st Class
Joined
Dec 20, 2017
Messages
316
Weigh her down!! Crazy winds today
Yeah, I bailed on today once the winds picked up! My son's snowmobile trailer went sailing across the yard and t-boned our maple tree. Hopefully I'll get a chance before cold weather returns.
 

renns

Petty Officer 1st Class
Joined
Dec 20, 2017
Messages
316
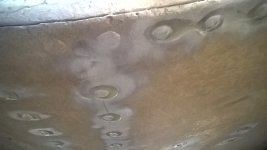
Got the water-test done! I ended up using trolley jacks to tilt the boat/trailer fore/aft and side-to-side, leaving it in each position about 30 minutes. There was a couple drips that passed through one rivet on the bottom, which I'll replace before going any further.
WP_20211212_16_10_50_Pro.jpg
There was a drip forming at the bottom of the transom, right where the bottom skin is riveted to the transom. There are four or five rivets that are heavily worn, and could use replacing as well. I left the G-Flex off those, waiting for a suitable bucking helper to arrive on scene. Hopeful replacing rivets will tighten the joint and address that issue. See pic below.
WP_20211212_16_39_23_Pro.jpg
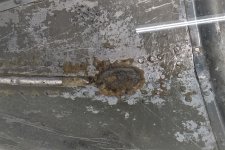
The last leak area was up front, at the bottom of the keel area. It was by far the worst, dripping about 1 drip every 10 seconds with about a foot of water in the hull at that area. There is a big blob of dark 'goop' in the hull at that area that looks like it could be original. I'm open to recommendations on how to deal with this. Should I dig out the goop, and re-seal that area with G-Flex?
WP_20211212_16_43_57_Pro (2).jpg

Overall I am encouraged that there aren't more issues to deal with. I did order a batch of Coat-It to liberally apply to the inner rivets and seams, but am hoping to apply this to an already sealed hull, as 'insurance', prior to getting on with floor installation.
 

ShoestringMariner

Lieutenant Commander
Joined
Apr 18, 2015
Messages
1,593
Got the water-test done! I ended up using trolley jacks to tilt the boat/trailer fore/aft and side-to-side, leaving it in each position about 30 minutes. There was a couple drips that passed through one rivet on the bottom, which I'll replace before going any further.
View attachment 353745
There was a drip forming at the bottom of the transom, right where the bottom skin is riveted to the transom. There are four or five rivets that are heavily worn, and could use replacing as well. I left the G-Flex off those, waiting for a suitable bucking helper to arrive on scene. Hopeful replacing rivets will tighten the joint and address that issue. See pic below.
View attachment 353746
The last leak area was up front, at the bottom of the keel area. It was by far the worst, dripping about 1 drip every 10 seconds with about a foot of water in the hull at that area. There is a big blob of dark 'goop' in the hull at that area that looks like it could be original. I'm open to recommendations on how to deal with this. Should I dig out the goop, and re-seal that area with G-Flex?
View attachment 353748

Overall I am encouraged that there aren't more issues to deal with. I did order a batch of Coat-It to liberally apply to the inner rivets and seams, but am hoping to apply this to an already sealed hull, as 'insurance', prior to getting on with floor installation.
Make sure that goop plug is in good shape. I had a car topper tinny that was leaking badly there, and let water in fast. The reason I call it a plug, is because it was obviously a sealant injected down in the keel hollow where the bow was pulled together. It had shrunk and was loose so I pulled it out and shot a pile of 3M-5200 down there and packed the hollow of the open keel channel for 6” for good measure

The goop patch that I have in my SS is in good shape but I put a solid bedding of 5200 over it just in case (I bought a caulking gun tube of it and did the seam on the inside also)

And i am jealous of your space!!
 
Last edited:

SHSU

Lieutenant Junior+Starmada Splash Of The Year 2019
Joined
Mar 8, 2017
Messages
1,725
A little heat can be used to help "Soften" it but would use as a last resort. Other option is to use a wire wheel on an angle grinder. Will create a mess, but you will be able to control the removal.

SHSU
 

renns

Petty Officer 1st Class
Joined
Dec 20, 2017
Messages
316
SHSU - So it sounds like mechanical extraction of that 'turd' is in order? I have hesitated to work in that area thus far, which is why some bits of foam can still be seen in the area.

SSM - thanks, we make good use of that workshop space. My two boys have various wheeled or tracked projects that keep growing in size, so I needed to negotiate space in my own building for this boat!
As for the repair, you mentioned 5200. What about tilting the boat stern-high, and puddling some G-Flex in there? I'm thinking it might flow into the cracks and crevices better than 5200? I've left the radiant heater on the floor under the bow aimed up to warm it and dry that area overnight.
 
Last edited:

SHSU

Lieutenant Junior+Starmada Splash Of The Year 2019
Joined
Mar 8, 2017
Messages
1,725
I would agree that G-Flex/Gluvit it closer to the original sealant then 5200. That being said, 5200 is a great sealer too. I have used many a tube on my project and will continue to do so when needed.

SHSU
 

renns

Petty Officer 1st Class
Joined
Dec 20, 2017
Messages
316
OK, popped out the turd, which looked like excess sealant that was dried out, and not really adhering very well. I hit the whole area with the wire wheel, vacuumed everything clean, and spread G-Flex around the area. The hull was positioned to keep the puddle in the area where that sealant was located. The cheapo electric radiant heater was set up below, to keep the aluminum in the area nice and warm. Hopefully that sorts out the leak issue.

On the topic of 5200... I've only used it once, and found once the tube was opened, it cured solid pretty quickly. Any tricks for extending shelf-life once opened?

In other news my son's buddy is installing a radiant tube heater in the workshop this coming Saturday - warm shop days ahead!
 

g0nef1sshn

Lieutenant
Joined
Feb 24, 2015
Messages
1,291
I kept mine in the fridge and it lasted a long time there.
Keep a small hole and use a nail in it to seal it. Place in fridge and it should be good for a few uses. Pull the nail out each time and it won't be clogged.
 

SHSU

Lieutenant Junior+Starmada Splash Of The Year 2019
Joined
Mar 8, 2017
Messages
1,725
+1 for nail or screw in hole. I also add a couple layers of tape on top as well. Keeps it sealed and have had no issues keeping tubes for months.

Now fast cure is a different story. That one I never could get to store well.

SHSU
 

renns

Petty Officer 1st Class
Joined
Dec 20, 2017
Messages
316
Thanks for hints on that 5200 storage. I only used it once prior, and found it solid in the tube shortly thereafter. The label said something like 24 hrs limit after opening.

Here's a brief update with a few pics.

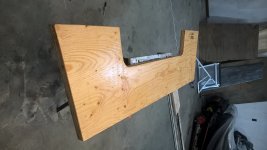
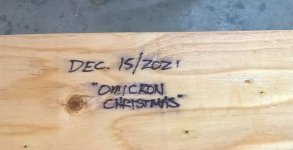
The transom replacement was laminated out of two layers of exterior grade 3/4" plywood, glued and screwed with short deck screws. After curing I pulled out the decks screws, and shot some G-flex into hole to seal it up. Then multiple coats of 'Old Timers Formula' treatment. Will finish off with multiple coats of straight urethane once all the holes are drilled and plugged. Anyone else add time capsule notes to their transom replacement? Also note the narrow splashwell compared to the genuine SS16 models. WP_20211216_15_13_37_Pro.jpgWP_20211216_15_13_55_Pro.jpg

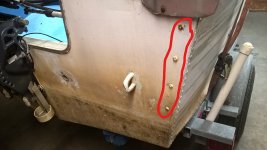
Question on the fasteners used for up the side of the transom (circled in red below). The previous setup used what appeared to be large (1/4" diameter) steel wood screws into the transom wood. They were badly corroded such that some had no threads remaining at all. I have since cut away the spray foam used under the back of the splashwell area, and plan to through-bolt using stainless machine screws, rather than screwing into the transom wood itself. Does that make sense? What's done on the genuine Starcraft specimens? Thanks again for the comments and encouragement!WP_20211104_19_20_06_Pro_LI.jpg
 

g0nef1sshn

Lieutenant
Joined
Feb 24, 2015
Messages
1,291
I added larger aluminum square plates to the ubolts on each side. In my head it helps disperse the pressure of really snuggin them down.
 
Top