Time to get started on the starcraft resto.

SigSaurP229

Commander
Joined
Oct 1, 2008
Messages
2,123
Re: Time to get started on the starcraft resto.

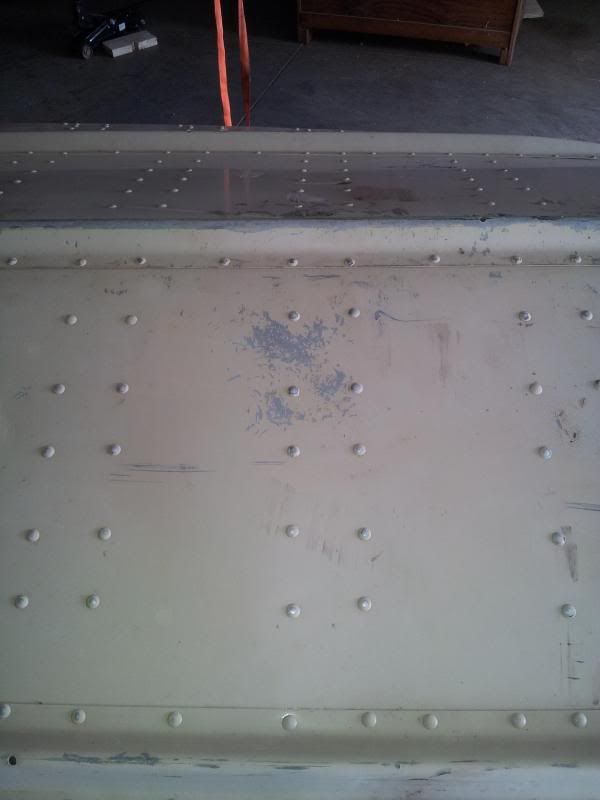
That is definetly the worst of it. When I filled it with water none leaked from those spots including overnight the concern I have is that the brown goop may have been what was stopping it from leaking.
 

dozerII

Admiral
Joined
Oct 25, 2009
Messages
6,527
Re: Time to get started on the starcraft resto.

Hey Nick, I wouldn't worry about the rivet lines, I honestly think that StarCraft hired a bunch of drunks to drill and rivet the seams. On all the boats I have worked on the lines are all over the place including over lapping ones. The area you have the picture of at the stern almost looks like it has been drug on the pavement. I think I would clean it up real good, rough it up with a course grinding disc and JB weld it then sand smooth and drill the missing rivet out from the inside and put in a new closed end rivet. A little trick with the JB is put it on smooth it out then put on a layer of wax paper then use your finger to get it very smooth and shaped, when it set take the wax paper off an your ready to sand for paint.
 

SigSaurP229

Commander
Joined
Oct 1, 2008
Messages
2,123
Re: Time to get started on the starcraft resto.

Hey Nick, I wouldn't worry about the rivet lines, I honestly think that StarCraft hired a bunch of drunks to drill and rivet the seams. On all the boats I have worked on the lines are all over the place including over lapping ones. The area you have the picture of at the stern almost looks like it has been drug on the pavement. I think I would clean it up real good, rough it up with a course grinding disc and JB weld it then sand smooth and drill the missing rivet out from the inside and put in a new closed end rivet. A little trick with the JB is put it on smooth it out then put on a layer of wax paper then use your finger to get it very smooth and shaped, when it set take the wax paper off an your ready to sand for paint.

Glen,

I am more concerned about the location, would any of this indicate a structural issue. I am almost thinking with the slight damage on the splashwell that the boat had been run with a bad transom for a while which caused a little seperation or flexing on the bottom of the hull that the p/o may have filled with whatever goop that may be.

I did find a tube of silicone during deconstruction though :facepalm:
 

GA_Boater

Honorary Moderator Emeritus
Joined
May 24, 2011
Messages
49,038
Re: Time to get started on the starcraft resto.

Ok Sig - It looks like the stern was dragged on the ramp or something. The rest of your pics really don't show anything bad. Looks like a rivit has popped there too.


I think the good part of this, is the damage is at the knee brace. I think you can get some aluminum strap at the depot, about 1/16" I think and a little wider than the rivet line there. Drill out the rivets and lay the strap on top and drill through the existing holes. That might be a little hard to do. Then use some closed end rivets and a lot of that new 5200 you just got and cinch it down. After its riveted use more 5200 to filet around the strap and fill the rivet heads.
 

dozerII

Admiral
Joined
Oct 25, 2009
Messages
6,527
Re: Time to get started on the starcraft resto.

Hey Nick, I'm thinking if it was structural, the rivet line where the knee brace rivets to the bottom of the hull would have loose rivets and or cracks. I think the damage is from a drag on the pavement, maybe the PO took the winch strap off before backing down a steep ramp and the boat had a premature launch!!
 

dozerII

Admiral
Joined
Oct 25, 2009
Messages
6,527
Re: Time to get started on the starcraft resto.

Also if your knee brace has the ears cracked off, cut the remaining ears off and rivet 3/16 aluminum angle on the sides making new ones, then drill new holes in the angle and the transom from the outside using the existing holes in the transom skin.
 

GA_Boater

Honorary Moderator Emeritus
Joined
May 24, 2011
Messages
49,038
Re: Time to get started on the starcraft resto.

That is definetly the worst of it. When I filled it with water none leaked from those spots including overnight the concern I have is that the brown goop may have been what was stopping it from leaking.

If it's not leaking, them maybe just smear 5200 over it, Gluvit the inside and call it a day. 5200 is supposed to be sandable. Prep the surface with a stainless wire brush. Starcraft didn't have a lot of pride when it came to pounding rivets. They work, just don't look nice and symmetrical.
 

SigSaurP229

Commander
Joined
Oct 1, 2008
Messages
2,123
Re: Time to get started on the starcraft resto.

Hey Nick, I'm thinking if it was structural, the rivet line where the knee brace rivets to the bottom of the hull would have loose rivets and or cracks. I think the damage is from a drag on the pavement, maybe the PO took the winch strap off before backing down a steep ramp and the boat had a premature launch!!

Yeah the dragging makes alot of sense the knee brace is good and tight. The boat is on a roller trailer as well. I am pretty sure the motor is a replacement which would make sense if someone trashed a lower unit on a premature launch as well. Hull is a 1985 motor is a 1981.0
 

jbcurt00

Moderator
Staff member
Joined
Oct 25, 2011
Messages
25,049
Re: Time to get started on the starcraft resto.

Drill out the rivets and lay the strap on top and drill through the existing holes. That might be a little hard to do. Then use some closed end rivets and a lot of that new 5200 you just got and cinch it down. After its riveted use more 5200 to filet around the strap and fill the rivet heads.
After you drill out the rivets, you can take a rubbing of the hole location, making reference lines on the hull to align the rubbing, slip the AL strap in under it, align it along the hull's edge, and mark the holes on the strip. Drill out the strap OFF the hull. Done carefully & accurately, it should be a really close fit to the original hull rivet holes.


I was thinking it was a shallow launch, or other oops off the trailer.... Dozer's winch strap oops is highly likely as well......

Close inspection of the hull~transom joint & knee braces should help ID if Dozer's correct about minimal (if any) structural strains/damage....
 

ezmobee

Supreme Mariner
Joined
Mar 26, 2007
Messages
23,767
Re: Time to get started on the starcraft resto.

You asked my opinion on the matter but FAR more knowledgeable people than me have already commented. I will say mine has some crooked rivets as well. I agree with the solutions presented. I wonder if someone prematurely launched this thing as one point :eek:
 

SigSaurP229

Commander
Joined
Oct 1, 2008
Messages
2,123
Re: Time to get started on the starcraft resto.

Well it is better news than I anticipated. I sincerly appreciate all of your help everyone.
 

jasoutside

Supreme Mariner
Joined
Dec 20, 2009
Messages
13,269
Re: Time to get started on the starcraft resto.

Ya, these fellas have given ya great advice up there ^^^. I think I'd be headed down the JB or 5200 road to seal up that drag damage.

And yup, I actually have rivets punched right on top of each other totally overlapping:rolleyes: (I think it's kinda cool, in a dorkey kinda way:joyous:)
 

SigSaurP229

Commander
Joined
Oct 1, 2008
Messages
2,123
Re: Time to get started on the starcraft resto.

One thing I learned today is this was a one man flip I am definetly have my neighbor bring the excavator down for the flip back over. I am not playing superman again even with the help of the straps and the shop beams it was still a bear to flip.
 

BonairII

Commander
Joined
Jun 7, 2011
Messages
2,727
Re: Time to get started on the starcraft resto.

Not sure what ya paid for the 5200....but it's much cheaper to buy it by the caulk tube. It's like $23 for a 10oz tube here on iboats.

JB weld would be my choice to fix that mess. And maybe 5200 on the inside.
 

SigSaurP229

Commander
Joined
Oct 1, 2008
Messages
2,123
Re: Time to get started on the starcraft resto.

It was $5.50 per tube at the depot I happened to be walking by saw the last two tubes on the shelf and said I am going to need those one way or the other so I bought em.
 

BonairII

Commander
Joined
Jun 7, 2011
Messages
2,727
Re: Time to get started on the starcraft resto.

$5.50 is cheap. At West Marine...they want $15 for a small tube.
 

dozerII

Admiral
Joined
Oct 25, 2009
Messages
6,527
Re: Time to get started on the starcraft resto.

Small tube is good, once you open the tube anything left will be toast in short order. I tend to save up the need for it then do a bunch at once so as to not waste what is left over in the tube.
 

SigSaurP229

Commander
Joined
Oct 1, 2008
Messages
2,123
Re: Time to get started on the starcraft resto.

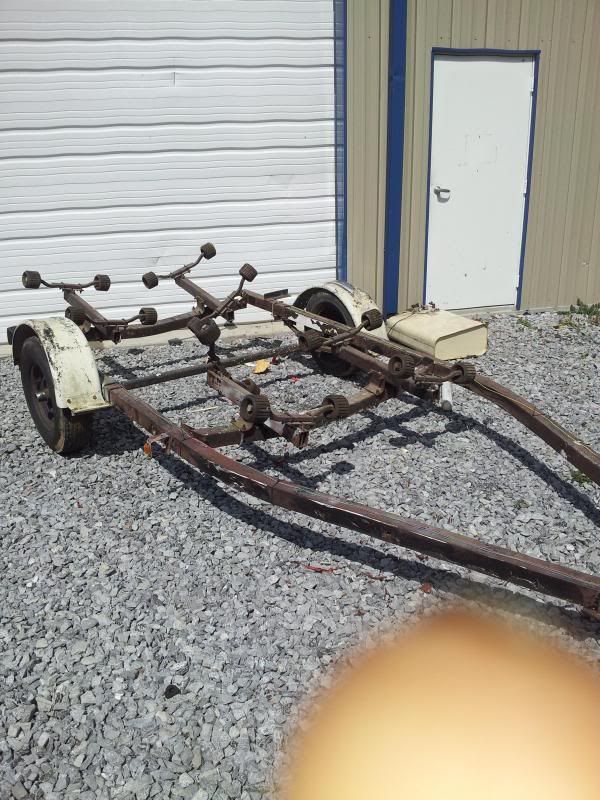
Good afternoon everyone it is time for today's update. I guess we have to work on the red-headed stepchild of the boat rebuild a little.

20130327_124546_zps0f72c0c2.jpg


The rollers seem to be in decent shape I am going to be cleaning them a little. I think the plan for it is basically just to wire wheel the rust off of it sand it to about 100 grit and thrown some rustoleum on it.

New Bearings I just changed the tires so I am good there.

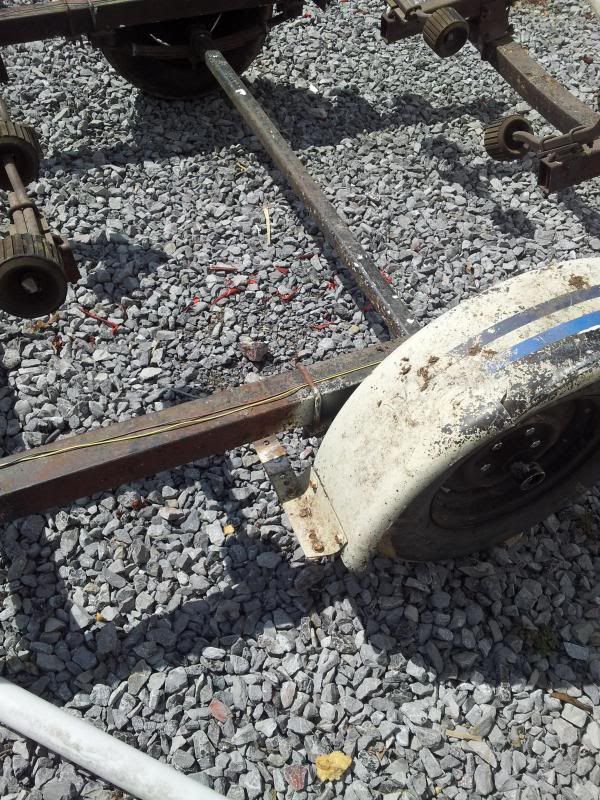
20130327_124615_zps3610c6e1.jpg


Anyone have any better ideas on how to run the wires for the lights this is a full box trailer not C Channel so I have no clue how to chase those wires all the way to the tongue? That was kind of a temporary solution. Of course you can see the broken UBOLT for the fender as well I snapped it when I was trying to loosen it to run the light wires.

I started rough sanding the hull today I know in the bare metal spots I am going to be priming with self etching. I am not a paint and body guy (I know just enough to be dangerous). I plan on filling the deep gouges with JB Weld there really aren't many and its more deep scratches than anything else.

20130327_130520_zps79dc8d8c.jpg


Like these spots feel fairly smooth to the hand after sanding but do I still need to do anything to fill it in before I spray the zinc chromate?

Can regular primer go over zinc chromate?

The plan is to Zinc Chromate the bare spots sand to level. Then spray the whole boat in regulare primer sand to 180 grit then shoot the top coat sand to 180 then 200 tack and shoot the second top coat wet sand at 400, tack it clean let it cure then buff to shine. That sound about right for the process?

I have to get rid of the old gas in that tank so I am thinking its going on the fire pit for some fun. :eek: In a safe and responsible manner of course :facepalm:
 

SierraMark

Petty Officer 2nd Class
Joined
Feb 27, 2012
Messages
135
Re: Time to get started on the starcraft resto.

I basically have found West Marine way over priced on pretty much everything.

I totally agree. I got a 50.00 gift card for Christmas and had the hardest time finding something to buy because I knew the prices for the things that I needed and they were all overpriced. I ended up getting a compass which I'm sure I could have gotten less but I didn't want to look it up.

-Mark
 
Top