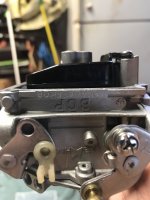
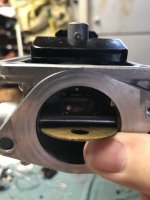
Thermostat housing hole.

Sea Rider

Supreme Mariner
Joined
Sep 20, 2008
Messages
12,345
When all 3 seats have been micro polished to mint cond check if all floats rests slight under or not which won't be an issue as long the needle's tip and seat are doing their homework right. Check that all seats rests fully down against carb body ? On non hinged carb floats, the height will be determined by the float, needle tip and seat condition.

Happy Boating
 

Douglasdzaster

Petty Officer 1st Class
Joined
Sep 11, 2020
Messages
315
When all 3 seats have been micro polished to mint cond check if all floats rests slight under or not which won't be an issue as long the needle's tip and seat are doing their homework right. Check that all seats rests fully down against carb body ? On non hinged carb floats, the height will be determined by the float, needle tip and seat condition.

Happy Boating
can make out the number on the jet it’s to screwed up. It is the middle carburetor. The company that I corresponded with told me it was a 120 but Yamaha discontinued and said I could try a 125. Here’s the float on #1 carburetor. I should be able to compare it with at least one more today when finished cleaning.
 

Attachments

  • E19E99CC-C78B-445B-9D27-55EF697298AC.jpeg
    E19E99CC-C78B-445B-9D27-55EF697298AC.jpeg
    1.2 MB · Views: 2
  • 82FDF493-3088-495D-84FA-80AC8FF34C82.jpeg
    82FDF493-3088-495D-84FA-80AC8FF34C82.jpeg
    1.1 MB · Views: 2

Sea Rider

Supreme Mariner
Joined
Sep 20, 2008
Messages
12,345
The float on carb one looks fine to me. The middle carb used to work with 3 different jet numbers which were : 115-120-125 while the slow jet remained 60 numbered on all 3 carbs. Is 115 the jet number stamped on 1-3 ? On many 3 carbed motors have seen one jet having a smaller or higher jet number than the other 2 not necessarily being the middle one. Factory tech issues.

Happy Boating
 

Douglasdzaster

Petty Officer 1st Class
Joined
Sep 11, 2020
Messages
315
The float on carb one looks fine to me. The middle carb used to work with 3 different jet numbers which were : 115-120-125 while the slow jet remained 60 numbered on all 3 carbs. Is 115 the jet number stamped on 1-3 ? On many 3 carbed motors have seen one jet having a smaller or higher jet number than the other 2 not necessarily being the middle one. Factory tech issues.

Happy Boating
I couldn’t make out the numbers. Will have a magnifying glass tomorrow and see if that helps. They had told me my motor had the 120 but not available and that their technician said better to go up than down. I’ll try looking at the numbers again tomorrow. Who ever before me had already scared up some of the jets probably using the wrong screw driver. Just for kicks I put the float on carburetor 2 last night and it stood way up like they all did when I removed them. This morning I finished cleaning and polishing #2 and now the float sits down just like the first one. All that polishing really makes a difference. Anyway number 3 is not damaged maybe I can polish and read that number but I’ll look at both with the magnifying glass.
 

Sea Rider

Supreme Mariner
Joined
Sep 20, 2008
Messages
12,345
Both 1-2 seats must have been really dirty, huge gunk accumulation on top for floats now to sit bit downward. If the tech said to go for a 125 jet must know his business well to end running 115-125-115 jets in that order when the carbs are installed back.

You can screw a jet head if severely stuck while trying to remove it with a wrong screwdriver head. A shade tree pseudo mechanic work for sure.

Happy Boating
 

Douglasdzaster

Petty Officer 1st Class
Joined
Sep 11, 2020
Messages
315
Both 1-2 seats must have been really dirty, huge gunk accumulation on top for floats now to sit bit downward. If the tech said to go for a 125 jet must know his business well to end running 115-125-115 jets in that order when the carbs are installed back.

You can screw a jet head if severely stuck while trying to remove it with a wrong screwdriver head. A shade tree pseudo mechanic work for sure.

Happy Boating
1and3 are 115 jets. Unfortunately everywhere I checked the 125 is at least a month away in Japan. Unless you have a source I may have to leave it for now.
 

Douglasdzaster

Petty Officer 1st Class
Joined
Sep 11, 2020
Messages
315
Both 1-2 seats must have been really dirty, huge gunk accumulation on top for floats now to sit bit downward. If the tech said to go for a 125 jet must know his business well to end running 115-125-115 jets in that order when the carbs are installed back.

You can screw a jet head if severely stuck while trying to remove it with a wrong screwdriver head. A shade tree pseudo mechanic work for sure.

Happy Boating
You’re right about those seats I’ve spent several hours on each one until the cotton came out clean. I tried to remove them with a thin wall 10 mm socket and they don’t want to budge. I was going to inspect the little o ring on the end of them. Hopefully they’re ok. No telling how old the seats are. I know I can blow on the fuel intake with my mouth and they’re not leaking until I turn the carburetor back over then they open so I guess they’re fine.
 
Last edited:

Sea Rider

Supreme Mariner
Joined
Sep 20, 2008
Messages
12,345
Never had same issue with a leaking carb after the seat was micro polished to new condition along new bowl gasket install. If the needle/seat closes fine while blowing air through the carb intake, expect the same when priming the fuel bulb till firm. Hope the removal of the screwed jet at the machine shop it's an easy fix to access and remove the nozzle located under it and once perfectly cleaned and shinny install the new 125 jet in.

So it was not just a motor restoration as I thought, it's the entire boat, motor, trailer package, long DIY work, but as long you're having fun go for it.

Happy Boating
 

Douglasdzaster

Petty Officer 1st Class
Joined
Sep 11, 2020
Messages
315
Never had same issue with a leaking carb after the seat was micro polished to new condition along new bowl gasket install. If the needle/seat closes fine while blowing air through the carb intake, expect the same when priming the fuel bulb till firm. Hope the removal of the screwed jet at the machine shop it's an easy fix to access and remove the nozzle located under it and once perfectly cleaned and shinny install the new 125 jet in.

So it was not just a motor restoration as I thought, it's the entire boat, motor, trailer package, long DIY work, but as long you're having fun go for it.

Happy Boating.
 

Douglasdzaster

Petty Officer 1st Class
Joined
Sep 11, 2020
Messages
315
Nothing fancy but it’s paid for and I’m fix it up the way I want. Motor was the biggest issue. I’ll be on the water soon as I get it back together. Then I can take my time on other things.
 

Douglasdzaster

Petty Officer 1st Class
Joined
Sep 11, 2020
Messages
315
Question sir. I almost messed up with the slow jets #60. The third one clogged and I couldn’t get a tooth pick to work. So I thought I’d compare it to the others and when I ran a toothpick in them they clogged as well. I don’t know if it’s toothpaste I missed or what. Anyway my question is does the hole in those jets bottle neck or do they stay the same size all the way through? I got one open and either that’s the case or it still has some blockage. The holes on the sides are all clear.
 

Sea Rider

Supreme Mariner
Joined
Sep 20, 2008
Messages
12,345
How did you cleaned the other (2) slow jets, are all (3) 60 gauge ? Slow jets have tiny diam fuel passages which narrows around the middle, a toothpick is too thick, better poke the narrowest metal needle you can find through both extremes, when finished squirt carb cleaner with the provided cannula through the jet. If placing the jet between a magnifying glass and a light source as a window will be able to see both extremes perfectly clean.

Happy Boating
 

Douglasdzaster

Petty Officer 1st Class
Joined
Sep 11, 2020
Messages
315
How did you cleaned the other (2) slow jets, are all (3) 60 gauge ? Slow jets have tiny diam fuel passages which narrows around the middle, a toothpick is too thick, better poke the narrowest metal needle you can find through both extremes, when finished squirt carb cleaner with the provided cannula through the jet. If placing the jet between a magnifying glass and a light source as a window will be able to see both extremes perfectly clean.

Happy Boating
I hate to admit this. When I cleaned them I shot c cleaner through then air and the passages where open so I didn’t bother to run anything through the holes . Then I polished them like new. Blew carburetor cleaner and air again. This was before I had a magnifying glass. I’m guessing toothpaste was in them and dried , not sure. Putting a toothpick in them clogged all three yesterday. I soaked them all night and that didn’t seem to help so I figured toothpaste and mixed vinegar and lemon juice to dissolve it. This worked and this time I used a bread tie and cleaned the first one. Unfortunately I checked with the magnifying glass and I had scratched it inside pretty bad as well as the others from using to big of wire. I fell on my sword and going to get new ones. Next thing is after polishing the last seat and needle it seems to want to take a split second to drop open when I turn the carburetor over. Is that ok or should I try polishing more? Oh I’m going back through everything with a magnifying glass too. I thought I was being careful to do things right.
 

Sea Rider

Supreme Mariner
Joined
Sep 20, 2008
Messages
12,345
What usually do if finding the jets severely gunk/clogged is to soak them in paint thinner overnight, run a thin needle through both sides, or just squirt carb cleaner, but never ever poke any wire that doesn't count with a sharp point. Non pointy wires will end scratching the internal jet, but as long the internal diam remains as factory delivered, assume not an isue.

With respect of the seat micro polishing method, it's just to achieve a shinny finish look after the cotton comes out white clean. No need to go any deeper or keep polishing it peresecula seculorum LOL !!

Although the jet hole may look clean when placing it against a light source, I always poke them slightly with a thin needle at both extremes. On severely gunked jets the interal walls could narrowed a bit due to mini gunk layer formations sitting there. It's not my case as I always run my carbs dry.

Tohatsu Jet.jpg

Don't worry if the third carb takes some microseconds to drop open, those carbs runs 50:1 fuel oil ratio which will lube the seat, needle, and float's arm when fuel enters the bowl at pressure.

Happy Boating
 

Douglasdzaster

Petty Officer 1st Class
Joined
Sep 11, 2020
Messages
315
What usually do if finding the jets severely gunk/clogged is to soak them in paint thinner overnight, run a thin needle through both sides, or just squirt carb cleaner, but never ever poke any wire that doesn't count with a sharp point. Non pointy wires will end scratching the internal jet, but as long the internal diam remains as factory delivered, assume not an isue.

With respect of the seat micro polishing method, it's just to achieve a shinny finish look after the cotton comes out white clean. No need to go any deeper or keep polishing it peresecula seculorum LOL !!

Although the jet hole may look clean when placing it against a light source, I always poke them slightly with a thin needle at both extremes. On severely gunked jets the interal walls could narrowed a bit due to mini gunk layer formations sitting there. It's not my case as I always run my carbs dry.

View attachment 331927

Don't worry if the third carb takes some microseconds to drop open, those carbs runs 50:1 fuel oil ratio which will lube the seat, needle, and float's arm when fuel enters the bowl at pressure.

Happy Boating
Definitely been a learning experience. 2 and 3 floats didn’t end up sitting as low as the first and the 3rd. doesn’t open quite as far but it does open and let’s air flow through. Should I figure out how to get them all the same or they ok just getting fuel?
 

Douglasdzaster

Petty Officer 1st Class
Joined
Sep 11, 2020
Messages
315
Definitely been a learning experience. 2 and 3 floats didn’t end up sitting as low as the first and the 3rd. doesn’t open quite as far but it does open and let’s air flow through. Should I figure out how to get them all the same or they ok just getting fuel?
I went fishing on another forum for my motor specs and got lucky. A support tech posted a diagram for me. Float height is 15mm and to adjust the metal piece on the float the needle hangs from. After my luck today I’d hate to bend it a little and it breaks. Lol
 

Sea Rider

Supreme Mariner
Joined
Sep 20, 2008
Messages
12,345
There's a tech associated issue running internal scratched jets or with widened small holes, if running so the jet will achieve an internal fuel disturbance along fuel/air ratio alteration which is nada bueno...

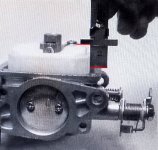
Before bending the float's hinge must know if all 3 needle's seats rest at same collar height with respect to its base. If all 3 doesn't have the same height there will be a float/needle height variation assuming all 3 needles are sharp pointy. Never posted back when asked if the floats were fixed or with a metal hinge both being different scenarios. Float's height are usually measured this way :

Float-Needle Height.JPG

With same ruler type or a vernier check how much in height all 3 floats differ from each other in 1-2-3 order. With hinged floats need to make minor adjustments by slightly bending the tabs on the metal float hinge in order to achieve the specified 15 mm float height if that's what the 40 HP carb calls for.

To know if a scratched jet will perform top, this is an easy way to troubleshoot so...


Plastic Container.JPG
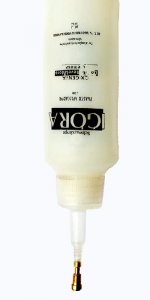
Get a plastic container the ones used for hair dye, insert jet tip fully in on nozzle at any of both sides, the jet/nozzle fit must be snug. If need to cut/shorten a bit the nozzle tip for that to happen do so.

Fill the entire container with fuel, turn it up side down, squeeze container hard and check the fuel flow exiting through the internal jet.


Fuel Squirt.JPG
If the squirt is hard, straight and consistent it's good to go, if squirts sideways and non consistent as having prostrate issues, that jet is shot, install a new one in. Lesson learned, never ever poke a non tiped wire through a jet...

Happy Boating
 

Douglasdzaster

Petty Officer 1st Class
Joined
Sep 11, 2020
Messages
315
There's a tech associated issue running internal scratched jets or with widened small holes, if running so the jet will achieve an internal fuel disturbance along fuel/air ratio alteration which is nada bueno...

Before bending the float's hinge must know if all 3 needle's seats rest at same collar height with respect to its base. If all 3 doesn't have the same height there will be a float/needle height variation assuming all 3 needles are sharp pointy. Never posted back when asked if the floats were fixed or with a metal hinge both being different scenarios. Float's height are usually measured this way :

View attachment 331965

With same ruler type or a vernier check how much in height all 3 floats differ from each other in 1-2-3 order. With hinged floats need to make minor adjustments by slightly bending the tabs on the metal float hinge in order to achieve the specified 15 mm float height if that's what the 40 HP carb calls for.

To know if a scratched jet will perform top, this is an easy way to troubleshoot so...


View attachment 331984
Get a plastic container the ones used for hair dye, insert jet tip fully in on nozzle at any of both sides, the jet/nozzle fit must be snug. If need to cut/shorten a bit the nozzle tip for that to happen do so.

Fill the entire container with fuel, turn it up side down, squeeze container hard and check the fuel flow exiting through the internal jet.


View attachment 331985
If the squirt is hard, straight and consistent it's good to go, if squirts sideways and non consistent as having prostrate issues, that jet is shot, install a new one in. Lesson learned, never ever poke a non tiped wire through a jet...

Happy Boating
I just came in from the shop . I set the floats with little adjustment and used a vernier caliper. The diagram or the tech didn’t mention checking the seat height so I’ll go back and check. Float needles look new as did the pilot screws. I think a kit or part of a kit was installed not long ago. Probably when the seats heads got rounded which I used a small file to take the burrs off the top so they’re level just need to measure . After soaking still can’t get one of the jets to clear. Used my wife’s smallest sewing needle this time. I appreciate you taking the trouble to get the information to me. Maybe I’ll only have to buy one jet if the other two test out. Again awesome information. Thanks
 
Top