Any round hole located somewhere it's part of the motor design, so the thermo is located to a side and not on top of the cylinder head as found in larger motors. If wanting to clean any hole, hidden passage buy a can of CRC carbon remover and spry an overdose with the provided red cannula.
Sat for a year after carbs were rebuilt, was that scenario with fuel in them or without ? if with fuel will probably need to remove all 3 carbs and micropolish the needle valve seat for an opt float/needle marriage, assuming all other internal carb's components such as jets, main nozzle were cleaned to perfection. Better is to consume fresh fuel for that outing and refill with fresh new fuel for next outing and save some cash not buying Stabil.
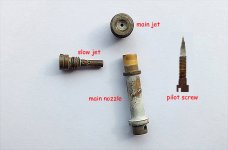
E blended fuels sitting inside carbs for long time periods will screw many internal metal and rubber components, pic speaks for itself...
Happy Boating