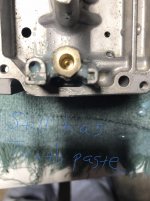
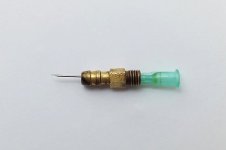
Tips for cleaning external/internal carb's parts. If need to micro polish the external slow jet, pilot's screw tips and threads pic (1) Dampen with water a flat cotton piece, place jet inside, add toothpaste, close cotton to form a U shape, grab tight the cotton against the jet, insert a screwdriver to other side, both jet's groove and screwdriver's flat head must match same width. Twist the screwdriver back and forth several times while adding more toothpaste until shinny. To clean the interior, pass a thin needle, grab one side and spin the jet with fingers several rounds as in (3)
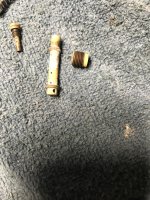
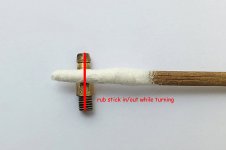
For nozzle polishing (3) hold tight nozzle ends, with a wooden cotton swab like moistened in water and added toothpaste rub the entire nozzle body sidewise, rotate it and keep polishing till shinny. Both ends must be immaculate clean. To clean the mini holes, a wooden toothpick tip rotated inside such holes will do the cleaning trick. If the nozzle is severely crusted soak it it in thinner for some hours prior poking the toothpick. Clean the interior with any wooden skewer that fits inside by rubbing it up-down against the internal wall. Wooden skewers, toothpicks will not scratch nor enlarge any hole whatsoever.
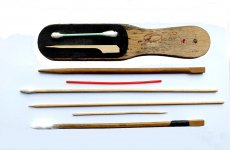
Will suggest to inspect the Pilot's Screw and the Nozzle cavities with a flaslight, if found dirty, gunked, roll a thin cotton layer dampened with thinner onto a wooden skewer and clean in circular motion the internal cavities and their threads. The rolled cotton portion must be taller than both cavity depths. (4)
Note : The cotton rolled whether CW-CCW onto the skewer must match the same CW-CCW circular motion cleaning inside each cavity, if not risk the cotton being disengaged from the skewer and be left inside the cavity which has occurred.
Some boaters following the thread will be wondering why a carb kit isn't used to avoid all the trouble and time consuming cleaning jets, nozzles. Will be much time/cost effective if being a one carbed motor, but that's a 3 carbed motor and at $85 per kit will end spending $ 255 bucks which can be used for other purposes.
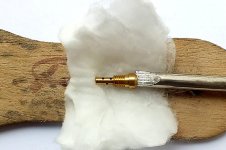
A Dremel rotating tool along these polishing cotton felts (5) will do the micro polishing job way faster....
Happy Boating


 1C7DC6DE-5E0D-4AC5-BA8F-639E4FDAEB55.jpeg2.6 MB · Views: 3
 A65EABDE-4D49-481E-9759-959E35F62F21.jpeg1.3 MB · Views: 3
 8F7D00F9-5761-4338-AE80-F12B873EBB77.jpeg2.2 MB · Views: 3
 15BD028B-DB08-4B65-91B4-874A0796FE89.jpeg2.3 MB · Views: 4
 1AE15954-44C8-4EB3-AB2C-F4C2366E2289.jpeg1.5 MB · Views: 4
 DD9A9844-2F0F-4FE7-9FAE-D84D28E1DC84.jpeg2.3 MB · Views: 4
 291E75E8-97D9-4697-8D3D-AD398E1D9E36.jpeg1.4 MB · Views: 3
 36F871A7-BE58-437B-893C-B8918BDA1A5E.jpeg1.6 MB · Views: 3