Shoestring Starcraft SS160 Resto-mod - let the long slow road begin

ShoestringMariner

Lieutenant Commander
Joined
Apr 18, 2015
Messages
1,593
Following this discussion with interest, as our boats will live much the same lives, although ours once splashed will stay in the water until ice-up. I'm currently planning to leave bare aluminum with Sharkhide for areas in continuous contact with water, with painted stripe above (top three strakes). Hoping that will look OK, and be a low-maintenance solution.
Ever ice-break to get her out of the water?
 

SHSU

Lieutenant Junior+Starmada Splash Of The Year 2019
Joined
Mar 8, 2017
Messages
1,726
Any reason why you are trying to use Sherwin Williams or such for the epoxy? I only ask as they aren't who I would think of for marine bottom paint.

As @classiccat mentioned, Interlux is a big brand in the Marine environment.

That being said, I have only used Fasco Epoxy and have been happy with its durability. I used them as they were significantly cheaper then Interlux or similar. They have since jumped in price, so I would seriously consider the others as well.

SHSU
 

renns

Petty Officer 1st Class
Joined
Dec 20, 2017
Messages
316

ShoestringMariner

Lieutenant Commander
Joined
Apr 18, 2015
Messages
1,593
Any reason why you are trying to use Sherwin Williams or such for the epoxy? I only ask as they aren't who I would think of for marine bottom paint.

As @classiccat mentioned, Interlux is a big brand in the Marine environment.

That being said, I have only used Fasco Epoxy and have been happy with its durability. I used them as they were significantly cheaper then Interlux or similar.

From what I can see, all interlux bottom paints are antifouling. I really don’t want to use it. It’s a poison that’s harmful to me and the water body.
When I think of Sherwin Williams, I too think “house paint” but they are big on industrial and marine coatings also. And 5 minutes from me vs 1hour.
I will look into Fasco.

Anyone know what Starcraft used in the factory finish?
Surely it’s a one coat fits all. (Top and bottom)
 

ShoestringMariner

Lieutenant Commander
Joined
Apr 18, 2015
Messages
1,593
Thinking of trying sea hawk aluma hawk aluminum boat paint for the whole thing if I can find it up here or have it shipped over the border. No primer required, safe to use, topside AND bottom side. Looks easy peasy but hard to find in basic white.
 
Last edited:

SHSU

Lieutenant Junior+Starmada Splash Of The Year 2019
Joined
Mar 8, 2017
Messages
1,726
Took some digging, but here is an Interlux product that I think fits the bill:
https://www.interlux.com/en/us/boat-paint/antifouling/vc-performance-epoxy

That being said, I don't think the original Starcraft paint was anything special. A lot of guys have used Tractor Paint with hardener. I originally planned on using the same until I found the Fasco product.

SHSU
 

ShoestringMariner

Lieutenant Commander
Joined
Apr 18, 2015
Messages
1,593
Took some digging, but here is an Interlux product that I think fits the bill:
https://www.interlux.com/en/us/boat-paint/antifouling/vc-performance-epoxy

That being said, I don't think the original Starcraft paint was anything special. A lot of guys have used Tractor Paint with hardener. I originally planned on using the same until I found the Fasco product.

SHSU
By George, that looks very promising. I can get that one up here for sure! Thanks for digging that up
 

MNhunter1

Lieutenant Junior Grade
Joined
May 12, 2014
Messages
1,053
Thinking of trying sea hawk aluma hawk aluminum boat paint for the whole thing if I can find it up here or have it shipped over the border. No primer required, safe to use, topside AND bottom side. Looks easy peasy but hard to find in basic white.

I've used the Duralux Aluminum Boat Paint with great results on bare aluminum. I believe the AlumaHawk is a very similar product. The Duralux is only available in the olive drab green, whereas the AlumaHawk is available in a light grey, black, blue, green , tan, and white. It's a matte or flat finish however, so you'll want to look at another option if you're going for a gloss finish. Also a roll on application rather than a spray. You can spray it, but I don't think you obtain the same adhesion results, and you'll need a larger tip and/or lots of thinning.
 

ShoestringMariner

Lieutenant Commander
Joined
Apr 18, 2015
Messages
1,593
I've used the Duralux Aluminum Boat Paint with great results on bare aluminum. I believe the AlumaHawk is a very similar product. The Duralux is only available in the olive drab green, whereas the AlumaHawk is available in a light grey, black, blue, green , tan, and white. It's a matte or flat finish however, so you'll want to look at another option if you're going for a gloss finish. Also a roll on application rather than a spray. You can spray it, but I don't think you obtain the same adhesion results, and you'll need a larger tip and/or lots of thinning.
Thanks MNH. I requested for Alumahawk dealers in Canada. They kindly and quickly responded that there are longer any distributors North of the border. I suspect it has something to do with compounds that may environmental restrictions here.

I’m going to chase down the interlux performance epoxy coating and see if that will work. Might be right up my alley. But thank you for the suggestion. Unfortunately olive drab won’t work for me. I’m keeping with the original white and blue.
 

ShoestringMariner

Lieutenant Commander
Joined
Apr 18, 2015
Messages
1,593
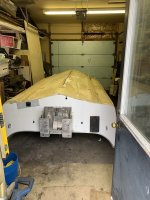
So, I finally I have some photos to update. Nothing wonderful to look at but a glimpse of what I’m dealing with.

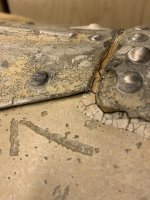
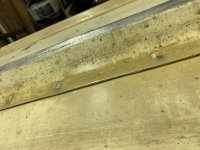
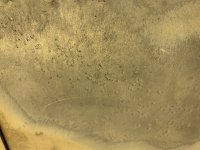
If you guys don’t mind, could you please take a look at the pictures of the pitting that seems to be through the paint. I cleared a spot and it is into the aluminum as you can see in the photos. Pic 4 of 4 shows pits with paint removed. So I think I’m going to have to skim these with Marine Tex. The question is, do I strip the paint or just skim the pitting and scratches where I see them, sand and prime/bottom coat? The factory paint is not peeling. If anything it feels tough.

Second of all, the keel strip is lifting and places. I don’t see any point in putting G flex on the seams, do you? There’s drain holes in theSecond of all, the keel strip is lifting and places. I don’t see any point in putting G flex on these seams, do you? There’s drain holes in them, so water is getting inside regardless. Not sure putting G flex on the rivet heads is even worth doing except those with the rivet head in direct contact to the hull skin itself.

Thoughts?
 

Attachments

  • 347B7740-6934-432B-942A-28943DA040C9.jpeg
    347B7740-6934-432B-942A-28943DA040C9.jpeg
    1.5 MB · Views: 33
  • CFEBC4E2-1363-44F0-A3A3-5115F80E142D.jpeg
    CFEBC4E2-1363-44F0-A3A3-5115F80E142D.jpeg
    1.3 MB · Views: 30
  • DB1AAFEE-397D-4DE6-A411-C57954DE3D67.jpeg
    DB1AAFEE-397D-4DE6-A411-C57954DE3D67.jpeg
    3.2 MB · Views: 31
  • C8E21AC2-B399-40A7-9B3B-8055627D8265.jpeg
    C8E21AC2-B399-40A7-9B3B-8055627D8265.jpeg
    1.8 MB · Views: 32

PaulyV

Chief Petty Officer
Joined
Sep 7, 2008
Messages
525
Thanks, I see what you’re saying. Algae build up I think is all I’m going to be dealing with.
What brands are you thinking, PPG, sherwin Williams etc?
I used Rusto Oleum Professional. High Gloss Black. Lasted 12 years No Peeling No chipping/ Just faded last few years. I have never waxed it probably should have. Put boat in Salt water this season/ did start to flake on bottom.
 
Last edited:

ShoestringMariner

Lieutenant Commander
Joined
Apr 18, 2015
Messages
1,593
I used Rusto Oleum Professional. High Gloss Black. Lasted 12 years No Peeling No chipping/ Just faded last few years. I have never waxed it probably should have. Put boat in Salt water this season/ did start to flake on bottom.
That’s great to hear. It’s just an air dry enamel, isn’t it?
 

PaulyV

Chief Petty Officer
Joined
Sep 7, 2008
Messages
525
That’s great to hear. It’s just an air dry enamel, isn’t it?
that's correct. I didn't use a hardener either. There are others here that have used it. I used aluminum etching primer/ and 2 coats of Rustoleum. I will be doing the same this winter as I have upgrades and a new motor going on the back, so I stripped her down to the flotation and stringers.
 

SHSU

Lieutenant Junior+Starmada Splash Of The Year 2019
Joined
Mar 8, 2017
Messages
1,726
Pic 4 of 4 shows pits with paint removed. So I think I’m going to have to skim these with Marine Tex. The question is, do I strip the paint or just skim the pitting and scratches where I see them, sand and prime/bottom coat? The factory paint is not peeling. If anything it feels tough.
Personally I would use a wire wheel to clean the the pitting, and then wipe it down before using Marine Tex or JB Weld. If original paint still has good bond, then no need to mess with it.

Second of all, the keel strip is lifting and places. I don’t see any point in putting G flex on the seams, do you? There’s drain holes in theSecond of all, the keel strip is lifting and places. I don’t see any point in putting G flex on these seams, do you? There’s drain holes in them, so water is getting inside regardless. Not sure putting G flex on the rivet heads is even worth doing except those with the rivet head in direct contact to the hull skin itself.

Ya, no need to put G flex on the exterior heads of those. If you could get it between where the plates meet then I would do that, but as you can't nothing to worry about. That being said, I only used Gluvit on the interior rivet tails.

SHSU
 

renns

Petty Officer 1st Class
Joined
Dec 20, 2017
Messages
316
That fourth pic with the corrosion pitting - whereabouts is that on the hull? I noticed some pitting along the waterline mostly on the transom. I've been planning to butter with JB-weld, and sand smooth, but am waiting for the shop heater installation to wrap up so I can get the hull up to a decent temperature first.
I'm of the same mind regarding the keel strip sealing. I'd think you should be able to access those rivets from inside the hull though? On that topic, where abouts are those drain holes located? On my hull there were none, or perhaps they were filled and painted over by someone in the past.
 

ShoestringMariner

Lieutenant Commander
Joined
Apr 18, 2015
Messages
1,593
That fourth pic with the corrosion pitting - whereabouts is that on the hull? I noticed some pitting along the waterline mostly on the transom. I've been planning to butter with JB-weld, and sand smooth, but am waiting for the shop heater installation to wrap up so I can get the hull up to a decent temperature first.
I'm of the same mind regarding the keel strip sealing. I'd think you should be able to access those rivets from inside the hull though? On that topic, where abouts are those drain holes located? On my hull there were none, or perhaps they were filled and painted over by someone in the past.
I had a lot of pitting on the transom below the waterline as well when I redid it. I used Marine Tex on this pitting before I re-painted and it cleaned up nicely. The patch of pitting you see is the starboard side bottom under the battery location.

There is one drainage hole in the keel and outer strakes(??) are placed 2/3 to 3/4 of the span towards the bow. My speculation is that it is needed or trapped water can create ice expansion damage.
 

ShoestringMariner

Lieutenant Commander
Joined
Apr 18, 2015
Messages
1,593
Personally I would use a wire wheel to clean the the pitting, and then wipe it down before using Marine Tex or JB Weld. If original paint still has good bond, then no need to mess with it.


Ya, no need to put G flex on the exterior heads of those. If you could get it between where the plates meet then I would do that, but as you can't nothing to worry about. That being said, I only used Gluvit on the interior rivet tails.

I am waiting for my stainless wheels to come in and I have a bristle disc that will get into the pits.

I’ve used Gluvit inside on the rivet tails, the g flex is extra insurance on the other side
 

ShoestringMariner

Lieutenant Commander
Joined
Apr 18, 2015
Messages
1,593
Today I messed around with a bit of RO sanding bristle disc patch areas. It’s not worth skimping here I think. The paint thickness is minimal so all pitting i see is into the hull skin, so I picked up a litre of stripper to try out. I’m just going to focus on the bottom for now. So I can re-invert and get working on the floors. I’ve got a lot on my plate with this rebuild and it has to be done by end of April, so I might leave painting the sides for the end or next winters hit list. I’m very slow with projects and the big thing with this project was that it has to be in service every summer.
So this years absolute musts left are; g flex, bottom paint, final gluvit, floatation foam, floors and bow seating rework. And all new wiring/controls and swim platform/ladder.
Yikes! 4 months and 2 days to go!!!
Time to light a fire under you know what
 

ShoestringMariner

Lieutenant Commander
Joined
Apr 18, 2015
Messages
1,593
That fourth pic with the corrosion pitting - whereabouts is that on the hull? I noticed some pitting along the waterline mostly on the transom. I've been planning to butter with JB-weld, and sand smooth, but am waiting for the shop heater installation to wrap up so I can get the hull up to a decent temperature first.
I'm of the same mind regarding the keel strip sealing. I'd think you should be able to access those rivets from inside the hull though? On that topic, where abouts are those drain holes located? On my hull there were none, or perhaps they were filled and painted over by someone in the past.
I just measured. The drain hole is 30 inches back on the streaks and the keel. From the front edge of each
 
Top