Shoestring Starcraft SS160 Resto-mod - let the long slow road begin

ShoestringMariner

Lieutenant Commander
Joined
Apr 18, 2015
Messages
1,593
Well here we go again. Time to dust off this stalled project once again. New motivation this time. Aside for a bit of flooring and remodelling inside the house, I have to get this boat ready for the end of may. (The season opening of the park we’re in)

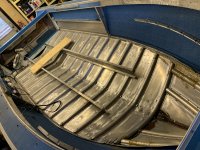
I recently replaced a pile of rivets and I’ve abraided all areas that I’m going to Gluvit with a bristle disc. Pressure washed and dried.
but I’m second guessing my approach because this boat will be staying in the water for the season as opposed to dry stored.

1) I could not get all of the sealant out of the bottom at the bow keel joint where the big bow plate meets the keel. A heat gun did nothing but cause nasty fumes that I was afraid would kill me and I injured my knee so I could not kneel properly for 4-5 months. So I left what was there planning on packing it full of 3m5200.

BUT now I’m concerned. Will it bond to the remaining original sealant? I was going to completely cover all the exposed rivets with it.

2) will Gluvit wick between the ribs and the hull? I have a few trickle leaks that appear by flowing out of the limber hole meaning the water is tracking down under the rib.
 

SHSU

Lieutenant Junior+Starmada Splash Of The Year 2019
Joined
Mar 8, 2017
Messages
1,724
I left the sealant at the keel since it had sealed so well and just poured what little gluvit I had left on top of it.

For the ribs, I think its mixed but general consensus is gluvit wont be able to seal at the rivet in-between the joints. That being said, plenty still do it as it makes them feel better. Other option is to buck all the rivets before you seal. Would be quick and easy since you aren't actually replaceing any.

SHSU
 

ShoestringMariner

Lieutenant Commander
Joined
Apr 18, 2015
Messages
1,593
I left the sealant at the keel since it had sealed so well and just poured what little gluvit I had left on top of it.

For the ribs, I think its mixed but general consensus is gluvit wont be able to seal at the rivet in-between the joints. That being said, plenty still do it as it makes them feel better. Other option is to buck all the rivets before you seal. Would be quick and easy since you aren't actually replaceing any.

SHSU
Thanks, I’ve done the rebuck but maybe I’ll hit them again. I’m hoping this captures it all. If this boat proves too leaky down the road, I’ll keep it at home for my day boat and get a glass bow rider (horrified gasps from the crowd) for the trottage.
 

SHSU

Lieutenant Junior+Starmada Splash Of The Year 2019
Joined
Mar 8, 2017
Messages
1,724
Another option people have done is use some gluvit on the exterior side of the rivet. It would seep into any areas that water would as well and should help with sealing as well. That being said, the hull would need to be turtled to be effective.

SHSU
 

ShoestringMariner

Lieutenant Commander
Joined
Apr 18, 2015
Messages
1,593
Another option people have done is use some gluvit on the exterior side of the rivet. It would seep into any areas that water would as well and should help with sealing as well. That being said, the hull would need to be turtled to be effective.

SHSU
I’m wondering if I should do that while it is still gutted. If I ever buy another riveted boat, I won’t touch one with corroded rivets. I should have left this one where I found it. I’m pretty sure the leaks I have now are actually from rivets I replaced as it wasn’t leaking after I replaced one damaged rivet. I could boat for a few days and the bilge was dead dry.

So feeling dismayed losing a half year to knee issues and now I’m back to chasing problems on this build...wondering if I’ll ever finish it.

Anyone know how heavy these hulls are for flipping over? Can 2 people roll a bare hull over? Are these hulls sturdy enough to roll over without damaging?

can I use Gluvit over the whole bottom if I strip the hull bare and sand it?
 

SHSU

Lieutenant Junior+Starmada Splash Of The Year 2019
Joined
Mar 8, 2017
Messages
1,724
Anyone know how heavy these hulls are for flipping over? Can 2 people roll a bare hull over? Are these hulls sturdy enough to roll over without damaging?

Easy to flip and very light when you have everything out. When I flipped ours, I was concerned about its strength as well. I fixed that by putting a couple 2x4 clamped to the gunnels across the hull. No issues after that.

can I use Gluvit over the whole bottom if I strip the hull bare and sand it?
I believe I have read where flat bottom boats up in Oregon and such do that. I am not sure I would do that, but that is just me.

So now I’m thinking of taking this opportunity to flip, Gluvit the hull and then paint the hull with this https://www.interlux.com/en/us/boat-paint/antifouling/trilux-33 before I go any further.

anyone use this before? I don’t want to strip the factory paint, only sand/prep.
Thoughts?
Why do you want antifouling? I know you want to leave the hull in the water, but year round or just a couple weeks at a time? If you pull it every couple months a quick pressure wash will do the trick as well but that is just me.

SHSU
 

ShoestringMariner

Lieutenant Commander
Joined
Apr 18, 2015
Messages
1,593
Easy to flip and very light when you have everything out. When I flipped ours, I was concerned about its strength as well. I fixed that by putting a couple 2x4 clamped to the gunnels across the hull. No issues after that.


I believe I have read where flat bottom boats up in Oregon and such do that. I am not sure I would do that, but that is just me.


Why do you want antifouling? I know you want to leave the hull in the water, but year round or just a couple weeks at a time? If you pull it every couple months a quick pressure wash will do the trick as well but that is just me.

SHSU
Thanks. Whether I coat the outer hull with Gluvit remains to be seen. I will rebuck the lot I think. Maybe we missed some or didn’t seat a few new ones enough. I had a few poorly drilled ones. I might redrill any questionable ones and replace with 3/16” now that I have some.

but I got to thinking; this boat will now be in the water May-October. I’m not sure if it needs to be anti fouling or not, but it has to be suitable for aluminum hulls. I know my local marine supplier carries this brand and I wanted bright white, so I chose this one.

and I’m not sure I’ll paint it laying on my back while it’s half on the trailer, so best time to paint is now. And I’d like to protect the new and old rivets from corrosion.

I’m open to other brands suitable for this hull as long as it ships to or is available north of the border. It needs to be brush/roll on capable though.
 

ShoestringMariner

Lieutenant Commander
Joined
Apr 18, 2015
Messages
1,593
OK. So some pics. How much to say. Looks like everybody’s else’s Restoration. However there’s one thing I noticed today that I don’t like. I did the transom a few years ago. Today I noticed some discolouration And deformation around where tiedown clamp boats come through The starboard side. I’m a little surprised by this as the boat is rarely outside for any length of time but yet there it is, looks like water damage. Perhaps the driveway storage time is longer than I think it’s been. But still, it is surprising given how tight the clamp is to the transom skin. I don’t see a hairline crack or anything under it. But I think I better put some thin neoprene pads underneath both of them and maybe I’ll plate the interior side

E64727BD-3799-46F8-806C-23F7883D72CA.jpeg
 

ShoestringMariner

Lieutenant Commander
Joined
Apr 18, 2015
Messages
1,593
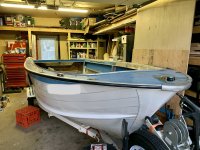
And to show my space handicap; This is the extent of my workspace. Its heated but It’s small. And I am NOT complaining. When I see that some in this world don’t have any indoor workspace at all, Let alone the funds to have a project to work on....Hell, some don’t have homes to live in. I consider myself to be very, very fortunate. I can get the boat inside and shut the door. Once I rebuck the rivets, and address a few more I don’t like. I’ll do the gluvit inside. Then I will flip it, and clean up and paint the bottom side. I figure I’ll build some sort of temporary dolly. I’ll focus on prepping one side and then the other before I break out the paint.

I also picked up another boat and trailer last year, scrapped the boat. (fibreglass) i’m going to extend the tongue and will likely make that trailer part of this boat package. The other one is getting a little bit rough.
 

Attachments

  • FD3D5D8A-4803-46FA-8EB7-F67F0ADC48EF.jpeg
    FD3D5D8A-4803-46FA-8EB7-F67F0ADC48EF.jpeg
    772.1 KB · Views: 17

Moserkr

Chief Officer + Starmada Splash Of The Year 2021
Joined
Nov 23, 2020
Messages
869
My hull had coat-it on the outside of the hull put on by my friend i bought it from. He only did below the water line but it sure does show through paint. The hull had dents n dings so looks didnt matter all that much to me. I ended up putting coat-it above the waterline on the bow rivets on the outer hull, and on every rivet inside. At least she doesnt leak…. But if you want clean, smooth lines with your paint, leave it off the outside or tape every rivet up and be prepared to sand it very smooth.
 

ShoestringMariner

Lieutenant Commander
Joined
Apr 18, 2015
Messages
1,593
My hull had coat-it on the outside of the hull put on by my friend i bought it from. He only did below the water line but it sure does show through paint. The hull had dents n dings so looks didnt matter all that much to me. I ended up putting coat-it above the waterline on the bow rivets on the outer hull, and on every rivet inside. At least she doesnt leak…. But if you want clean, smooth lines with your paint, leave it off the outside or tape every rivet up and be prepared to sand it very smooth.
Thanks for pointing that product out. I think I’ll stick with the Gluvit on the inside since I’ve purchased it already. (After I re-buck)
I’ll do a leak test at a boat launch if I can get it done before snow flies. if I don’t see any leaks, I’ll simply paint the bottom side. If it still leaks, I’ll use this product, taping off at the spray rail. It’s not a performance boat so I’d imagine I want notice any substantial performance loss due to it being a less slippery surface?
 

Moserkr

Chief Officer + Starmada Splash Of The Year 2021
Joined
Nov 23, 2020
Messages
869
Gluvit and coat-it are basically the same thing. I dont think many guys put it on the outside of the hull, but it shouldnt affect performance. It just doesnt look great on the outer hull - in some spots it made it look like I had horrible paint drips. Where I taped it off, it looks much cleaner.
 

ShoestringMariner

Lieutenant Commander
Joined
Apr 18, 2015
Messages
1,593
Hey guys, how bad are the fumes with Gluvit?
I have a 20x15 garage with electric shop heaters with fans. Do I need to be concerned with fumes during the curing process? Ie with the heaters running maintaining room temperature?
 

classiccat

"Captain" + Starmada Splash Of The Year 2020
Joined
Dec 20, 2010
Messages
3,412
Hey guys, how bad are the fumes with Gluvit?
I have a 20x15 garage with electric shop heaters with fans. Do I need to be concerned with fumes during the curing process? Ie with the heaters running maintaining room temperature?
It has an odor (similar fishy smell that you get with MarineTex, Interlux filling epoxy, etc.) however I don't recall it having the heavy fumes that you'd encounter with paints or adhesive.
 

ShoestringMariner

Lieutenant Commander
Joined
Apr 18, 2015
Messages
1,593
It has an odor (similar fishy smell that you get with MarineTex, Interlux filling epoxy, etc.) however I don't recall it having the heavy fumes that you'd encounter with paints or adhesive.
Perfect, thanks. Going to apply it to the ribs and inner rivets this weekend. Then off to find an open launch to leak test. Everything closed around me now. You know what they say about procrastination....
 

ShoestringMariner

Lieutenant Commander
Joined
Apr 18, 2015
Messages
1,593
Would you look at that. I actually did some work on this boat!
First round of gluvit down. Should have enough for second coat. Of course I can’t do under the part I did a few years ago. The part under the splash well as seen earlier in this thread. Just as well, it wasn’t leaking there anyway. If I had my time back I would’ve used Gluvit under there also but c’est la vie. I did use 3M 5200 to bed in all the rivets around the rear transom when I replaced rivets there.

So as it’s curing I am pondering how much of a sump pit to leave. When I say sump pit I mean the area that is not insulated with rigid Styrofoam.
Because my plans are to add as much styrofoam as possible, there won’t be much room for water except for a small channel down the centre. I’m planning on terminating the insulation coverage up from the limber holes by a few inches and planning on putting 1 inch thick insulation between the ribs and filling the rest of the void up to the floor. I’m not cutting the styrofoam so tight to the ribs that water can’t get down to the limber holes.

my plans have changed. Now this will be in the water all season. Sometimes unattended for a few weeks. An auto bilge will be going in. I don’t want to leave the sump pit so small that it is cycling constantly any time a bit of water gets in.
thoughts?
 

BOYS & TOYS

Petty Officer 2nd Class
Joined
Mar 1, 2008
Messages
144
You might consider two separate bilge pumps with separate float switches. I nearly sunk my boat at the dock after a very heavy rain when the float switch failed.
My boat was unattended for only two or three days and you're talking weeks.
 

ShoestringMariner

Lieutenant Commander
Joined
Apr 18, 2015
Messages
1,593
You might consider two separate bilge pumps with separate float switches. I nearly sunk my boat at the dock after a very heavy rain when the float switch failed.
My boat was unattended for only two or three days and you're talking weeks.
Thanks, good plan. It will have mooring covers on it but we know they are leaky. I might put a 1 piece cover on it.
 
Top