Shoestring Starcraft SS160 Resto-mod - let the long slow road begin

ShoestringMariner

Lieutenant Commander
Joined
Apr 18, 2015
Messages
1,565
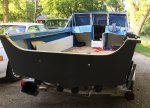
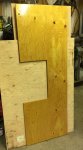
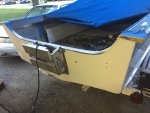
Update: had a productive weekend. Transom is in. Not perfect. I had another issue with the motor well tubes. I forgot to include the thickness of the transom skin when I cut them to size. I thought I’d try it anyway. It’s got a slightly flared opening on the motor well side. I had another that wasn’t cut down yet, so I got that one right. I’ve ordered another to replace the one that is too shallow.

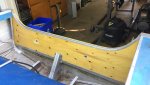
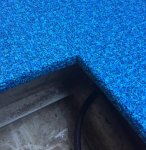
the exterior of the transom is sanded and primed with Etching Primer. Not sure what I’m going to do about the heavy pitting below the waterline. Using Water Weld or Marine Tex seems like a LOT of work. Wouldn’t a light automotive spot putty work considering it will be sealed under paint?

I’m still debating whether to use this PPG ALK200 that I have on hand. This is a trailered boat but it could be in the water for a week at a time a few times per year.

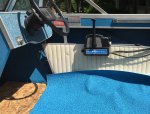
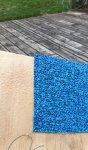
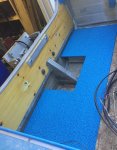
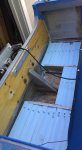
Next up is installing the CMC and new rearmost floor section which has been treated with the OTF everyone is talking about here. I think I will also strip and repaint the splash-well before reassembly
 

Attachments

  • photo316092.jpg
    photo316092.jpg
    1.4 MB · Views: 17
  • photo316093.jpg
    photo316093.jpg
    1,014.2 KB · Views: 17

Watermann

Starmada Splash of the Year 2014
Joined
Jan 12, 2013
Messages
13,753
Marine Tex is easy to spread and sand smooth, bondo is not the way to go to fill pitting on boats.
 

ShoestringMariner

Lieutenant Commander
Joined
Apr 18, 2015
Messages
1,565
I used the Marine Tex. It spread out and filled the pits very well. The dwell time seemed pretty reasonable. Today I find out how tough it is to sand. Fingers crossed it isn’t rock hard.

I also picked up a roll of Nautolex flooring. Debating on committing to having no boat this summer and going full out with the rest of the flooring and hull restoration right now. I’m very slow moving on projects and worried I won’t have it in the water for my September vacation.

Anyone know the weight of a striped out hull? Wondering if I can simply roll it over on the grass.
 
Last edited:

Watermann

Starmada Splash of the Year 2014
Joined
Jan 12, 2013
Messages
13,753
Yeah 2 guys can roll a stripped hull over, bit much for one fellow to handle, it's lowering it down that becomes a problem. 2 lift, one balance while the other goes around to catch and lower. Also I put a 2x4 midship with a ratchet strap squeezing the sides to the fitted 2x4 so as to not deform the middle of the boat.
 

ShoestringMariner

Lieutenant Commander
Joined
Apr 18, 2015
Messages
1,565
Thanks.

I need info on glue fit the Nautolex. I’ve done the Old Timer Formula as a sealer on the rear floor section and put spar varnish on it. I hear that some adhesives will eat into the spar do I’m looking for something that will work
 

Watermann

Starmada Splash of the Year 2014
Joined
Jan 12, 2013
Messages
13,753
I've seen guys use everything on the vinyl from the Nautolex adhesive, contact cement and 3M products. The most shoestring way to go is the contact cement, I used it on my Chief and it's been great. The most expensive would probably be the 3M products 77, 80 and 90.
 

ShoestringMariner

Lieutenant Commander
Joined
Apr 18, 2015
Messages
1,565
Thanks. I’m wary of anything with instant “stick” which is why I was interested in s trowel down product. I’ve got a can of 77 left over and have a sample piece curing. Not holding my breath...I wasn’t a fan of 77 last time.

This blue Nautolex is going to look great against the white panels and seats. The dealer that sold me the Nautolex also has the pleated vinyl material which o think will look amazing,

ive also decided I cannot get this project comfortably done in 7 weeks. Too busy at work and home. I have to stick to modular sections which means this hull will likely never get the 100% strip and gluvit deal. I don’t care if it’s a wee bit leaky
 

ShoestringMariner

Lieutenant Commander
Joined
Apr 18, 2015
Messages
1,565
I actually had a can of 3M Super 77. I now remember buying it because it has a bit of dwell time. This sample worked out very well. Now on to finding out how to leak resistant seams on inside and outside corners. I’m doing the floor under the splash well area now.
 

Attachments

  • CB7E1D54-FE70-4E40-BBFD-A8EACC84234C.jpeg
    CB7E1D54-FE70-4E40-BBFD-A8EACC84234C.jpeg
    691.4 KB · Views: 11
  • 5881B1D7-343A-49D8-BCD8-A62353156AA3.jpeg
    5881B1D7-343A-49D8-BCD8-A62353156AA3.jpeg
    777.1 KB · Views: 11

ShoestringMariner

Lieutenant Commander
Joined
Apr 18, 2015
Messages
1,565
It was a really good week. I had time off and managed to get a few things done.

1) I removed dozens of rivets under the back of the transom. What a chore on the creeper. I found that drilling at least part of the river out allowed me to drive the rest of it out with a punch. Still tough work and some sloppy holes to deal with. I wish I had ordered 3/16 rivets to replace these 5/32 with as it would have cleaned up the holes a bit by drilling them oversize. 3M5200 will have to save my bacon here. Both on the rivets during installation AND a liberal bedding of it on top of the bucked ends and seam. No time to bring any more in across the border. I hope it doesn’t leak..much.

2) The transom got more primer and a coat of white. It’s not great but good at 10’ so it will suffice for now, I’ve got to make hay and get this thing back in the water. I’ll sand and repaint later this season.

3) I made the riser clamp adapter for the CMC tilt. My old ’76 Merc has the clamps and only small bolts on the bottom and won’t fit without the adapter. I could have bought one but I had access to some aluminum flat bar so I made my own. If I had a milling machine, I would have taken 1/4” off the big bars, but they are surprisingly light.
I then mounted the unit on a 1/8” shim plate to keep pressure off of the rivet heads. Drilling fresh holes through a new transom made me a bit uneasy.

4) I clad the rear floor section. It turned out pretty nicely. I figured out how to do clean inside corners. This 3M Super 77 is actually quite the thing. The seam between floor sections will be located at the sliding door track. I will add support strips of ~.090” aluminum under the joiner edge so there’s no flex in the floors in between ribs and support z bars. The floors are 5/8” but look “thin”. I would have preferred 3/4” but I didn’t want helm fit up issues. I may still anyway. And maybe not...the floors will have Styro SM directly beneath unless an air gap for breath ability is recommended. (Thinking wet styro on underside of floors isn’t best idea)

5) I stripped and primed the splash well. Washed with vinegar and water then shot in acid etch primer. Still have to shoot the upper cross connector. I’m not sure this SW will be staying in the long run. I may rip it out and rework it to be a bench seat/folding casting floor eventually. I dream big

Next up tomorrow; install rivets and start with styro floatation foam under floor and along rear chine. I broke one of the aluminum door jambs trying to straighten it out but it buckled and tore through a rivet hole, so I’m going to bend up a pair at work next week. Leak test before floor and Styro goes in.
 

Attachments

  • photo316765.jpg
    photo316765.jpg
    864.5 KB · Views: 20
  • photo316766.jpg
    photo316766.jpg
    914.5 KB · Views: 19
  • photo316767.jpg
    photo316767.jpg
    1.2 MB · Views: 19
  • photo316768.jpg
    photo316768.jpg
    1.6 MB · Views: 20

Watermann

Starmada Splash of the Year 2014
Joined
Jan 12, 2013
Messages
13,753
5/32" rivets on the bottom?

Yeah I had to use the CMC clamp adapter for my old 140 Merc TOP and build a spacer as well.

Deck vinyl is looking good and those inside corners like for your bilge I find is easiest to trim out with either thin channel or angle AL.
 

bchaney

Petty Officer 1st Class
Joined
Jul 3, 2018
Messages
246
That vinyl looks great man. Tight and clean. You plan on wrapping each piece of floor separately?

Do you prefer 5200 over gulvit when reinstalling rivets?
 

ShoestringMariner

Lieutenant Commander
Joined
Apr 18, 2015
Messages
1,565
5/32" rivets on the bottom?

Yeah I had to use the CMC clamp adapter for my old 140 Merc TOP and build a spacer as well.

Deck vinyl is looking good and those inside corners like for your bilge I find is easiest to trim out with either thin channel or angle AL.

Thanks

What size do you have on the bottom edge of yours? Are they not 5/32?

i like idea of the trim, any good sources? I’m about to build the pull out piece.
 

ShoestringMariner

Lieutenant Commander
Joined
Apr 18, 2015
Messages
1,565
That vinyl looks great man. Tight and clean. You plan on wrapping each piece of floor separately?

Do you prefer 5200 over gulvit when reinstalling rivets?

Thanks very much. I have the 5200 on hand and I like how it drizzles on the rivet. I’ve never used gluvit
 

Watermann

Starmada Splash of the Year 2014
Joined
Jan 12, 2013
Messages
13,753
Thanks

What size do you have on the bottom edge of yours? Are they not 5/32?

i like idea of the trim, any good sources? I’m about to build the pull out piece.

None of my boats have had 5/32" solid rivets, lots of them in blinds tho all on the gunnels, bow cap and my Chief had 106 of them holding on the cabin. Are you talking about the seams when you say bottom edge?

I just picked up the AL pieces at Home Depot.
 

ShoestringMariner

Lieutenant Commander
Joined
Apr 18, 2015
Messages
1,565
That vinyl looks great man. Tight and clean. You plan on wrapping each piece of floor separately?

Do you prefer 5200 over gulvit when reinstalling rivets?

Sorry, I forgot your question about the floor pieces. I think for the balance of the floor, I will try to do in one piece. If prefer to have a rivet less look as much as possible. The seam should be hidden or at least not look out of place at the door track. You will see large flange rivets when you open a slider but that’s it I think.
 

Watermann

Starmada Splash of the Year 2014
Joined
Jan 12, 2013
Messages
13,753
Yeah the 16'rs must have the 5/32 rivets then, my 18's and 22'r have 3/16"
 

ShoestringMariner

Lieutenant Commander
Joined
Apr 18, 2015
Messages
1,565
Slow week. Busy, long days at work mean not much time to play in the garage. Got some flotation foam ready. Need the weather to cooperate so I can back into the lake and do leak checks before I install the floor piece.

painted and sanded the splashwell panels several times. Not overly happy with PPG ALK200 paint. Maybe I should have used hardener.
 

Attachments

  • photo317050.jpg
    photo317050.jpg
    787.1 KB · Views: 11
Top