Shoestring Starcraft SS160 Resto-mod - let the long slow road begin

ShoestringMariner

Lieutenant Commander
Joined
Apr 18, 2015
Messages
1,602
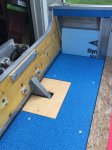
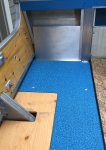
Well, still not much to show. Couldn’t get to it for 2 weeks. Did a leak test at the lake and found a broken rivet. At a nasty dent near the keel. It terminated at a rib, slightly deforming the rib. It was a relatively fast leak and I’m sure the prime culprit of my leak woes. Dry everywhere else. Because I couldn’t bang out the damage, I left it. I used stainless pan head screw and a nylock nut with 3m 5200 on this instead of rivets.

And, finally got the underfloor Styro SM installed along with the rear floor, each piece glued to the next with foam board adhesive. I put Styro 12” up the hull and clad it in aluminum. I wasn’t going to mess around making it form fit to the transom as nobody is going to look under there anyway.
I remade the door jambs as the originals were beat and broken. They ended up wider as my brake couldn’t do double flanges so close together.

tomorrows work is reinstalling the splashwell, final paint and motor installation. Found some bad wiring on the CMC that I need to replace. I hope my steering cable and controls will work with the CMC setback. Install seats and new hull numbers
 

Attachments

  • photo317694.jpg
    photo317694.jpg
    1 MB · Views: 18
  • photo317695.jpg
    photo317695.jpg
    995.4 KB · Views: 18

Watermann

Starmada Splash of the Year 2014
Joined
Jan 12, 2013
Messages
13,795
Control wire cable is always long, the shift/throttle cables too but it's the steering cable that is always close and has to be put inside the tilt tube as you're setting the motor on, not after.
 

ShoestringMariner

Lieutenant Commander
Joined
Apr 18, 2015
Messages
1,602
Control wire cable is always long, the shift/throttle cables too but it's the steering cable that is always close and has to be put inside the tilt tube as you're setting the motor on, not after.

Would you mind explaining where that is? I had a hard time getting it out. The motor was in place. I’ve got the splash well in now, caulking is drying. Getting ready to drop the motor on
 

ShoestringMariner

Lieutenant Commander
Joined
Apr 18, 2015
Messages
1,602
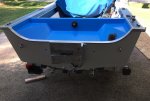
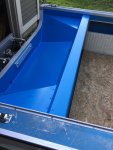
Finally back together and final paint. Caulking wasn’t as clean as I liked but it will do. The splash well will only be in the boat for another year or two. I would like to customize the backend with a pair of small seats on either side and a small splash well in the middle,

The paint shows up a lot darker in these photos. It’s basically a safety blue. This looks like a royal blue.

i’m loving the newness. I wish I could just rip the rest of it apart and redo it but I really got to get out fishing!!! I have no desire to do it in a canoe anymore.
 

Attachments

  • photo317750.jpg
    photo317750.jpg
    842.3 KB · Views: 43
  • photo317751.jpg
    photo317751.jpg
    676.4 KB · Views: 21

Michigan Lakes

Petty Officer 3rd Class
Joined
Dec 20, 2018
Messages
86
That looks absolutely fantastic. That being said, I would also like to add a few jump seats in place of the splash well on my SS. Completely understand the need for us in Northern climates to not let the Summer pass before the boat is ready.
 

FIGMO

Petty Officer 1st Class
Joined
Jun 18, 2017
Messages
321
Hey Shoe!

It appears that you painted the SW in the boat. How did that work out for you? I have been debating painted mine out of the boat with the consoles, but then I would have to seal the SW and paint over the seal after installation. The other issue is that there is a good chance of scratching the new paint job during the installation of the SW....
 

ShoestringMariner

Lieutenant Commander
Joined
Apr 18, 2015
Messages
1,602
That looks absolutely fantastic. That being said, I would also like to add a few jump seats in place of the splash well on my SS. Completely understand the need for us in Northern climates to not let the Summer pass before the boat is ready.

Thank you very much. Knowing myself and my turtle pace, I’m not surprised it’s taken this long. It will be in the water this weekend. I really like the idea of the little jump seats or at least a step over to get to small swim step if I have room.

On the opposite side I’m going to mount a kicker bracket. I think having something to kneel on to pull the motor up would be helpful. My back isn’t getting any stronger these days. Whatever I do here will have to be Structural. But I think I’ve got it worked out in my head. Basically I’m going to fabricate light aluminum drop-in skeleton frame that ties the gunnels, floor and transom together. It will support seats on both sides, a short centre splashwell and perhaps a bait well or storage cubby at top front. I’m not sure if I’m going to have much room in front of the splash well. Fuel tank storage and battery compartment will probably have lift up doors , Possibly with the original perforated panels in them in a smaller configuration.

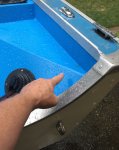
What I haven’t worked out in my head it’s hard to get and if it’s possible to get the steering cable to come out in a tight bend in the top corner which would be directly behind the seat back. Any of you steering experts care to chip in? I may even move it to that location now because I don’t like how it’s coming out of the boot. (Photo pointing to preferred location)
Don’t forget I have the CMC tilt on the back. ( no laughing at my clamp adapter. I had the flat bar available but no milling machine to knock it in half so it’s chunky looking)
 

Attachments

  • photo317849.jpg
    photo317849.jpg
    739.4 KB · Views: 17

ShoestringMariner

Lieutenant Commander
Joined
Apr 18, 2015
Messages
1,602
Hey Shoe!

It appears that you painted the SW in the boat. How did that work out for you? I have been debating painted mine out of the boat with the consoles, but then I would have to seal the SW and paint over the seal after installation. The other issue is that there is a good chance of scratching the new paint job during the installation of the SW....

I did paint them while they were out of the boat. Before I put them in I didn’t like The finish and sanded them with 220. I didn’t want white or black caulking and shiny rivets standing out so I decided I was going to repaint it in place anyway. That and I didn’t want to leave the transom just varnished, So I mask everything off and sprayed it all once in place. It hit my less than stellar caulking work. The paint I used was PPG ALK 200 which had fantastic coverage with my crummy princess auto HVLP gun that I paid 20 bucks for on sale. ( for those of you below the border that would be Canada’s version of harbour freight or perhaps grizzly)
if I had my money back I would’ve used ALK201 which has a hardener.

when I get around to re-doing the rest of the top sides and the replacement splash well, I will use it instead as it has a little more resistance to gasoline. Just in case of the incidental spill or drips
 

Watermann

Starmada Splash of the Year 2014
Joined
Jan 12, 2013
Messages
13,795
Finally back together and final paint. Caulking wasn’t as clean as I liked but it will do. The splash well will only be in the boat for another year or two. I would like to customize the backend with a pair of small seats on either side and a small splash well in the middle,

The paint shows up a lot darker in these photos. It’s basically a safety blue. This looks like a royal blue.

i’m loving the newness. I wish I could just rip the rest of it apart and redo it but I really got to get out fishing!!! I have no desire to do it in a canoe anymore.

fetch

Looks really good to me, time for some power!

On seam sealing, I use frog tape on either side of the seam, apply the pelican poo, run the smoother and pull the tape. Once cured I paint the sealer up.
 

ShoestringMariner

Lieutenant Commander
Joined
Apr 18, 2015
Messages
1,602
I should’ve taped it off but to be honest I was seeing the barn door and just needed to get it painted. I trusted that I could do a clean job without taping. Thankfully the paint covered up some of the stuff I did not like. I use a wet finger . What is the smoother you’re speaking of? Is there a special tool ?
 

FIGMO

Petty Officer 1st Class
Joined
Jun 18, 2017
Messages
321
when I get around to re-doing the rest of the top sides and the replacement splash well, I will use it instead as it has a little more resistance to gasoline. Just in case of the incidental spill or drips

I was thinking of using some Interlux bilge paint for under the SW, its about 40.00 a quart and resists chemicals and fuel.

Another note, how thick is that piece of aluminum brace on the inside top of the transom? Post #101

https://forums.iboats.com/forum/own...-long-slow-road-begin?p=10778139#post10778139
 

ShoestringMariner

Lieutenant Commander
Joined
Apr 18, 2015
Messages
1,602
I was thinking of using some Interlux bilge paint for under the SW, its about 40.00 a quart and resists chemicals and fuel.

Another note, how thick is that piece of aluminum brace on the inside top of the transom? Post #101

https://forums.iboats.com/forum/own...-long-slow-road-begin?p=10778139#post10778139

I will look into that. Because sure enough, my old merc was dripping gas out of the cowl when tilted up. Not sure if typical of all old Ob’s or not. Fortunately no drips on the fresh paint or at least not yet.

The bar across the top of the transom is 1/2 x 2 aluminum bar. Way overkill maybe but It’s material that was readily available. And I’d rather be too heavy than too light. I don’t even know what’s recommended for the attachment
 

classiccat

"Captain" + Starmada Splash Of The Year 2020
Joined
Dec 20, 2010
Messages
3,412
I was thinking of using some Interlux bilge paint for under the SW, its about 40.00 a quart and resists chemicals and fuel.

I've always been impressed with their paints...just don't look at the receipts! :lol:

Be sure to study the technical data on each product b/c you'll probably need at least 1 primer and thinner/solvent depending on your substrate(s). For example, bare metal requires sanding + interprotect 2000/2001e thinned with 2333N followed by PreKote thinned with 333. $40 just turned into $140 :lol:
 

FIGMO

Petty Officer 1st Class
Joined
Jun 18, 2017
Messages
321
The bar across the top of the transom is 1/2 x 2 aluminum bar. Way overkill maybe but It’s material that was readily available. And I’d rather be too heavy than too light. I don’t even know what’s recommended for the attachment

Hey Shoe,

Thanks for that. I know I have to get better supports for the engine mounts on my transom. I really like how solid that looks. I think I am going to check out my local metal supplier to see how much it would cost me.

Your work is really clean!
 

ShoestringMariner

Lieutenant Commander
Joined
Apr 18, 2015
Messages
1,602
Hey Shoe,

Thanks for that. I know I have to get better supports for the engine mounts on my transom. I really like how solid that looks. I think I am going to check out my local metal supplier to see how much it would cost me.

Your work is really clean!

Thanks for the kind compliment. I think the piece cost me somewhere between five and 10 bucks. Specialty suppliers are a little bit pricey, but if you know a fabrication or machine shop that deals with aluminum, often they let you contribute to the coffee fund.

at 1/3 the weight of steel it’s surprisingly light in your hands.
 

Watermann

Starmada Splash of the Year 2014
Joined
Jan 12, 2013
Messages
13,795
I used the same Van Sickle alkyd enamel with hardener as I used on the entire boats in my bilge and it's held up great with no problems. Just be sure to use white if you paint it, otherwise it's can be a black hole.

On the pre-mix leaking out, yeah all carbs will leak fuel from the throats when tilted. I cured this issue by putting a SS fuel petcock valve between the bulb and motor. I let the motor idle with the valve closed until the motor starts to stumble then turn it off. That draws down enough fuel to where the carbs don't drip fuel.

Red little valve handle seen in the pic.

IMAG2997.jpg
 

ShoestringMariner

Lieutenant Commander
Joined
Apr 18, 2015
Messages
1,602
I used the same Van Sickle alkyd enamel with hardener as I used on the entire boats in my bilge and it's held up great with no problems. Just be sure to use white if you paint it, otherwise it's can be a black hole.

On the pre-mix leaking out, yeah all carbs will leak fuel from the throats when tilted. I cured this issue by putting a SS fuel petcock valve between the bulb and motor. I let the motor idle with the valve closed until the motor starts to stumble then turn it off. That draws down enough fuel to where the carbs don't drip fuel.

Red little valve handle seen in the pic.


Thanks but would disconnecting the fuel line not run the carbs out the same way? I do this at low idle and still get some dripping


What model boat is that? Looks like my brothers Sylvan Supersportster.
 

Watermann

Starmada Splash of the Year 2014
Joined
Jan 12, 2013
Messages
13,795
If you're worried about fuel mess then disconnecting the line spews fuel in the lake and on your motor or boat.

That's my 18' V5 SS
 

ShoestringMariner

Lieutenant Commander
Joined
Apr 18, 2015
Messages
1,602
If you're worried about fuel mess then disconnecting the line spews fuel in the lake and on your motor or boat.

That's my 18' V5 SS

I have not noticed any leakage disconnecting the coupling. I’ve got an old 65 Merc with a twist lock connector. Must be a check valve in it
 
Top