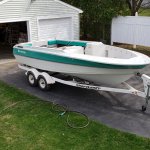
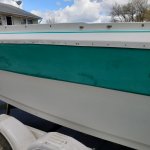
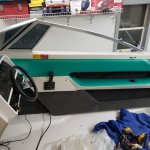
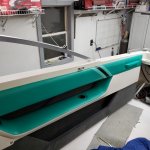
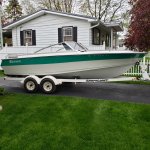
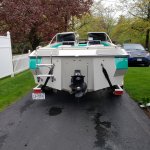
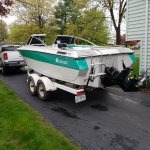
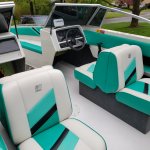
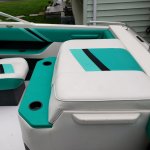
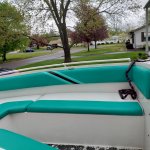
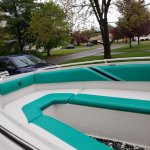
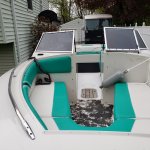
Restoring a 1990 Larson

Meames1

Petty Officer 2nd Class
Joined
Dec 14, 2020
Messages
157
Milestone time !
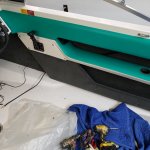
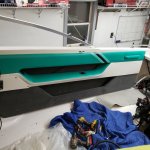
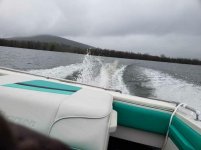
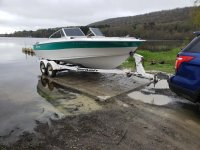
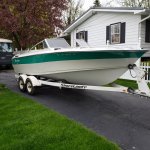
The cap is back on, we have a one-piece boat again, lol.
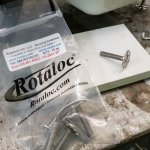
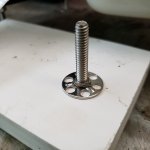
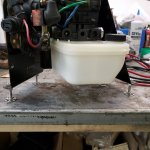
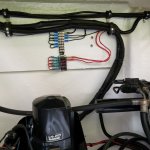
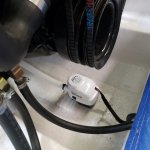
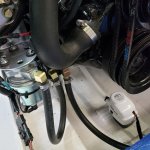
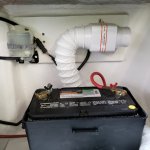
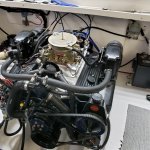
Tons of other work done this week, not much picture worthy. Engine is basically ready to run, all new hoses etc installed. Set up the fuel system, just have to wire everything. Sanded and buffed the bow section, looks great. I have to limit the amount of sand and buffing, both shoulders have had rotator cuff surgery so I'm limited before the pain sets in.
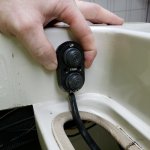
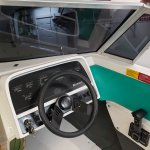
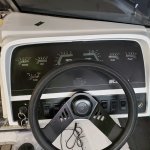
Steering, trim pump and lines, and controls next.
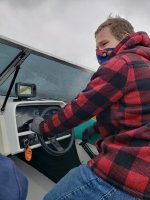
My 16 y/o son and I have set a date for no later than mid-May for launch.
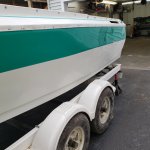
 

Attachments

  • 20210410_143757 (1024x1024).jpg
    20210410_143757 (1024x1024).jpg
    706.7 KB · Views: 35

Meames1

Petty Officer 2nd Class
Joined
Dec 14, 2020
Messages
157
Lots of work done this week. Been working on wiring, installing components, and cleaning / painting old parts going on.
I am trying not to put any screws through the finished deck, or as few as possible anyway.
I found these neat glue studs from McMaster-Carr. They are 316 S/S and I adhered them to the deck with West Systems epoxy that I thickened a bit with cabosil. For spacers I used PVC trim boards so there is no wood above deck. Then used a 1 1/2" spade bit to "indent" the PVC so the adhesive area of the studs will recess and make the spacers flush to the deck. I used 1/4" diameter ones for the trim pump and (8) 5/16"s ones for the battery box.
Today I sanded about 3/4 of the port side and buffed. The difference is near amazing. The original 31 year old gelcoat was chalky and rough. Started with 800 grit to smooth it out and remove the oxidation and pinstripe tape marks. Followed up with 1000, 1200, 1500, and finally 2000 grit. Buffed with 3M "heavy cut" gelcoat compound and a wool pad, then switched to gelcoat polishing compound and a medium foam pad, finally a light cut foam pad and gelcoat cleaner wax.
Every day a step closer.
 

Attachments

  • 20210417_095341 (1024x1024).jpg
    20210417_095341 (1024x1024).jpg
    515.1 KB · Views: 35
  • 20210417_095352 (1024x1024).jpg
    20210417_095352 (1024x1024).jpg
    286.6 KB · Views: 31
  • 20210417_095412 (1024x1024).jpg
    20210417_095412 (1024x1024).jpg
    475.4 KB · Views: 30
  • 20210417_104543 (1024x1024).jpg
    20210417_104543 (1024x1024).jpg
    243.3 KB · Views: 33
  • 20210417_104614 (1024x1024).jpg
    20210417_104614 (1024x1024).jpg
    244.3 KB · Views: 33
  • 20210417_104817 (1024x1024).jpg
    20210417_104817 (1024x1024).jpg
    219.8 KB · Views: 33
  • 20210418_100134 (1024x1024).jpg
    20210418_100134 (1024x1024).jpg
    332.6 KB · Views: 29
  • 20210418_100942 (1024x1024).jpg
    20210418_100942 (1024x1024).jpg
    365 KB · Views: 32
  • 20210418_102316 (1024x1024).jpg
    20210418_102316 (1024x1024).jpg
    395 KB · Views: 32
  • 20210418_102322 (1024x1024).jpg
    20210418_102322 (1024x1024).jpg
    400.4 KB · Views: 33
  • 20210418_121146 (1024x1024).jpg
    20210418_121146 (1024x1024).jpg
    337.9 KB · Views: 34
  • 20210418_121150 (1024x1024).jpg
    20210418_121150 (1024x1024).jpg
    333 KB · Views: 35
  • 20210418_133717 (1024x1024).jpg
    20210418_133717 (1024x1024).jpg
    452.8 KB · Views: 36
Last edited:

Meames1

Petty Officer 2nd Class
Joined
Dec 14, 2020
Messages
157
Got the wiring straightened out, at least where I'm happy with it. The wiring in this vintage of boat is crap to put it bluntly. I sure hope newer boats have gotten better. Anyway, I added some ground and power busses, some additional sleeving, and loom clamps. The new blower, bilge (added one with float and auto function), and fuel pumps all got new weatherpack connectors. I added a relay to power the fuel pump. Hooked up the battery and tested everything tonight and it all works as it should. I am also adding an external trim switch that I can access from the stern under a compartment I can reach from outside the trailer.
Drive goes on tomorrow, fuel, prime the oil system, and we will get some fire in the cylinders this weekend if all goes to plan.
 

Attachments

  • 20210422_193918 (1024x1024).jpg
    20210422_193918 (1024x1024).jpg
    463 KB · Views: 32
  • 20210422_193930 (1024x1024).jpg
    20210422_193930 (1024x1024).jpg
    363.8 KB · Views: 29
  • 20210422_193934 (1024x1024).jpg
    20210422_193934 (1024x1024).jpg
    493.2 KB · Views: 32
  • 20210422_193942 (1024x1024).jpg
    20210422_193942 (1024x1024).jpg
    400.1 KB · Views: 31
  • 20210422_193957 (1024x1024).jpg
    20210422_193957 (1024x1024).jpg
    586.4 KB · Views: 34
  • 20210422_194044 (1024x1024).jpg
    20210422_194044 (1024x1024).jpg
    371 KB · Views: 30

Meames1

Petty Officer 2nd Class
Joined
Dec 14, 2020
Messages
157
Sorry for not many updates, been working non-stop on the boat during all my free time. Also, not much picture-worthy. Cleaning, polishing, painting, and installing all the "little" stuff, cleats, rails, thru hulls, snaps, and stuff like that.

Everything that I could I replaced with polished SS, things like the fuel filler and cleats were "special" sizes and bolt patterns and I finally found that apparently everything on my boat came from Seachoice. So those items I had to get from them and unfortunately only offered in chrome plated pot metal (zamak ?). Of course I had to get all the sanding and buffing done before any of that could be done. I'll post pics and a walkaround video once completed, the exterior gelcoat ended up being in really, really good shape for 31 years old.

I'm installing the interior now, I count my blessings as my interior was in super shape for the age. A lot of cleaning and all new carpet on the carpeted pieces and everything looks like new. Of course I'm stuck with '90's colors, but consider myself lucky by not having to rebuild it all like some of you guys have. I never would have a chance getting this done in the 5 months if I was to do the interior too.

I also installed the windshield after tinting the glass. The original gauge cluster face and switch panels was sun faded completely white and you couldn't even see the gauges. I had to sand them down with 800-3000 grits and buffed and polished, they look pretty good. I don't like this 90's Fiero style cluster, going to build a new one...but the gauges all work, so that's a next off season project.

It's getting Splashed this weekend !
 

Attachments

  • 20210503_192931 (1024x1024).jpg
    20210503_192931 (1024x1024).jpg
    440.9 KB · Views: 29
  • 20210503_192939 (1024x1024).jpg
    20210503_192939 (1024x1024).jpg
    479 KB · Views: 29
  • 20210503_192942 (1024x1024).jpg
    20210503_192942 (1024x1024).jpg
    435.7 KB · Views: 31
  • 20210503_193326 (1024x1024).jpg
    20210503_193326 (1024x1024).jpg
    436.5 KB · Views: 31
  • 20210503_193332 (1024x1024).jpg
    20210503_193332 (1024x1024).jpg
    445.4 KB · Views: 29
  • 20210503_193348 (1024x1024).jpg
    20210503_193348 (1024x1024).jpg
    460.9 KB · Views: 31
Last edited:

Meames1

Petty Officer 2nd Class
Joined
Dec 14, 2020
Messages
157
You've done incredible work and worked at an incredible speed on this boat.
Thanks. I tend to go all-in when I tackle a project. LOL.
That's code for obsessed, and put more time and money in than it'll ever be worth. Ha HA.
 

JASinIL2006

Vice Admiral
Joined
Feb 10, 2012
Messages
5,524
Looking really nice! You've made great progress in a fairly short time period. I don't know about the cluster... it's so dated, it's almost cool again!

Good luck with the splash! And remember... take pictures or video, or it didn't happen!
 

briangcc

Commander
Joined
Jul 10, 2012
Messages
2,090
I'm not sure I would have tinted the windshield. Kinda hard to remove that at night when its dark out and you need every bit of light to see, but hey...your boat.

Otherwise, looks great!
 

Meames1

Petty Officer 2nd Class
Joined
Dec 14, 2020
Messages
157
I'm not sure I would have tinted the windshield. Kinda hard to remove that at night when its dark out and you need every bit of light to see, but hey...your boat.

Otherwise, looks great!
I went back and forth on it, I definitely like the look of it. We'll see how we actually use the boat. At least at this point in time we don't really fish and got the boat to pull the kids around, so obviously daylight hours. If it changes, I can rip it out.
 

Meames1

Petty Officer 2nd Class
Joined
Dec 14, 2020
Messages
157
SPLASHED !!!
Cold and misty today but we've been itching to try this thing out, so off we went to the closest lake.

It was "supposed" to be a test. Back it into the water, float it, run it, and check for leaks etc. But everything was working correctly, so we backed it off the trailer and gave it a go.

A few laps around the boat ramp and it still looked good, so off we went to deep water. Ran it the length of the lake back and forth a dozen times.

Everything worked flawless ! My wife, 16 year old son, and myself spent about 90 minutes on the lake until we were freezing, lol.
The boat jumps up on plane at around 16 mph per the GPS. Runs super smooth. I guessed at a prop and put on a 14 1/4" x 21 pitch prop...and it can use a lot more. GPS showed 42 mph at 5,200 rpm and I had a Lot of throttle left. I expect I'll try this one for pulling tubes and wake boards and go from there.

Engine ran 160 degrees the whole time, revved very smoothly and sounded great.

I cannot be happier with our initial voyage. From a rotted-out piece of scrap to this in a very short 5 months, whew. You'll see in the pics I still have to have a piece of carpet made for the bow area and replace the rotten wood on one bow cusion (that's why it's missing).
As required, pics and video below. By the way, we are wearing our masks because of the cold, lol.


Attachments

  • 28045 (720x960).jpg
    28045 (720x960).jpg
    108.9 KB · Views: 44
  • 28053 (907x680).jpg
    28053 (907x680).jpg
    57.5 KB · Views: 41
  • 28064 (1008x756).jpg
    28064 (1008x756).jpg
    150.8 KB · Views: 46
  • 20210508_113458 (1024x1024).jpg
    20210508_113458 (1024x1024).jpg
    672.2 KB · Views: 43
  • 20210508_113508 (1024x1024).jpg
    20210508_113508 (1024x1024).jpg
    782 KB · Views: 44
  • 20210508_113521 (1024x1024).jpg
    20210508_113521 (1024x1024).jpg
    685.2 KB · Views: 43
  • 20210508_113528 (1024x1024).jpg
    20210508_113528 (1024x1024).jpg
    746.4 KB · Views: 44
  • 20210508_113537 (1024x1024).jpg
    20210508_113537 (1024x1024).jpg
    466.2 KB · Views: 44
  • 20210508_113540 (1024x1024).jpg
    20210508_113540 (1024x1024).jpg
    370 KB · Views: 41
  • 20210508_113547 (1024x1024).jpg
    20210508_113547 (1024x1024).jpg
    516.3 KB · Views: 41
  • 20210508_113554 (1024x1024).jpg
    20210508_113554 (1024x1024).jpg
    602.1 KB · Views: 41
  • 20210508_113556 (1024x1024).jpg
    20210508_113556 (1024x1024).jpg
    601.3 KB · Views: 41
  • 20210508_113607 (1024x1024).jpg
    20210508_113607 (1024x1024).jpg
    490.5 KB · Views: 41
Last edited:

Meames1

Petty Officer 2nd Class
Joined
Dec 14, 2020
Messages
157
Correction, I wrote the numbers above wrong, the boat was going 42 mph at 4800 rpm. I meant I will comfortably run it to 5,200 on "occasion".
 

Meames1

Petty Officer 2nd Class
Joined
Dec 14, 2020
Messages
157
Holy Cow, I just realized I never re-calibrated the tach for the V8.
So....anyone know how to switch a factory Larson tach from a V6 to a V8 ?
No wonder I thought I was out of revs...lol
 

Meames1

Petty Officer 2nd Class
Joined
Dec 14, 2020
Messages
157
I found that the factory tach has a switch on the back, so it's now set for an 8 cylinder.
 

todhunter

Canoeist
Joined
Sep 15, 2020
Messages
1,234
What a great job, man! Very happy for you.

When you get a chance, pull up the teak hatch cover, disassemble, run it through a planer to just skim cut the oxidized surface off, sand, oil, and reinstall. I was amazed at how much better my ski locker hatch looked after doing this. I'll be doing my swim platforms and the other teak around the boat as time permits.
 

Meames1

Petty Officer 2nd Class
Joined
Dec 14, 2020
Messages
157
What a great job, man! Very happy for you.

When you get a chance, pull up the teak hatch cover, disassemble, run it through a planer to just skim cut the oxidized surface off, sand, oil, and reinstall. I was amazed at how much better my ski locker hatch looked after doing this. I'll be doing my swim platforms and the other teak around the boat as time permits.
Yeah, I am going to do that after seeing yours. I don't own a planer, gotta find out which of my friends do. Thanks
 

Meames1

Petty Officer 2nd Class
Joined
Dec 14, 2020
Messages
157
We took the boat out for the second trip this weekend and it runs excellent. We did encounter one issue. Last week during the initial splash I towed it to a small lake (340 acres) that is usually not busy with my 3/4 ton pickup, but we put it in and out with my wife's Explorer. She met us there as we were leaving and going separate directions. Everything towed fine.

Well, this week we set off towing with her Explorer at 40mph the boat started swaying almost uncontrollable. We went the back roads @ 35 the rest of the 10 miles and back.

Yesterday, I started looking at the shorelandr trailer and I knew the front was light, but at her hitch height (19") I could lift the front of the trailer with 1 finger. I noticed the boat could come forward another 3" and still have the rollers at the end of the transom, so I moved the winch post and pulled it forward. I then jacked it up and moved the axles back 14" !!

After all the "adjustments" this ended up giving me about 215 lbs on the tongue at 19". I hooked it back up to the Explorer and the new tongue weight only sagged the rear 3/4". Drove it up the highway about 68 mph or so and straight and true, no sway even with cars / trucks passing.

I know I added a 5.7 in place of the V-6 (around 150 lbs.) but, the trailer was not even close to being set up correctly before.

All in all though the boat is performing great. Time to hit the bigger lakes. We live 15 miles from Seneca Lake, and 30 miles from the other Finger Lakes. Our favorite camp ground is on a 500 acre COE lake 45 minutes away in PA. So we hope to get a lot of use out of it.
 
Top