Restoring a 1990 Larson

Meames1

Petty Officer 2nd Class
Joined
Dec 14, 2020
Messages
157
Cleaned and set the fuel tank. Cut the hole for the deck plate to access the fill / vent lines and sending unit in the future as I'm glassing the tank cover in. Some may have noticed in previous pictures, the half moon shaped cut-out I had placed on the upper half of the rear bulkhead. I did that so I can reach in and replace the fuel line if needed down the road. Looks like it will work out good.
Also got the rest of the deck smoothed where I PB'd the edges and the foam cut outs.
Next up, tab floor at perimeter and engine bay and start laying the 1708 and 6oz over entire floor.
 

Attachments

  • Tank.jpg
    Tank.jpg
    286.3 KB · Views: 25
  • Tank2.jpg
    Tank2.jpg
    176.3 KB · Views: 25
  • Tank Cover.jpg
    Tank Cover.jpg
    204 KB · Views: 25
  • Tank Deck Plate.jpg
    Tank Deck Plate.jpg
    178.7 KB · Views: 24
  • Deck Plate.jpg
    Deck Plate.jpg
    197.2 KB · Views: 23
  • Fuel Line 1.jpg
    Fuel Line 1.jpg
    286.5 KB · Views: 24
  • Fuel Line 2.jpg
    Fuel Line 2.jpg
    347.9 KB · Views: 24
  • Fuel Line.jpg
    Fuel Line.jpg
    300.3 KB · Views: 25

Meames1

Petty Officer 2nd Class
Joined
Dec 14, 2020
Messages
157
These were waiting for me when I got home today. I'm running out of excuses to not get this done. :p
SEI Upper and lower drives, 1.47 ratio upper.
 

Attachments

  • 20210312_153701 (2) (1024x1024).jpg
    20210312_153701 (2) (1024x1024).jpg
    500.1 KB · Views: 5

Meames1

Petty Officer 2nd Class
Joined
Dec 14, 2020
Messages
157
Tonight, I cleaned up the floors and coated the edges with resin where the tabbing goes so it can soak in overnight. Also, coated the bottom of the fuel tank cover / floor and the last of the cleats. Tab the floors tomorrow, install the fuel tank cover and then soak the whole floor. Hoping to get at least the 1708 down before the end of the weekend, maybe a layer of 6 oz too if I'm lucky.
Also, opened the new drive and checked it out. Quality looks pretty nice.
 

Attachments

  • 20210312_201046 (1024x1024).jpg
    20210312_201046 (1024x1024).jpg
    442.8 KB · Views: 33
  • 20210312_201055 (1024x1024).jpg
    20210312_201055 (1024x1024).jpg
    616.5 KB · Views: 37
  • 20210312_201826 (1024x1024).jpg
    20210312_201826 (1024x1024).jpg
    484.5 KB · Views: 37
  • 20210312_202128 (1024x1024).jpg
    20210312_202128 (1024x1024).jpg
    522.5 KB · Views: 36

Meames1

Petty Officer 2nd Class
Joined
Dec 14, 2020
Messages
157
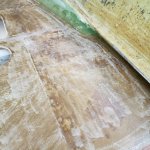
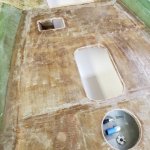
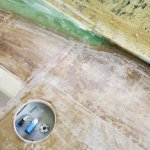
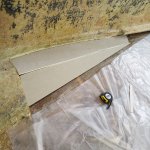
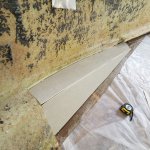
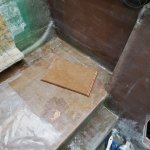
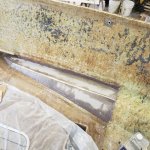
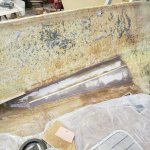
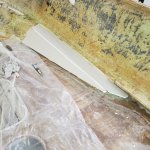
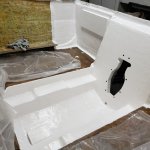
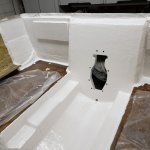
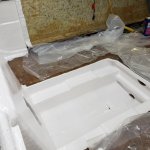
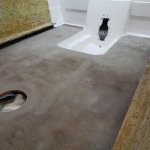
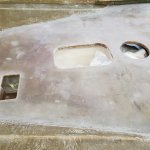
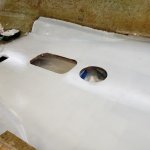
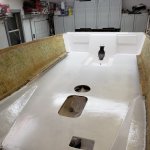
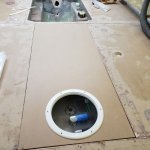
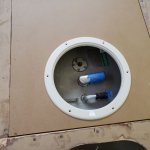
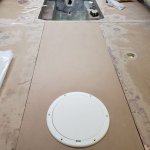
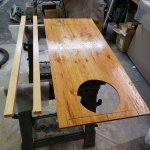
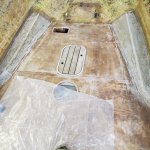
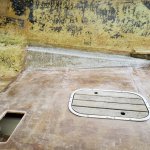
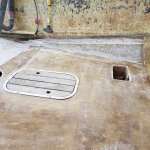
I was able to get the fuel tank cover done, cleats installed, glued and screwed and PB'd in place. The whole floor tabbed to the hull with 2 layers of 1708.
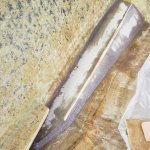
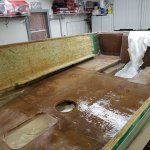
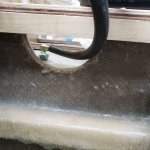
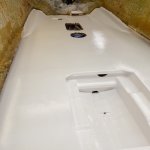
Then installed a layer of 1708 over the entire floor. Some of you guys in these rebuild threads make it look easy, lol. The center piece of 1708 I did in one shot, it was 50" by 70" long and it Kicked My Butt. All in all though pretty happy with the final product. I have a few raised sections where the pieces overlap and a few areas where the 1708 is frayed at the ends. I'm going to smooth these spots out with a quick hit with the grinder and add some fiberglass filler before installing a layer of 6oz over the whole thing.
Not gonna lie, it's got me thinking about putting carpet back and walking away. (nah...I'm too fussy).
More Pics coming tonight.
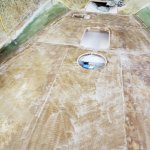
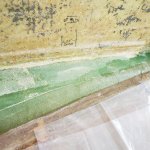
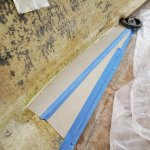
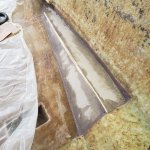
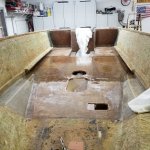
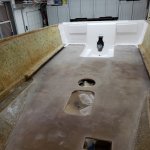
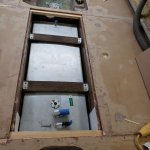
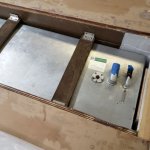
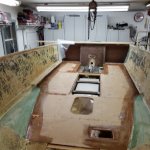
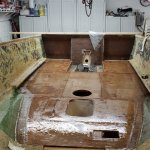
The only picture I took this weekend, here the floors are tabbed and I coated the floors with resin to soak overnight before adding the 1708. This was also before adding the PB to the fuel cover gaps and screw holes. Trying to make sure any wood has ample time to soak up resin before adding any PB or mat.
 

Attachments

  • 20210313_202146.jpg
    20210313_202146.jpg
    136.1 KB · Views: 28
Last edited:

JASinIL2006

Vice Admiral
Joined
Feb 10, 2012
Messages
5,548
Seems like laying glass over a big, flat surface would be easy, doesn't it? I found it more challenging than expected, especially when working with CSM. 1708 was a bit easier, but still took some work to get it flat and rolled out.

Yours looks really good. I'll be interested to see what you think after laying the 6 oz. (which has its own challenges....)
 

Meames1

Petty Officer 2nd Class
Joined
Dec 14, 2020
Messages
157
Seems like laying glass over a big, flat surface would be easy, doesn't it? I found it more challenging than expected, especially when working with CSM. 1708 was a bit easier, but still took some work to get it flat and rolled out.

Yours looks really good. I'll be interested to see what you think after laying the 6 oz. (which has its own challenges....)
Thanks,
went through your thread again earlier today. Once I do something I can more relate and pick up a few new things in every re-build thread. What issues / characteristics did you find laying the 6oz ?
 

JASinIL2006

Vice Admiral
Joined
Feb 10, 2012
Messages
5,548
Thanks,
went through your thread again earlier today. Once I do something I can more relate and pick up a few new things in every re-build thread. What issues / characteristics did you find laying the 6oz ?
The 6 oz. is so light, I found that it was really easy to get it out of shape and/or wrinkled. Woodonglass recommended using very little resin and start rolling from the center of the piece to the edges. I very lightly coated the surface with resin before putting down the cloth, and then I sparingly added more resin as needed when I rolled it out. It doesn't take much resin for the 6 oz. cloth...
 

todhunter

Canoeist
Joined
Sep 15, 2020
Messages
1,244
Looking good! That drive is minty fresh. Yeah...carpet...I'm glad I'm not gelcoating the whole boat on mine. :) Though I'm sure it's going to look sweet and be pretty easy to maintain!
 

Meames1

Petty Officer 2nd Class
Joined
Dec 14, 2020
Messages
157
Tonight I quick-sanded the deck and 1708 with a 60 grit disc, nothing serious just scuffed the knobs off and leveled the seams. Looks and feels pretty good, nowhere near where it needs to be for Gel. Once the 6 oz is put down I'll have to smooth several areas with fairing, but at least for now I'm still set on Gel-coating the floor.
I decided to deal with another item before the 6 oz is put down. The front of the floors have an area that was foamed about 3/4" thick and sprayed over with resin and chopped glass. I had to cut this out to be able to tab the floor into the hull. I'm now experimenting with a solution to add the foam and thickness back. I'm installing some 1/2" thick high density polyiso insulation. It's closed cell and 110 PSI compressive strength. I will glue these pieces in with foam adhesive (also closed cell) and shape the foam with a sander and fairing (or PB) as needed, then cover with resin and CSM or 1708 before covering with 6 oz with the rest of the floor.
I also started the 2 sacrificial pieces at the stern, 1 for the battery and the other for the trim pump.
 

Attachments

  • 20210315_183925 (1024x1024).jpg
    20210315_183925 (1024x1024).jpg
    636 KB · Views: 21
  • 20210315_183928 (1024x1024).jpg
    20210315_183928 (1024x1024).jpg
    767.8 KB · Views: 22
  • 20210315_183932 (1024x1024).jpg
    20210315_183932 (1024x1024).jpg
    810.9 KB · Views: 24
  • 20210315_183953 (1024x1024).jpg
    20210315_183953 (1024x1024).jpg
    646.2 KB · Views: 24
  • 20210315_183956 (1024x1024).jpg
    20210315_183956 (1024x1024).jpg
    715.4 KB · Views: 24
  • 20210315_185320.jpg
    20210315_185320.jpg
    2 MB · Views: 23
  • 20210315_192042 (1024x1024).jpg
    20210315_192042 (1024x1024).jpg
    650 KB · Views: 23
  • 20210315_192044 (1024x1024).jpg
    20210315_192044 (1024x1024).jpg
    740.7 KB · Views: 24
  • 20210315_192056 (1024x1024).jpg
    20210315_192056 (1024x1024).jpg
    615.5 KB · Views: 25
  • 20210315_192059 (1024x1024).jpg
    20210315_192059 (1024x1024).jpg
    688.9 KB · Views: 21
Last edited:

Meames1

Petty Officer 2nd Class
Joined
Dec 14, 2020
Messages
157
I got both sides of the foot well / hull insulation adhered. I set them in full coverage of the low-rise foam. After curing I used PB to fill in the edges. The original insulation here was more "rounded" as these are angular and more defined, but I like them. These will get covered in a layer of 1708 (at least that's what I'm leaning towards), maybe even a layer of CSM and 1708....still experimenting. Then they'll get covered in 6 oz with the rest of the floor. Pretty happy with how they are turning out.
 

Attachments

  • 20210316_141441 (1024x1024).jpg
    20210316_141441 (1024x1024).jpg
    747.1 KB · Views: 19
  • 20210316_141445 (1024x1024).jpg
    20210316_141445 (1024x1024).jpg
    466.4 KB · Views: 19
  • 20210316_180942 (1024x1024).jpg
    20210316_180942 (1024x1024).jpg
    771.2 KB · Views: 19
  • 20210316_180955 (1024x1024).jpg
    20210316_180955 (1024x1024).jpg
    779.7 KB · Views: 19
  • 20210316_181002 (1024x1024).jpg
    20210316_181002 (1024x1024).jpg
    779.4 KB · Views: 20
  • 20210316_181014 (1024x1024).jpg
    20210316_181014 (1024x1024).jpg
    735.5 KB · Views: 23
  • 20210316_181252 (1024x1024).jpg
    20210316_181252 (1024x1024).jpg
    747.2 KB · Views: 19

Meames1

Petty Officer 2nd Class
Joined
Dec 14, 2020
Messages
157
I put a layer of csm and 1708 on the insulated foot wells ( I guess that's officially what I decided to call them). Then scuffed them with the DA and a 40 grit disc. Just have to do some smoothing here and there then lay the 6 oz. Hope to start the gel coat by Sunday.
 

Attachments

  • 20210318_190910 (1024x1024).jpg
    20210318_190910 (1024x1024).jpg
    675.6 KB · Views: 26
  • 20210318_191332 (1024x1024).jpg
    20210318_191332 (1024x1024).jpg
    848.4 KB · Views: 26
  • 20210318_191404 (1024x1024).jpg
    20210318_191404 (1024x1024).jpg
    814.3 KB · Views: 26
Last edited:

Meames1

Petty Officer 2nd Class
Joined
Dec 14, 2020
Messages
157
Got the layer of 6 oz down on the floor. I was able to get a couple coats of gel coat on the transom and bilge / engine mounts.
 

Attachments

  • 20210320_121512 (1024x1024).jpg
    20210320_121512 (1024x1024).jpg
    642.6 KB · Views: 23
  • 20210320_121517 (1024x1024).jpg
    20210320_121517 (1024x1024).jpg
    669.4 KB · Views: 24
  • 20210321_193718 (1024x1024).jpg
    20210321_193718 (1024x1024).jpg
    537.3 KB · Views: 24
  • 20210321_193722 (1024x1024).jpg
    20210321_193722 (1024x1024).jpg
    417.6 KB · Views: 26
  • 20210321_193751 (1024x1024).jpg
    20210321_193751 (1024x1024).jpg
    488.6 KB · Views: 25
  • 20210321_193806 (1024x1024).jpg
    20210321_193806 (1024x1024).jpg
    482.8 KB · Views: 25

Meames1

Petty Officer 2nd Class
Joined
Dec 14, 2020
Messages
157
Well, I have been on the edge about retreating and ordering carpet to install on the deck. Decided to start sanding and smoothing my many mistakes and giving it two more days before I bail and get the carpet. I am glad I did ! Got the deck where I was happy enough with it to start laying the gelcoat. First coat down. I mixed 20 ounces and laid a light but thorough coat and I couldn't be happier with the result. I'll do a second (heavier) coat tomorrow and hopefully it will cure enough by Thursday night so I can tape to it. Tape the pattern for the non-slip and I'll add that coat. The 4th and final coat will have wax and will also be the last coat on the transom and bilge. At least that's the plan as of now.
 

Attachments

  • 20210323_182409 (1024x1024).jpg
    20210323_182409 (1024x1024).jpg
    483.4 KB · Views: 22
  • 20210323_182422 (1024x1024).jpg
    20210323_182422 (1024x1024).jpg
    470.5 KB · Views: 22
  • 20210323_182430 (1024x1024).jpg
    20210323_182430 (1024x1024).jpg
    538.1 KB · Views: 20
  • 20210323_191247 (1024x1024).jpg
    20210323_191247 (1024x1024).jpg
    404.7 KB · Views: 20
  • 20210323_191250 (1024x1024).jpg
    20210323_191250 (1024x1024).jpg
    356.2 KB · Views: 21
  • 20210323_191309 (1024x1024).jpg
    20210323_191309 (1024x1024).jpg
    446.3 KB · Views: 22
Top