Project Sea Sprite

Mark42

Fleet Admiral
Joined
Oct 8, 2003
Messages
9,334
Re: Project Sea Sprite

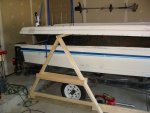
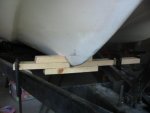
I agree with not cutting the cap. I think your idea of hoisting up the aft end enough to work is a good one. A few 2x4's might be used to support it from the underside.

Also, after doing the transome, re-attach the cap and then install the new floor. The cap prevents the boat from deforming, so you want it on before installing the new stringers and floor.
 

Cougar_15

Petty Officer 3rd Class
Joined
Aug 11, 2008
Messages
93
Re: Project Sea Sprite

Well the wheels are turning slow but I'm still moving forward (free time is hard to come by with 2 small kids).
This past weekend I was able to get the cap off of the hull!

attachment.php


attachment.php


Once I had the cap up I discovered that it is a really good thing that I needed to pop the cap
because I found a problem area (2 actually) under the bow seats. The bottom of the bow seats were
apparently rubbing on the hull and had started to eat away the glass... :(

attachment.php


attachment.php


So I have added another item to my project list but at least I found this now rather than
on the water after the entire restoration was done...

Do you guys think a couple/3 layers of glass (I'm thinking 1708) over the two spots
will be enough or should I try to put something (no idea what) between the seats
and the hull after the hull is repaired?
 

Attachments

  • IMG_0162.jpg
    IMG_0162.jpg
    57.3 KB · Views: 2
  • IMG_0161.jpg
    IMG_0161.jpg
    55.7 KB · Views: 2
  • IMG_0166.jpg
    IMG_0166.jpg
    59.1 KB · Views: 2
  • IMG_0168.jpg
    IMG_0168.jpg
    54.9 KB · Views: 2

redfury

Commander
Joined
Jul 16, 2006
Messages
2,655
Re: Project Sea Sprite

That's a bad design...or your bow area was collapsing and rubbing. I'd find out what you need to do to bolster the bow if you can, or you may have to find a way to support it when it is installed back on the boat so it doesn't sag and rub. Beyond that, I'd repair the area and possibly put some thick rubber membrane on that area to avoid it from rubbing through ( at least as easily ).

I've got the same problem along the outer edges holding water and there is no way to divert it out of there short of tabbing some glass along that entire length, I don't know what you would do to avoid the water build up.
 

Driven1

Petty Officer 2nd Class
Joined
Jul 13, 2008
Messages
157
Re: Project Sea Sprite

In my MFG, the plywood floor went all of the way up into that area, supporting the walk-through and separating it from the hull. You'll definately want to come up with a way to support that properly and minimize future wear. In mine, because the floor was shot underneath the walk-through, the windows wouldn't align properly and the fiberglass floor of the walk-through developed stress cracks in the corners. Definately something to fix.
 

Cougar_15

Petty Officer 3rd Class
Joined
Aug 11, 2008
Messages
93
Re: Project Sea Sprite

I think maybe the seats sagged when the deck supporting the walk-through rotted away. When I lifted the top off, there was a pile of mush (rotten wood) under the walk-through... After I get the hull repaired and replace the deck section under the walk-through, I'm planning on doing a test fit of the cap to see if the seats still touch the hull. If they do then I'll have to come up with a way to add some support.​
 

Cougar_15

Petty Officer 3rd Class
Joined
Aug 11, 2008
Messages
93
Re: Project Sea Sprite

Well, I managed to find a little time to work on the boat this weekend. I added a brace under the front of the keel to (hopefully) help the hull maintain it's shape once the stringer is out.​

attachment.php

I also removed the wood from the transom. I had hoped to be able to remove it in one piece to use as a template but it was not to be, it was way to rotten...​

attachment.php

attachment.php

The wood in the transom appeared to be single piece of 1 1/8 inch plywood.​

For the replacement would it be better to use a single piece of ply or to laminate 2 thinner pieces with mat in-between?​
 

Attachments

  • IMG_0182.jpg
    IMG_0182.jpg
    15.8 KB · Views: 2
  • IMG_0192.jpg
    IMG_0192.jpg
    37.2 KB · Views: 2
  • IMG_0199.jpg
    IMG_0199.jpg
    32 KB · Views: 2

Mark42

Fleet Admiral
Joined
Oct 8, 2003
Messages
9,334
Re: Project Sea Sprite

I've been thinking about the rubbing problem for a bit. I think a good solution would to be add a mechanical fastener between the cap and the hull so those areas can no longer rub. But drilling a hole through the hull and into the bow area to put nuts and bolts will eventually leak and be hard to seal. So I came up with the following:

- Basic design: Epoxy a U bolt to the hull that protrudes into the bow area where nuts/washer will be added to tighten the bow down to the hull.

- Details:

Get a length of stainless or aluminum or galvanized threaded rod in 3/8 inch and bend into a U shape with 2" tall legs and about 4 or 5" across the bottom. Put down one layer of 1708 using epoxy. Then put the U bolt down and two layers of 1708 on top. Make the pieces of 1708 about 14"x7" or so in size so they get a good grip on the hull.

Drill holes in cap to match the U bolt. Assemble cap and put stainless fender washers and ny-loc nuts. Tighten to prevent movement of cap/hull.
Cut off excess rod sticking into the bow area.


You could slap a glob of thickened epoxy between the two pieces when assembled, but you would never be able to separate them again. Or you could put down the 1708 to reinforce the hull, and a piece of rubber like from truck inner tube to prevent rubbing, but it will eventually wear out. I think the U bolt works best because you can remove the cap if you ever want to in the future.

But then again, just reassembling the cap (with some 1708 reinforcement on the hull ) and drilling two holes on each side and installing stainess carriage bolts, washers and nuts with epoxy or a good sealer in/around the carriage bolt would probably last for many years too.
 

i386

Captain
Joined
Aug 24, 2004
Messages
3,548
Re: Project Sea Sprite

You could slap a glob of thickened epoxy between the two pieces when assembled, but you would never be able to separate them again. Or you could put down the 1708 to reinforce the hull, and a piece of rubber like from truck inner tube to prevent rubbing, but it will eventually wear out. I think the U bolt works best because you can remove the cap if you ever want to in the future.

That's what I'm thinking. Peanut butter the sucker together or bolt it like you said. Future removal is the only factor I can think of.

The whole stern end of my boat's cap was peanut buttered in originally. Looking back, I think they "glued" it with gelcoat but I can't say for sure. When I reassemble I think I will either use nothing or maybe just a few small blobs of PL Premium here and there.
 

Nova II 260

Senior Chief Petty Officer
Joined
Jul 27, 2006
Messages
681
Re: Project Sea Sprite

You could use some GOOD STUFF spray foam in the rub area once you have your cap back on. That stuff sticks and will cushion any movement. As far as having to take it apart in the future ... let the next guy worry about that.
Another thing you might consider doing is flipping the hull over and taking care of any problems there.
Nice resto with lotsa pics might help you
 

jcsercsa

Captain
Joined
May 21, 2007
Messages
3,401
Re: Project Sea Sprite

Well, I managed to find a little time to work on the boat this weekend. I added a brace under the front of the keel to (hopefully) help the hull maintain it's shape once the stringer is out.​

attachment.php

I also removed the wood from the transom. I had hoped to be able to remove it in one piece to use as a template but it was not to be, it was way to rotten...​

attachment.php

attachment.php

The wood in the transom appeared to be single piece of 1 1/8 inch plywood.​

For the replacement would it be better to use a single piece of ply or to laminate 2 thinner pieces with mat in-between?​

Hay couger , can you check the thickness of the transom again , most are 1 1/2 inchs thick !!!! and its better i think if you use 2 pieces on the transom !! John
 

fire7882

Petty Officer 2nd Class
Joined
Jul 15, 2008
Messages
172
Re: Project Sea Sprite

Hay couger , can you check the thickness of the transom again , most are 1 1/2 inchs thick !!!! and its better i think if you use 2 pieces on the transom !! John

Mine was only 1 1/4 so I used 2 pieces of 5/8th. I couldn't make it thicker either because the splashwell wouldn't have fit if I did.
 

Cougar_15

Petty Officer 3rd Class
Joined
Aug 11, 2008
Messages
93
Re: Project Sea Sprite

John,
I'll double check it tonight, I saved the one piece that came out solid for a referance (about 12" x 12"), but I am pretty sure that it came in at less than 1 1/4 (not counting the inner glass)... Here is an shot of it from the side:​

attachment.php

I wouldn't mind going a little thicker but I'll have to check to see if I have any extra room between the transom and the splash well...​
 

Attachments

  • IMG_0196.jpg
    IMG_0196.jpg
    22.6 KB · Views: 0

jcsercsa

Captain
Joined
May 21, 2007
Messages
3,401
Re: Project Sea Sprite

John,
I'll double check it tonight, I saved the one piece that came out solid for a referance (about 12" x 12"), but I am pretty sure that it came in at less than 1 1/4 (not counting the inner glass)... Here is an shot of it from the side:​

attachment.php

I wouldn't mind going a little thicker but I'll have to check to see if I have any extra room between the transom and the splash well...​


Hay , thats the ticket Cougar , that piece dont look like it swelled or rotted !! did someone do this before ??? I like the idea , see if you have the room for a little thicker transom , if not go with what you got !! are you going to put 3 layers of glass ??


I was reading another thread where he put in 1 inch when it should have been 1 1/2 , just didnt want you to have to add another have inch to her when you were trying to put her back together !!

Keep up the great work Cougar !!! John
 

Cougar_15

Petty Officer 3rd Class
Joined
Aug 11, 2008
Messages
93
Re: Project Sea Sprite

I took another measurement, from the one dry, non-rotten piece of wood I found during the tear-out, and it looks like the transom was only 1 inch thick. I think the spot I used for my initial measurement (only one I could get to at the time) was swelled up. Here is a pic showing the measurement:​

attachment.php

I also measured the clearance between the edge of the transom and the splash well (attempted to anyway, with the cap off it's an estimate at best) and there does not appear to be much extra room availible.​

So, unless there is a good reason not to, I think I'm going to replace it with 1 inch thick ply (for simplicity sake) and several layers of glass (I haven't figured out yet what kind mat/1708 or both...).​
 

Attachments

  • IMG_0200.jpg
    IMG_0200.jpg
    29.3 KB · Views: 0

Driven1

Petty Officer 2nd Class
Joined
Jul 13, 2008
Messages
157
Re: Project Sea Sprite

You should be able to tell how thick the original transom was by measuring the gap between the inside of the outer transom skin to the inside of the inner transom skin at the side of the hull...

BILD0155.jpg


I would expect that it was originally 1 1/2" thick. (Two pieces of 3/4" ply laminated together.)
 

jcsercsa

Captain
Joined
May 21, 2007
Messages
3,401
Re: Project Sea Sprite

I took another measurement, from the one dry, non-rotten piece of wood I found during the tear-out, and it looks like the transom was only 1 inch thick. I think the spot I used for my initial measurement (only one I could get to at the time) was swelled up. Here is a pic showing the measurement:​

attachment.php

I also measured the clearance between the edge of the transom and the splash well (attempted to anyway, with the cap off it's an estimate at best) and there does not appear to be much extra room availible.​

So, unless there is a good reason not to, I think I'm going to replace it with 1 inch thick ply (for simplicity sake) and several layers of glass (I haven't figured out yet what kind mat/1708 or both...).​

Nope Go for it !!! John
 

Cougar_15

Petty Officer 3rd Class
Joined
Aug 11, 2008
Messages
93
Re: Project Sea Sprite

I'm continuing to inch forward. This weekend I cut out the rest of the deck and started removing the rest of the rotten wood and foam. I was surprised to find that the foam was all dry, I have not found any that was wet yet... Here is a pic of the forward end of the stringer:​

attachment.php

Looking at this I keep going back to the idea of leaving the current stringer intact and using structural foam on each side. I know that this would cost more and possibly be more work than just replacing the stringer but it would go a long way towards helping to address some of logistical issues I have with this project. The workspace I'm using is half of the family garage, the other half hold the wife?s car and the kids outdoor toys and the lawn equipment. This means that I have to minimize the amount of dust that escapes the hull because I don't want to contaminate the other things in the garage. I have a sander that connects to my shop vac that does a great job of cleaning up the surfaces without letting any dust escape but grinding is going to be a problem. I know I will not be able to escape it completely but anything I can do to limit the amount of grinding needed will greatly help. If I can get away without have to remove/replace the stringer that will go a long way towards making this project feasible given my constraints. Taking over the entire garage is not an option as the one stipulation about this project from my wife was that she gets to keep her car in the garage.​


So my question is, if I was to leave the current stringer intact and fill the area on both sides of the stringer with #4 foam would this make a safe hull? I know this may not be the best way but will it work???:confused: I haven't tested it fully yet but the stringer seems to be pretty solid and the wood from a core sample (only checked one spot so far) looked pretty good...​


I'm mostly concerned about safety, if this would in any way create an unsafe boat then I will come up with a different plan, what do you guys think?:confused::confused:


Attachments

  • IMG_0201.jpg
    IMG_0201.jpg
    63.3 KB · Views: 1

jcsercsa

Captain
Joined
May 21, 2007
Messages
3,401
Re: Project Sea Sprite

Man i dont know ???? it will surely stiffen the hull !! do a couple more core samples , and let us know !!! if the stringers are good , I would say go for it !! I know i used the 2 lbs stuff and it really made mine soild !!! John
 

Cougar_15

Petty Officer 3rd Class
Joined
Aug 11, 2008
Messages
93
Re: Project Sea Sprite

My thinking is, even if the stringer is not completely sound, how different would it be from doing a complete foam job without any stringers (this has been mentioned on a couple different threads)? Maybe I'm way off base but in theory wouldn't it be almost the same? Does this make any sense or am I just totally into wishful thinking land...?​
 

jcsercsa

Captain
Joined
May 21, 2007
Messages
3,401
Re: Project Sea Sprite

My thinking is, even if the stringer is not completely sound, how different would it be from doing a complete foam job without any stringers (this has been mentioned on a couple different threads)? Maybe I'm way off base but in theory wouldn't it be almost the same? Does this make any sense or am I just totally into wishful thinking land...?​

Couger I really think your wishing , if it was safe dont you think all the boat companys would do that ??? dont get me wrong its your ride and you can do what you want , but you taking your life and the people you take out life in your hands !!We all wish we didnt have to do all this , but its got to be done !!!!I really dont think there is any way to get around this if your stringers are bad you should replace them !!! John
 
Top