Project Sea Sprite

Cougar_15

Petty Officer 3rd Class
Joined
Aug 11, 2008
Messages
93
Re: Project Sea Sprite

Hi Guys, not much progress so far this week, still trying to figure out the back to school routine... I am planning on spending some time tomorrow and Friday evening to pull the outboard, hopefully.​

Even though I haven't been able to do much, I have been doing a lot of thinking and planning and I came up with a question that I'm hoping has a better answer than what I'm expecting.​

Is there any way to safely heat a garage in order to be able to glass during the winter?

Right now it's looking like by the time I'm ready to start glassing it will be too cold to start :confused:. I have an attached garage that is insulated (except for the aluminum door) but not heated. I want to be able to work on the project over the winter but I would rather not burn down/blow up the house in the process and from everything I read the vapor from Poly resin is very flameable :eek:.​
 

Mark42

Fleet Admiral
Joined
Oct 8, 2003
Messages
9,334
Re: Project Sea Sprite

Depending on how cold it is, I read where some members were able to glass just using a few heat lamps on stands to warm the area being worked on.
 

Cougar_15

Petty Officer 3rd Class
Joined
Aug 11, 2008
Messages
93
Re: Project Sea Sprite

As busy as this weekend was I managed to make some progress, the outboard is off the transom!​

attachment.php

Now I can get serious about working on the hull. I guess I'll need to stop by the store and stock up on Corona, I'll be grinding soon... ;)
 

Attachments

  • IMG_0133.jpg
    IMG_0133.jpg
    53.2 KB · Views: 0

Bsquared

Seaman Apprentice
Joined
Aug 30, 2007
Messages
39
Re: Project Sea Sprite

Be careful with the heat lamps; get 'em too close or leave them for too long and they WILL burn a hole in your glass work. Leave 'em long enough and that hole could extend to your garage...

I've had decent luck putting a wood frame with plastic sheeting over the work area with a couple of oil-filled/electric heaters (no open elements) under the frame. Of course, this was on a small boat in Virginia; might be hard to do on a bigger project further north :)
 

Cougar_15

Petty Officer 3rd Class
Joined
Aug 11, 2008
Messages
93
Re: Project Sea Sprite

Redfury, wouldn't that heater be a fire risk since it uses Propane as a fuel source?​

Would a regular electric space heater/fan work? They don't have any flame but they do have metal coils that glow red...​

Bsquared, the oil-filled space heater sounds interesting, I'll check into that idea...​

I'm thinking saftey first, if I have to wait till spring to finish then that's what I'll do but I really don't want to wait..​
 

redfury

Commander
Joined
Jul 16, 2006
Messages
2,655
Re: Project Sea Sprite

No flame, it's a catalytic reaction...same way your catalytic converter burns off excess fuel. Granted, there is still more of an issue than pure electric, but it only takes a spark if the conditions are right. Honestly, if the fumes are that concentrated, you shouldn't be working in there even with a respirator.
 

Cougar_15

Petty Officer 3rd Class
Joined
Aug 11, 2008
Messages
93
Re: Project Sea Sprite

Thanks redfury, I learn something new every day!​

I guess I'll just have to wait and see how cold the weather is when I get to the point of glassing and go from there. If I can find some time to work on it maybe I can get some done before the temp's slide too far...​

I'm hoping to get going on seperating the hull this weekend, then I can finish tearing out the deck and foam and start grinding.​

While I'm thinking about it, anyone have any tips about how to minimize the possibility of hull distortion once the top is off?​
 

redfury

Commander
Joined
Jul 16, 2006
Messages
2,655
Re: Project Sea Sprite

Long threaded rods with nuts and fender washers through the hull. You'll have holes to fill, but that's really not all that big of a deal....oops! did it to the hull extension. Currently on mine, I've got holes in the side of the boat from some idiot that put snaps halfway down and ran copper wire through them and have it held into "shape" that way, though it's a little distorted, so I plan to put the cap back on for winter and let its "belt" out.
 

jcsercsa

Captain
Joined
May 21, 2007
Messages
3,401
Re: Project Sea Sprite

Hay cougar I got a torpedo heater, I just open the garage to the top of the heater , let it run for 15 mins or so and i can work out there in my short sleeves shirt !! here in mich , it was in the 20 last winter and in the garage it was in the 70's, I would run it every hour or so till everything in there got warm, in the afternoon would only have to run it once or twice !!

warning it can cause a fire , or carbonmonoxida poisoning, you have to have the fresh air comming in while its running !! I loved it went threw 3 tanks of gas for her , but i was warm all winter in the garage !! just be carefull if you get one . oooh and i got mine off of ebay , think it was 55 bucks for a 60,000 btu !!! John
 

Cougar_15

Petty Officer 3rd Class
Joined
Aug 11, 2008
Messages
93
Re: Project Sea Sprite

Ok guys, I've got to make a choice and I'm hoping your opinions will help me make up my mind... Here's the situation, I removed the rub rail and drilled out all of the rivets holding the top to the hull. The top is now unattached but still resting on the hull. My original plan was to completely remove the top, replace the stringer, replace the deck, replace the transom then reattach the top. The more I think about it the more I'm not sure that will work the best under my current circumstances.​

There are a couple of wrinkles with this plan. The first is that I don't have the space for the top in my garage (I am limited to half of a standard 2 car), so the top would have to go in the backyard. By the time I am ready to reattach the top it will probably be very cold and I would be afraid to move it because of the possibility of breakage due to it being frozen...​

The second wrinkle is that the top is very heavy and I don't know how I would get it off and moved. There are only a couple of guys I know that I could possibly call on for help and one of them has a back injury so he's out (I actually have one myself so I should not be trying to lift that much either).​

So, I am now rethinking the idea to cut the top and only remove the aft 4 feet or so to get at the transom. This would eliminate both of the problems listed above plus it would allow me to work on the top in-between working on the hull as it would stay in the garage.​

Does this make any sense ??? :confused:

If I was to cut the top how would I go about reattaching it when the work on the hull is done? There would be only limited access the seam from the under side of the gunnel, would I just add new glass over the seam from the top? Would this result in a weak spot/ loss of strength??​

Does anyone see any other pros/cons of either approach?​

I'm really kind of stuck here as to how I should proceed, I want to do the best job I can but I also need to fit it in with my limited space and complete lack of any kind of help...​
 

i386

Captain
Joined
Aug 24, 2004
Messages
3,548
Re: Project Sea Sprite

Speaking from experience... Don't cut the cap unless you absolutely have to. If you do cut it, you'll want to do the bulk of the repair from the back side. If you can't get to the back side for a proper repair, I wouldn't cut it.

I would say do whatever you have to do to get it off in one piece and get it to the back yard. You can sit it on some saw horses and put a tarp over it. It'll be fine until you're ready for it.
 

redfury

Commander
Joined
Jul 16, 2006
Messages
2,655
Re: Project Sea Sprite

I forget exactly how your cap is designed, but do you have enough room in the garage to pull the cap, but just slide it forward ON the boat to get access to your transom? I think that's what John did with his Glastron.

Otherwise, I guess it's going to depend on your garage. If the ceiling is high enough, you could pick up some pulleys and lift it straight up and suspend it while you work, and then drop it back down while you are not working. You can lift the cap by yourself. Look at my project..I've done everything you see in my pictures without any help at all up to this point.
 

Cougar_15

Petty Officer 3rd Class
Joined
Aug 11, 2008
Messages
93
Re: Project Sea Sprite

I hear yea i386, it sounded good for a few minutes but cutting the cap looks like it would create more problems than it solves.​

Redfury, unfortunately the cap can't slide forward due to the molded bow seats (which is also one of the reasons it's so heavy...).​

The idea I'm chewing on now is to build a frame around the boat with supports to rest the cap on above the hull. I figure I can attach a winch or pullys to the ceiling to lift it up then rest it on the supports until the hull is done. The ceiling is high enough that I should be able to get the cap far enough up to give me the room I need to work on the hull.​
 

Driven1

Petty Officer 2nd Class
Joined
Jul 13, 2008
Messages
157
Re: Project Sea Sprite

I mentioned in an earlier post in this thread that your boat and mine are very similar. You were lucky and had rivets holding the cap on. I wasn't so lucky. Mine was bolted on. They were, of course, rusted in place. I did end up cutting my gunnels near the transom but it wasn't the best of ideas. I also cut the bowrider fiberglass walkway through the consoles out so I could get at the rest of the floor. Which brings me to my point.

In order to do a good job of getting the floor in and totally sealed you need access to that portion of the plywood floor that extends under the bowrider section. Because your cap was riveted it makes your life a lot easier.

Do whatever you have to to get the cap out of your way and go from there. I wouldn't cut it because it comes off so easily. Do the transom 1st, then the stringers, and finally the floor. Rivet the cap back on and your done.

Enjoy
 

Cougar_15

Petty Officer 3rd Class
Joined
Aug 11, 2008
Messages
93
Re: Project Sea Sprite

Driven1, I went back and reread your thread again as I've been thinking about this. The rivets weren't too bad to get out but a lot of them were loose so I had to cut them off rather than drill them out. I'll have to remove the backs once the cap is off...​

So the vote is in, the caps coming off. I'm going to be making some phone calls and calling in some favors to get enough guys to lift it off and carry it to the yard.​

It's been recommended a few times that I should do the transom first, I was thinking to do the stringer and deck (except for the aft 2 feet or so) first since I have already removed about half of the old deck. My thinking was that this would minimize the risk of the hull changing shape, does this make any sense? Would it be better to leave the stringer and the remainder of the deck in place and do the transom first?​

I am very gratefull for all the help and advice and information on this forum, every time I get lost and confused you guys are there to pull me through. I'm the type of person who tends to over think things but your feedback helps to keep me grounded.​

Now if only I could find some extra hours in the day so I could have more time to spend on the boat...​
 

Andy in NY

Commander
Joined
Oct 25, 2007
Messages
2,109
Re: Project Sea Sprite

Cougar, I have a suggestion. What if you remove the windshield and hoist the cap up to the ceiling, suspended to the rafters?


BTW, I built almost the exact same stand and I love it! I had all the 2x4's laying around, so it cost me the price of the casters and nothing more!

100_0113.jpg
 

Driven1

Petty Officer 2nd Class
Joined
Jul 13, 2008
Messages
157
Re: Project Sea Sprite

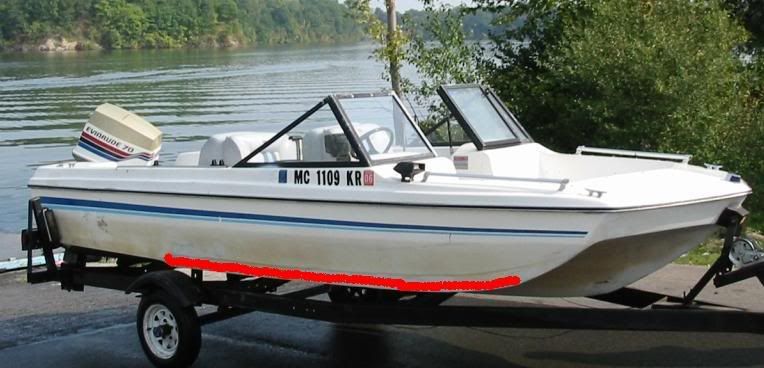
Cougar, the reason for doing the transom 1st is so that when you install the stringers, you can get them up tight against the transom and glue and glass them to it. Why? They help transfer some of the force created by the engine to the bottom of the hull and spread it out, evening out some of the pressures exerted on the sides and bottom of the hull. Some people will add "knees" to the stringers that extend up to the heighth of the transom to help reinforce it and to transfer even more of that energy to the bottom of the hull.

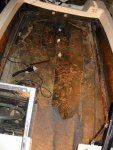
When you cut the floor out, the hull will become very flimsy. You will most likely loose some of the shape of the hull, especially with the cap off.

You might be able to retain most of the shape by cutting 2 or 3 2x4's to the inside width of the hull where the cap was riveted in and use the rivet holes to screw them in place from side to side. This should help keep the shape. If you can criss-cross them, they should also help prevent the hull from twisting if it wants to. Do this before cutting the floor out. Because my cap is mostly still on it's helping to hold the shape of the hull. I still should have pulled the cap instead. There was a way to do it, I just didn't think it out long enough. It didn't bring any more trouble. Just a little more work.

If after bracing the hull, and you still end up with a slight twist in it, that should be straightened out before you glass or glue anything back in. Especially the floor! If there's a twist and you glass everything back together, that twist will be permanent.

I think I said earlier that pre-measuring stuff before, and as, you're taking stuff out can be very helpful later. Try to be the least destructive as possible. I know however, that sometimes that is impossible. Save what you can to use as templates or for "reconstructive" measurements. Think about what you need to do and what other effects it might have and try to minimize them if possible before you do it. Sometimes you have to be a bit creative. That's part of the fun! :D

Example: Mine didn't have much floor in it when I got it. Nothing left to use as a template. For the floor I made a scale model of it on graph paper, measuring at 3 inch intervals front to back from the center of the boat to the edges of the floor with one square on the graph paper equaling 3". I measured from the bow to the stern and graphed it all out. When I'm ready to start cutting the floor panels I'll be putting a 3" grid on the plywood and then just duplicate what I have on the graph paper.

Measure the heights of the old stringers. In my case, the floor is mostly level with a slight curve towards the center to direct water to the bilge. Knowing that my stringers were 4" high in the back originally, I was able to "copy" the shape of the stringers to the front of the boat. That's in my thread.

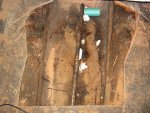
When you're thinking about putting stuff back together, think about what got the boat waterlogged and rotted in the first place. Entrapped water. Think about what you can do to correct that little manufacturing flaw. For example, I'll be cutting a "drainage notch" in the bottom rear corners of my stringers so that water can drain into the bilge from the outside edges of the stringers. The areas to the outside of the stringers held water before because they were totally glassed to the transom but not sealed from water. They won't anymore! There are other areas that do the same. Do what's best to make drainage for all of the water that might get down there.

Last and certainly not least. Safety First! Itching later.

All of this stuff's not really hard at all. Plus, it's fun and extremely rewarding. It can be a bit frustrating at times, but you just take a breather. Ask Oops how he felt on his 1st float or jcsercsa on his 1st time out with his boat. I can't wait to feel that way!

Have fun! :D
 

Cougar_15

Petty Officer 3rd Class
Joined
Aug 11, 2008
Messages
93
Re: Project Sea Sprite

Driven1, That makes a lot of sense. I had not thought of using the rivet holes to secure the hull braces, good idea.​

Part of the reason I had thought to replace the stringer (my boat only has one) and the deck first is that my stringer does not tie into the transom. I don't have a real good pic but this one shows (sort of, you can see the end of the stringer but not the transom) that there is a gap of about 4-5 inches between the end of the stringer and the transom.​

attachment.php

The thought was that leaving the transom intack until the stringer and most of the floor is replaced would help the hull retain it's shape (at least a little).​

I am also planning on leaving the rails on each side of the deck in place and glassing the new deck to (and new glass all the way around) them. You can sort of see in the pic below that the wood part of the original deck fit in-between these rails and actually did not even go all the way to the edges at the bow end. So, I'm hoping that these rails will also help reduce the amount of shape change in the hull.​

attachment.php

I have taken a bunch of measurements on the inside and I will be taking more from the outside as soon as the cap is off (before I do anything else).​

On the subject of drainage, the only thing I have found so far that is limiting water making it to the bilge area is the foam on either side of the stringer. The form in the stern is dry but starting about the middle and going forward it is waterlogged. This hull does not have any bulkheads and the bilge is not framed in so there is nothing else down there to block the water. I have not decieded yet, buy I'm thinking about not replacing the foam next to the stringers. There really is not that much there anyway and there is foam under the gunnels and both sides of the hull (from the bow to just before the transom) are are lined with foam from deck up to the gunnel.​
 

Attachments

  • IMG_0063.jpg
    IMG_0063.jpg
    80.2 KB · Views: 2
  • IMG_0076.jpg
    IMG_0076.jpg
    65.4 KB · Views: 2

Driven1

Petty Officer 2nd Class
Joined
Jul 13, 2008
Messages
157
Re: Project Sea Sprite

Cougar,

I took a look at the pics you provided and they show me that there actually used to be 1 more stringer to each side of the center one, for a total of three stringers. Center, left, and right. They were probably adhered to the hull portion of the boat with resin or an adhesive of some sort at one time but rotted loose. From what I can tell by looking at the pics (and what I'd expect), those stringers originally went all the way to the transom. Normally on tri-hulls, the center stringer (if it had one) didn't because of the bilge area.

If those stringers are still attached to the bottom of the floor, you could save them for templates or measure them, that would be a big help to you later. If there's nothing left of them at all, that would be an indication that someone else may have replaced the floor at one time and decided they weren't important. You can still figure out what should be there though if there's nothing usable for measurements or a template. A straight-edge is a wonderful thing.

Those outside stringers need to be replaced, well glassed to the hull, and attached to the transom. You'll also want to provide drainage, as I mentioned, at the transom end of those stringers. The rest looks good as far as drainage.

Another observation made on my boat is that the area just before the rear planing area on my hull will hold water separately from the rest of the hull because there is a V shape there. I'm not quite sure what I'm going to do there yet, but whatever it is, water won't be able to lay in there anymore. You may have a similar area on your boat, outlined in red...

Cougar2015.jpg


The Transom itself does next to nothing to hold the shape of the boat. The largest percentage of the hull shape and stiffness is provided by the floor. The rest is held by the cap. When you get to it, it's important that the floor is glassed in good and solid and has a solid, no gaps connection with the hull. You can work around the "rails" or side pockets, which were actually originally designed as water ski storage. You'll want real good surface preparation around the whole outer floor area on the hull before glassing. The floor is also the largest part of the structure that helps transfer energy from the transom to the rest of the hull so you'll want a good connection there. The transom is simply a place to hang the motor and an energy distribution point. It doesn't do much else.
 
Top