Popular Mechanics 1962 PM38 Build [SPLASHED 2017]

pekstrom

Chief Petty Officer
Joined
Dec 31, 2015
Messages
490
Thanks for all the kind words. They are greatly appreciated!

I've made a lot of progress in the past few days. I got the motor control all ready, with the electrical harness and the throttle/gear wires through the seat backs and organized running back to the transom. I think I may have gotten control wires that are a foot or two longer than needed, but better that than too short. I also got the steering wires and pulleys rigged up. Once the motor is in place I'll need to make a few final adjustments. I've got some pictures I'll post a bit later.

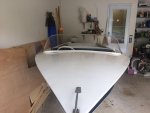
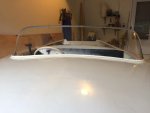
I started working on the windshield. I discovered that the curvature of the deck is a bit more than the windshield can handle. So now I'm trying to come up with a pair of shims that follow the windshield base to level it out a bit. We'll see how that turns out. Anyone have any other ideas? It is made of plexiglass so not sure I would be able to cut the curvature into it. I really don't want to crack it!

PM38_Windshield_02.jpeg
 

gm280

Supreme Mariner
Joined
Jun 26, 2011
Messages
14,602
Thanks for all the kind words. They are greatly appreciated!

I've made a lot of progress in the past few days. I got the motor control all ready, with the electrical harness and the throttle/gear wires through the seat backs and organized running back to the transom. I think I may have gotten control wires that are a foot or two longer than needed, but better that than too short. I also got the steering wires and pulleys rigged up. Once the motor is in place I'll need to make a few final adjustments. I've got some pictures I'll post a bit later.

I started working on the windshield. I discovered that the curvature of the deck is a bit more than the windshield can handle. So now I'm trying to come up with a pair of shims that follow the windshield base to level it out a bit. We'll see how that turns out. Anyone have any other ideas? It is made of plexiglass so not sure I would be able to cut the curvature into it. I really don't want to crack it!


pekdtrom, I don't know what part of your wiindshield isn't fitting right, but being plexiglass does mean you can trim it and make it fit. You could use a die grinder with a few 2" rolloc discs in different grinds and basically sand the edges to fit. To help from any splits while trimming use masking tape on both sides. Just an Idea.JMHO
 

pekstrom

Chief Petty Officer
Joined
Dec 31, 2015
Messages
490
pekdtrom, I don't know what part of your wiindshield isn't fitting right, but being plexiglass does mean you can trim it and make it fit. You could use a die grinder with a few 2" rolloc discs in different grinds and basically sand the edges to fit. To help from any splits while trimming use masking tape on both sides. Just an Idea.JMHO

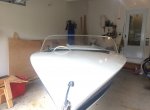
Hmm, ok, I could try to grind off a bit in the middle. The following pictures I think gives a better idea of what it looks like. In this picture it is just sitting on top of the deck and you can see the gaps on each side better.

PM38_Trailer_46.jpg
 

gm280

Supreme Mariner
Joined
Jun 26, 2011
Messages
14,602
Hmm, ok, I could try to grind off a bit in the middle. The following pictures I think gives a better idea of what it looks like. In this picture it is just sitting on top of the deck and you can see the gaps on each side better.


Usually when I am trimming things like that to make them fit, I take compass and scribe a line referrenced from the hull to get the correct arch on the plexiglass. A sharpie works great in a compass for that effort.
 

pckeen

Commander
Joined
Jun 20, 2012
Messages
2,067
Set up the windshield on the bow. Then use a pair of calipers with a magic marker to trace the curvature of the bow onto the windshield base, then carefully cut,
 

pekstrom

Chief Petty Officer
Joined
Dec 31, 2015
Messages
490
Ok, I'm probably more comfortable carefully grinding at it. What would I cut it with? A jigsaw? Or some kind of handsaw? There are 4 holes along the front for screws going through small rubber grommets. I guess I can just drill up new ones as the arch would either get too close to the middle ones or remove them completely?
 

gm280

Supreme Mariner
Joined
Jun 26, 2011
Messages
14,602
Ok, I'm probably more comfortable carefully grinding at it. What would I cut it with? A jigsaw? Or some kind of handsaw? There are 4 holes along the front for screws going through small rubber grommets. I guess I can just drill up new ones as the arch would either get too close to the middle ones or remove them completely?

I have cut plexiglass and even Lexan materials with most anything that you would use to cut wood.

I have cut plexiglass with my table saw, chop saw, and even a bandsaw without any problems what so ever. I would apply the masking tape to make sure you don't scratch the plexigalss while trimming it.

If you have a fine tooth blade for your jigsaw, you could try it and see how that works. Just remember, it is a plastic type compound and if you cut and heat up the material, it can reseal itself after the blade passes by. So slow speed blade movement is a better idea.

And if you are looking for a very smooth edge after you cut it, you can use a blow torch and flame treat the edge to make it smooth as if it was never cut. But be careful if you decide to do that. It doesn't take much heat to warp the edge either. It is a learning curve type issue.

If you go the grinding route, use whatever you have and see how it cuts and removed material as you go. Again, it is all a learning experience issue. But if you approach each method with respect, you will be okay.

Remember, you started this project not knowing basically anything about boat building, and you built a very nice boat. So use that same mental experience with this as well. Slow and easy to get the feel. JMHO
 

pekstrom

Chief Petty Officer
Joined
Dec 31, 2015
Messages
490
I have cut plexiglass and even Lexan materials with most anything that you would use to cut wood.

I have cut plexiglass with my table saw, chop saw, and even a bandsaw without any problems what so ever. I would apply the masking tape to make sure you don't scratch the plexigalss while trimming it.

If you have a fine tooth blade for your jigsaw, you could try it and see how that works. Just remember, it is a plastic type compound and if you cut and heat up the material, it can reseal itself after the blade passes by. So slow speed blade movement is a better idea.

And if you are looking for a very smooth edge after you cut it, you can use a blow torch and flame treat the edge to make it smooth as if it was never cut. But be careful if you decide to do that. It doesn't take much heat to warp the edge either. It is a learning curve type issue.

If you go the grinding route, use whatever you have and see how it cuts and removed material as you go. Again, it is all a learning experience issue. But if you approach each method with respect, you will be okay.

Remember, you started this project not knowing basically anything about boat building, and you built a very nice boat. So use that same mental experience with this as well. Slow and easy to get the feel. JMHO

Ok, I may give this a try. I have a cordless jigsaw with variable speed and I have an assortment of blades. I should have one with fine teeth. And I guess I'll just cover the glass with masking tape so running the saw on it won't scratch. And a sharp drill bit should work for re-drilling the holes afterwards.

Thank you pckeen and gm280 for your great ideas. I think I have a good idea of what I need to do now. :)
 

pekstrom

Chief Petty Officer
Joined
Dec 31, 2015
Messages
490
Well, now I can say I have cut plexiglass for the first time. It was a bit scary at first but I ran the saw on a slower speed and had a very fine-toothed blade and just took my time. It went great! Drilling the new holes was even scarier I have to say. I was just waiting for it to split but I started with a small bit and progressively went up in size. And now it is installed!

PM38_Trailer_51.jpeg

PM38_Trailer_53.jpeg

The white seal is bubbling a little in a couple of spots and I hope that over time it will settle in.
I can't seem to get rid of them. Other than that though I think it looks pretty neat.
 

gm280

Supreme Mariner
Joined
Jun 26, 2011
Messages
14,602
Bravo sir, bravo. How could it look any better. Very nice job. I knew you were a little apprehensive about cutting it, but you did it and it looks like it fits like a glove. Now you too can assist others with similar issue cutting plexiglass. Another skill set leaned. :thumb:
 

pekstrom

Chief Petty Officer
Joined
Dec 31, 2015
Messages
490
Thank you all! Who says you can't teach an old dog new tricks, huh? :whoo:

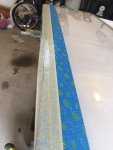
Seriously though, y'all's advice helped me greatly so I really appreciate that! As the picture shows, I did put masking tape on both sides of it when I cut. I added the wider blue tape so the saw wouldn't scratch it and it worked out well. I also added masking tape on both sides for the two holes I had to re-drill. And it seemed like starting with a small drill bit to drill the starter hole and then progressively move on up in size worked well. I ran the drill really slow so I could stop quickly if I noticed any cracking. And I didn't push on it but just let it work its way through the hole on its own. That seemed to work well.

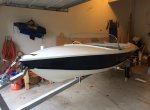
The following is what she looks like now. Just waiting for the yellow and blue paint so I can paint those spray rails yellow and then finish up the blue parts.

PM38_Trailer_54.jpg
 

gm280

Supreme Mariner
Joined
Jun 26, 2011
Messages
14,602
pekstrom, I think you doubted yourself more then we doubted you. You really never know if you can do something unless you try. And since I honestly thought you could do it, and do it well, I offered support.

Glad you got it fitted. It does look great. If you ever get to a point to wonder how far you've come, take a look back over your build. That is another great reason for popping pictures on these threads. JMHO
 

SGoergen

Petty Officer 3rd Class
Joined
Jul 12, 2016
Messages
91
Pekstrom, your boat looks awesome! Really like the way it is coming together and can't wait to read about the splash!

Scott
 

Patfromny

Lieutenant Junior Grade
Joined
Dec 2, 2012
Messages
1,197
Great job. The windshield really changes the whole look of the boat. Congrats on another victory.
 
Top