New Boat For Christmas

wooky30014

Petty Officer 1st Class
Joined
Jun 8, 2012
Messages
288
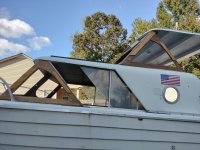
That's gonna add a nice touch to the appearance
Thanks Cap, the way I finger it, the wood was put there for a purpose, still not sure of its species, and since its still in outstanding overall condition, may as well make it shine like a slightly tarnished penny LOL. (will definitely be a "one-of-a-kind" boat wherever we go) There are fewer and fewer examples of both wooden and wood trimmed vessels out there, and me being me, since I happen to have snagged one . . . . . . do a refurb best I can using what I have here since I'm not a skilled woodworker. Don't know if its due to the Himmicane presently bashing Florida but our temps dropped from the 90s to the 60s today, usually doesn't happen til mid Oktober (climate change ??) OH, and something else I've come to realize, these decks don't creak or crackle when my fat arse is up on them (the cabin roof WOULD be a good "sun deck")
 
Last edited:
wooky30014

Petty Officer 1st Class
Joined
Jun 8, 2012
Messages
288
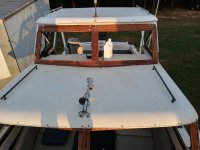
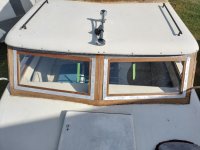
After a late start (thought it was gonna rain on the parade) I pulled the side glass and got the two windshields fronts sanded and two coats of the water-based sealer applied and it soaked right in (yeah, I did a test board and water beaded up on the surface)
Started 1.jpg
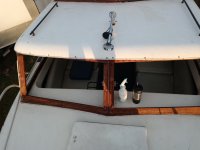
Dang but don't that look much better already, and the screw heads stand out, there are a few that will need to be replaced and again for the most part that wood is solid overall
Started 2.jpg
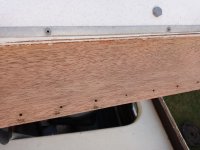
I got a closeup of the wood, anyone have any idea to the species ?
What Species.jpg
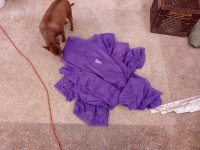
Oh and I FINALLY got rid of . . . . . . . . . wait for it, are yall sitting down, the purple hazed curtains. they were getting in the way LOL
Purple GONE.jpg
And Daisy Mae is giving them a sniff LOL
The finished product won't look factory new but I look at it this way, any blemish, nick, bump, whatever is simply a mark of its character and that the vessel has been used and not parked in a glass bubble to only be seen and not touched
 
Last edited:
wooky30014

Petty Officer 1st Class
Joined
Jun 8, 2012
Messages
288
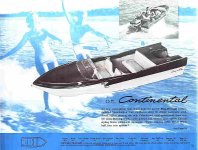
It's "funny" how oh so many years ago I started out with MY first boat that I bought in 1986 from my Uncle in Ky. She was a '57 LoneStar with a 45hp Chrysler outboard. My coworkers called it the "Batboat" because of the fins. I ran the wheels off that boat and later was given an MFG runaround (to get it out of my friends way), it had more room for the family for riding and fishing. Sadly, the day came when I needed another car more than the boat, so a trade was made
789px-Lonestarb57002.jpg
My Uncle also had another LoneStar, a cruiser, can't remember the model name but from the front it looked like an airplane and the snoot like a propeller hub. It was a rare beastie as it rode on an original LoneStar trailer and still had all 4 LoneStar hubcaps. That was back in the '70s and when he passed away some 15 years ago he still had it down by his shop
 

wooky30014

Petty Officer 1st Class
Joined
Jun 8, 2012
Messages
288
Looking good, The grain looks like mahogany
Thanks Cap, I was kinda hoping you'd say that, I wasn't sure but given the year built I was leaning towards that because mahogany was one of the woods of choice by boat builders
 

wooky30014

Petty Officer 1st Class
Joined
Jun 8, 2012
Messages
288
Working steadily with cooler temps and no clouds. I've got the first coat of varnish applied and (don't know what they are called) new backer / patch boards cut, varnished and screwed in place. I had to make a few repairs on the mahogany frames as well. This will be a temporary fix while I pay off some of the items I've bought and installed or about to install. I'll gather up some new appropriately sized mahogany lumber to rebuild the windshield frames at a later date. Lake is down about 4 feet, seasonal norm, so no hurries to float her. I came to the conclusion that maybe I was in too big a hurry to go boat riding and with the windshield leaking when it rained wasn't good for the helm, SO, refurbish it was. Here are a couple of before and present pics. I think she's gonna look good when done (juss Break-Out-Another-Thousand LOL)
Wood Refurbish 1.jpg
And now
Wood Refurbish 3.jpg
More coats of varnish are in the works
 

wooky30014

Petty Officer 1st Class
Joined
Jun 8, 2012
Messages
288
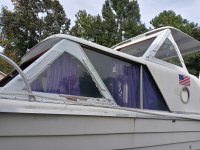
Another been busy as a beaver here. I finished up with the cabin windshields and reinstalled them, WOO HOO, now for just a little caulking and reinstall the metal trim strip along the bottom edge of the frame. I put some foam tape (like what is used under a topper on a pickup truck bed) under the metal surrounds and along the top of the window frame to help seal out any water intrusion from either rain or bow-spray (I haven't removed the frogtape yet, it told me which side was which) I think this looks MUCH better than flaking white paint (and until I get some new mahogany lumber for later)
Refurbed Cabin Windshields.jpg
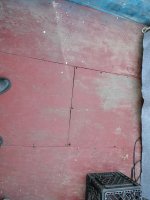
I also pulled the deck carpet and the seats for the moment and here is what I found.
Bare Deck.jpg
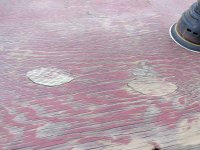
The wood is still in pretty good shape, and I've got some penetrating epoxy otw to do some deep sealing before screwing and gluing it back down, yeah a good sanding to get rid of the red. I did pull out a couple of the panels for a look-see underneath . . . . . . . that bilge is filthy, grungy, NASTY, and I found . . . . . the rat nest. Our pups "found" (not sure if they were already deceased) two mousy rats in the yard and I found two more deceased in the cabin. No, I don't think I brought them home in the boat, most likely crawled up the docking ropes I had hanging down for a short time. ANYWAY, I shop-vacced the nest and prepping for an intense bilge scrub. I also found some more unwanted residents (I'm gonna have an almost NEW boat here when I get done and re-splash next time), a colony of ants had set up shop where the cabin wall met the deck. I believe that due to water leaks from above (that I am addressing right now) is where the waterlogged panel areas came to be. Replacing the cabin bulkheads will be a cheap fix (another of those "while I'm in there" items). I still have no complaints about Riff Raft, she is a well-built boat that has lasted this long with a few attempted repairs, no this ISN'T the original deck

Two sheets of 1/2inch exterior grade ply with penetrating epoxy applied after all the needed cuts are made and she should last another number of years. I have no idea if they even make mahogany plywood and marine ply around here . . . . . . you've got to be kidding.

Now to head back out for some caulking, break time is up
 

wooky30014

Petty Officer 1st Class
Joined
Jun 8, 2012
Messages
288
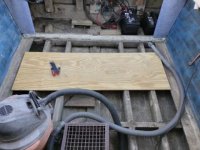
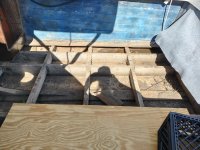
Ok, done with the windows for now, the upper windshield frame will be rebuilt at a later date but for now I'll run with what's there. I've got the bilge open now and nasty isn't a good description, plus there is standing water in one section that its drain is blocked (I'll have to dig deeper, literally LOL). The ply you see is just a piece I'm using as a walkboard for now
Open Bilge.jpg
The floor, I mean deck boards that I pulled aren't / isn't the original deck but for however long it HAS been in place it is in surprisingly good and solid condition for the most part. The worst parts are the screw holes and some bits missing from the under-layers at the rear corners. I sanded the bottom sides and have applied 2 coats of penetrating epoxy watered down a bit with mineral spirits (per the label). The first coat soaked right in, especially the edges which got two coats to start. The second coat went on a little while later and boy howdy that wood sure was thirsty LOL. Pics tomorrow of it as it got late and didn't want to leave them laying out for dew fall

Oh yeah and that is a keel board just above the ply running up forward as far as I can see and the bulkheads (?) look original, going by the similar woodwork in the cabin where the toilet was mounted
 
Last edited:
wooky30014

Petty Officer 1st Class
Joined
Jun 8, 2012
Messages
288
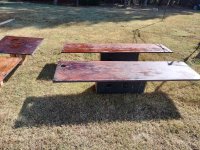
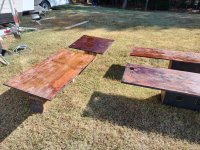
Here are a couple of pics of the epoxied deck boards, cured overnight but just to make sure I'm laying them out in the sun for a bit. The other side will get the same treatment plus doing the edges again to hopefully make them completely waterproof / resistant
Deck Boards 1.jpg
Deck Boards 2.jpg
One thing I did notice about these pieces of plywood is that any imperfection / knothole on either side had an inlay of wood put in place. Could this be actual "real" marine ply ?
 

wooky30014

Petty Officer 1st Class
Joined
Jun 8, 2012
Messages
288
Here are a couple of the wood inlays I mentioned in the last post. This is something I've never seen before as any imperfection with other plywood has been "fixed" with a dollop of wood putty then sanded. This is a first-class repair to some dry but solid boards
Wood Inlays.jpg
Finished sanding the topsides and ready for epoxy to be applied tomorrow
 

froggy1150

Master Chief Petty Officer
Joined
Nov 3, 2017
Messages
846
All my marine plywood had those pucks. Also marine poly has waterproof glue with 7 plys instead of 5 I think
 

wooky30014

Petty Officer 1st Class
Joined
Jun 8, 2012
Messages
288
Ply not poly..... stupid auto correct
LOL, my 'puter has some sort of program installed that senses incorrect spellings, punctuation, etc, helps with those brain cramps

Cool that this is actual marine ply, this has 5 layers and for some wood that has been in place long enough for screws to erode away and had carpet laying on it that stayed damp and no delamination I can find.
 

wooky30014

Petty Officer 1st Class
Joined
Jun 8, 2012
Messages
288
Now the deck boards are encased in epoxy and for all intents and purposes very water resistant (not gonna say waterproof because is anything REALLY waterproof ??) Now to go out, late start from fiddling with this new phone, and start cleaning the bilge from years of dust, dirt, water standing. I don't know why a sponge and some sort of metal ring were left behind
Epoxied Deck Boards.jpg
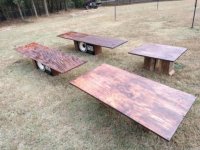
Top side of the deck, port, starboard and the two down the center with two coats of penetrating epoxy thinned with paint thinner
 

wooky30014

Petty Officer 1st Class
Joined
Jun 8, 2012
Messages
288
And in the meantime . . . . . . . I have the little bit of bilge open to see what's under the deck. 😮 The water pooled up in the starboard stern is mostly mud and crud collected over the years since the re-deck. Kinda screwy drain system here but once again I've come across nothing rotten. The stringers, what can be seen at the joints, is good wood (Yeah, I know that didn't sound right LOL) 😆
Bilge Open For Work.jpg
I got the water draining and will get the mud and crud out tomorrow then give the entire bilge a good scrubbing. 😷 I'm hoping that the now gone terlit 🚽 didn't leak anything down in there :sick:

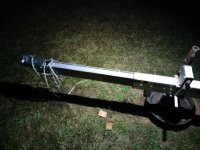
I'm glad I decided to take this project a little slower than what I initially did, chomping at the bit to get her bottom wet. Now taking care of some issues so it'll be comPLETELY right when we do the re-splash later. So far I've got the trailer tongue extended by 3 feet, for sure NOW she should be easier to launch and retrieve
Tongue Extension.jpg
The windshields redone, hopefully to stop some of the leaks / water intrusion. A rewire and new lights for the trailer, rewire of the hull (will clean it up a bit while doing the cabin bulkheads) I'd rather do this now than be disappointed with some discovery out on the water

OH, and the tongue extension is a 5 foot section of steel square tubing with 1/4inch flat steel welded on either side. It's a snug fit side to side and it's got 3 3/4inch bolts holding it in place along with the serial plate through bolted and the jack clamped at the rear. I don't think it'll go anywhere and my welder friend agrees. He couldn't quite understand what I was needing until the day he had me come to the shop, at that point he could see the madness to my method and said yep, it'll work
 
Last edited:
wooky30014

Petty Officer 1st Class
Joined
Jun 8, 2012
Messages
288
Can't wait to see it all put together
Yeah, me too Cap. Another "while I'm in there" is to go ahead and build the rear seat and its box that will hide / hold the gas tanks, either a flip forward or more likely a flip up lid, lockable of course as well as a blower installed even though not required with outboard power, safety first
 

wooky30014

Petty Officer 1st Class
Joined
Jun 8, 2012
Messages
288
OH yeah, I've got some sort of orange flavored bilge soap to use, going to get a "proper" scrub brush today to tend to that. I was thinking juss a bit ago (yeah, can be a dangerous activity around here sometimes LOL), thinking of foaming the two outer bilge channels to help keep water out since there doesn't seem to be any drains except to drop the bow the raise it and the water runs down the center and out. OR I could drill through the stringers and use 4200 to seal in a length of PVC pipe (the far outer stringer hole would have to be at an angle). Any other suggestions out there and if foamed what could I get local at either Lowes or HD ? At one time I even thought about pool noodles but they would still have possible water intrusion around them
 
Top