New Boat For Christmas

wooky30014

Petty Officer 1st Class
Joined
Jun 8, 2012
Messages
288
Steam box the wood
Two things on that, I've seen videos on steaming being done, I don't have a steam box and the frame itself isn't bowed. They are all straight with the exception of where it sits/sets on the cabin roof. L & R base pieces measure at just shy of 3 ft, a bit more when figuring the angles at the ends. I'll see what I can finger out using the old pieces as perhaps a template of sorts
 

mike3218

Recruit
Joined
May 24, 2023
Messages
1
Greetings Yall. I got a new boat for Christmas, well it's new to me anyway, I've got it beat by a year in age and can't find much info about her. A 20-foot 1961 Albright Cabin Cruiser with an 85hp Force outboard hung on a bracket. She's in fantastic shape, good deck and transom. She's what I had in my head for a long time, WAS even working on another boat project until I realized that even 5 years from now I wouldn't be finished so when I saw this one for sale I pounced on her.
View attachment 355179
I'm going through the engine even though it was running good I wanted peace of mind. All 3 carbs, fuel pump, water pump have been overhauled, fine tuning adjustments are next along with a new helm switch panel and ignition switch with electric choke capable. She still has what looks like a factory original pump toilet that will be removed due to the legalities of having one without a blackwater tank. I'll cap the thru-hulls for the time being. The woodwork on this vessel is in outstanding condition, don't know any of her history or where she was used or stored and am convinced this is how she was built due to that and the matching wood framed windshields, though the door looks to need a coat of varnish
View attachment 355180
Inside the cushions have a couple of worn places, taped up, but still in great shape, and yeah, those curtains will HAVE to go LOL
View attachment 355181
I'm curious, does anyone here have any knowledge of the Albright Boat Company of North Carolina ? I can't find any but a couple of mid '50s runabouts. I can't wait for warmer weather and the lake to fill back up. It's 5 miles down the road to the nearest ramp / marina
The woodwork really does look good, feels like its straight out of history.
 

wooky30014

Petty Officer 1st Class
Joined
Jun 8, 2012
Messages
288
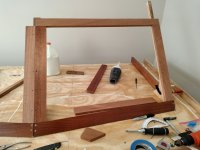
Been a while since . . . . . Thanks Mike. The old and original woodwork needed some refurb and replacement done (hey it's ONLY a year younger than me), lots of good stuff still there that I've been reusing where I can and some, not so much. The last month or so I've been on a sho-nuff learning curve with a new toy and some mahogany boards I bought for the cockpit/helm windshield. I took about 40 thousand measurements (J/K) I am halfway using the footprint of the original and will be remounting the hardtop. The idea of build as I go didn't work so well SO using a former model train table, still in the front room for now, I'm building as I go there without having to worry about falling off, again using the initial measurements and layout from the cabin roof. The new toy, a table saw, makes this process a WHOLE lot easier and faster plus having straighter, more consistent cuts with some of the angles needed. I only have the one pic so far and some of the wood has varnish applied but with some of the follow-up cuts will need more and some doesn't have any yet. I'll apply 4 or 5 good coats with a light sand between and then on assembly will slather a little between the joints to sorta "glue" it all together then a final coat after. I'm still pondering the "glass", will be plexi but I'm still up in the air about fixed or flip out, which I do have the old hardware but want to steer away from a wood frame. (me thinks I'll enjoy the Summer cruising without glass while I finger out what to do)

Here is what I have at the moment, port side almost completed with some additional screws to be installed and since there are stainless oval heads I'm not going to cover/plug the heads
New Mahogany Windshield Frame.jpg
The center upright post needs a slight trim and the one over to the side being held with the clamp is just a temporary jig as the sidelight window will have a brace which isn't in place yet. Overall this is the same height as the original but with a larger glass area
 
Last edited:

cptbill

Senior Chief Petty Officer
Joined
Oct 6, 2012
Messages
762
Man your getting that woodworking thing down to a science! A little air flow might not be a bad thing
 

wooky30014

Petty Officer 1st Class
Joined
Jun 8, 2012
Messages
288
Man your getting that woodworking thing down to a science! A little air flow might not be a bad thing
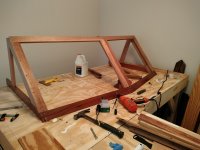
Thanks Cap, I think part might be an "OCD" thing, I know this isn't perfect but that doesn't matter as it IS going to be functional in holding up the leading edge of the top. I've got a couple of ideas rolling around in me cranial cavity about the window "treatments", first and foremost not wanting it / them to leak rainwater. I'll have the mating surfaces to the deck sealed by using camper top foam rubber, by its nature will fill in any minor imperfections but will still get a small bead of silicone and the metal trim installed. Here is the completed mass of lumber cut and fitted together with a couple more trims to be made to the aft end of the side rails ending in a round instead of the sharp corner.
Frame Complete.jpg
Now to disassemble and apply the water based sealer/varnish, the lower pieces seen here have already seen 5 coats and are ready. Oh, and I've installed some braces in the lower corners to help stiffen the joints. Never mind that jug of glue, its now a paperweight that is left over from another project and the L part will be removed and repurposed from the table and it shortened just a tad to match the table saw height when moved to the garage.
 

wooky30014

Petty Officer 1st Class
Joined
Jun 8, 2012
Messages
288
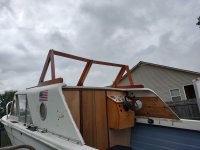
After having to do a couple of recuts, adding the angle that I had overlooked and a recoat of varnish on the raw wood I finally now have the new windshield frame installed
New Frame Complete.jpg
My first endeavor with more than just straight cuts and while not "perfect" it is functional and (I believe) watertight at the deck joint all the way around. I slathered some varnish on all connecting joints and will apply more later to help fill any voids between the pieces. Now to get the top ready to install. Also got a new tarp for covering (why don't these last long ?)

OH, we had a "visitor" come around the other night, no not invited and certainly NOT welcome with us and the 4 pups running around the back yard. Say hello to my 'lil friend, and goodbye
Dayed Hayed.jpg
This here was one of those "pennyhead" aka copperhead. Talk about unexpected, I was about to step outside and there it sat, right where I would have stepped (good thing the pups were upstairs and not headed out). I called my son down, he was visiting over the weekend, and agreed to the species (part of our Boy Scout training from years ago to recognize these). Had it been a King or a garter/garden variety we would have let it be BUT this wasn't a "friendly". I've been here almost 15 years and while I have seen a few serpents around, none have been this version.
 
Top