New Boat For Christmas

wooky30014

Petty Officer 1st Class
Joined
Jun 8, 2012
Messages
288
might try cutting the pvc in half and epoxying it in, less chance of stray water
Not sure what you mean Cap, cut in half like "( )" and lay on the flat or just a short length through the stringers. I still have some epoxy out in the garage as well as some penetrating left from the deck boards
 

froggy1150

Master Chief Petty Officer
Joined
Nov 3, 2017
Messages
843
With my cuddy there is a step down and I had to put a "floor drain" to allow the water a place to get to the bilge. I used 1" pvc and bedded it in with peanut butter then glassed over the top. On the ends I ruffed up the pvc so the resin could stick better. I also made nice smooth transitions on the ends. There is a tee right at the step down where I made a little floor drain that screws into the tee. When testing the bilge pump I did have backwards water flow so I put a little check valve at the bilge. The valve I used was a 3/4 inline and fits snug in a 1" pvc pipe. I think I got good picks of drain pipe without check valve in my build post ( 1974 reinell cuddy restore)
 

wooky30014

Petty Officer 1st Class
Joined
Jun 8, 2012
Messages
288
Oh I forgot to mention (I think) that this hull, while starting out as a "V" ends up as for all intents, a flat bottom. The outermost stringer/bulkhead joints have maybe 1/4 inch under them for water flow to the stern. The inner stringers have about 3/4 inch and the bulkheads also lay across the keel board. When I pulled the deck boards the bilge was dry as a bone except for the last 2 1/2 starboard "compartments" and most of what was in those was mud and paint chips (?) and I didn't find the mud until I pulled the portable tanks and the batteries out and then the deck in the rear cubby. Someone didn't do any cleaning while redoing the decking. There are no step-downs here, but I know what you are talking about Froggy. I did an experiment the other day but will use my floor jack now . . . . hosed down the bilge to see what loose stuff (dust) I could rinse out bow up, then dropped the bow and back up with most of the water running down the center and out the drain. I'm gonna head out in a few and start some scrubbing
 

wooky30014

Petty Officer 1st Class
Joined
Jun 8, 2012
Messages
288
I'm having a lazy day here, juss went out to take a look and see how much water might still be down in the "bowels of the beast" and she's dry as a bone, even where the mud was. I also took an icepick to probe the screw holes and . . . . . . . . . . . I have no idea what was used as a preservative when she was built but the skeleton is in very good solid shape. After I do the cleanup and let her dry I'll pour up some of the penetrating epoxy into the screw holes to shore it up some and use new screw holes when laying the deck back
 

cptbill

Senior Chief Petty Officer
Joined
Oct 6, 2012
Messages
762
Yep, lay it on the flat, very stable that way and your still using the hull. no restrictions that way
 

wooky30014

Petty Officer 1st Class
Joined
Jun 8, 2012
Messages
288
Yep, lay it on the flat, very stable that way and your still using the hull. no restrictions that way
This thing sometimes lets me know of replies and posts, sometimes not šŸ˜’

I got some cross drains in place but found a larger length of PVC AFTER I was done. I'll do more in a couple of days then get pics of them. I fingered out a relatively easy way to bore through the stringers and end up with a tight fitting pipe AND have it right next to the hull skin. Not enough room for a drill to fit SO . . . . . . having to do this by hand with either a ratchet or a wrench to turn the bits, using a boring bit (I don't know its "proper" name) I get the point set where the outer edge is just above the hull and bore away with it angled just uphill and when it breaks through the other side it is at the hull skin. (seeing this being done is easier than describing it). I rigged up a tarp to help keep SOME of the drizzle out
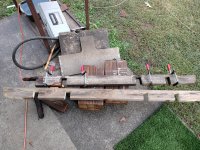
While I was poking around I found one spot that was a but more mushy than I liked so after a closer look, the mud did a bit more damage than I liked SO out with the old, the one with the clamps as it came out in pieces
New And Old Bulkhead.jpg
The bad spot is on the far left and the new is a length of old pressure treated 2X4 that came off the old gates of my fence. Using the old to cut to fit after it dries back out (it's been drizzling last two days) it'll get some epoxy sealer. Where this fits is the last bulkhead at the battery / gas tank compartment.
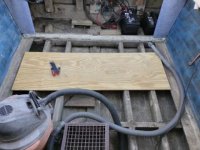
Bilge Open For Work.jpg
Again, I'm glad I decided to slow down and check deeper. With the dampness of the last two days I took the opportunity to give the bilge a good scrubbing, once it dries back out I'll apply the epoxy sealer where it needs it and a good coat or two of bilge paint I have here, THAT should seal everything up where no more worries about under the deck
 

froggy1150

Master Chief Petty Officer
Joined
Nov 3, 2017
Messages
843
Here is a little trick if needed. When I put my sch 40 PVC drain in I needed it to follow the contour of the hull. I heated up the pipe so it was soft enough to manipulate into position then let cool. They do make heaters for this but all I did was warm in front of a propane turbo garage heater. You could also use a heat gun. It does take practice to get the heat right. I got plenty running conduit in trenches
 

wooky30014

Petty Officer 1st Class
Joined
Jun 8, 2012
Messages
288
Thanks froggy, no need for bending the PVC here as the lengths are only about 2 1/2 inches or so and one being about 4. The 4 inch pipe will be through the keel board and to strengthen it back up I'll be laying some 1708 over the cut made then a piece of ply with another layer of 1708 over it. I'll take a bunch of pics when done with these (I know, "pics or it never happened" LOL)

I was even thinking (yeah, a dangerous activity here sometimes) of setting an electric barn heater blowing into that compartment while mounting up some lighting and wiring
 

wooky30014

Petty Officer 1st Class
Joined
Jun 8, 2012
Messages
288
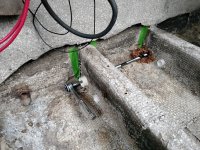
Alrighty, here we are done with the boring of the bilge cross drains, or whatever they are called. Pardon the grungy look to the under-deck area (what would YOU look like after 61 years of little if any attention lol). Remember, it had mud standing in one section for who knows how long as well as whatever other grunge made its way under the deck. I'll give it a good stiff brushing to clean up and roughen up before paint or epoxy is applied.
New Drains 1.jpg
Each stringer got two drains with the more rearward ones being a larger sized pipe. The one in the keel will be glassed over with a piece of ply to strengthen it back up. The hull originally came with two drain holes but someone in the past "permanently" closed off the port drain hole. Now to wait for a warmer day to slather some epoxy around the new drains, they are a tight fit in their respective holes.
New Drains 2.jpg
The blocked off drain is still there, juss gotsta finger out how to pull the plug. My drill wouldn't fit down in betwixt SO the boring bit and my trusty ratchet did its thing, a little tedious to make sure it was lined up correctly, but ALL 8 pipes are level with the uphill side so very little if any water will remain. After the epoxy is applied where it needs to be everything under the deck (the WHOLE bilge) will get a good coating of paint, grey that I'll mix up with some buoy paint I have here

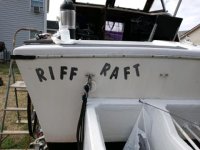
OH, the grey and white blotchy looking paint on the transom is the same throughout the entire boat as the "topcoat" on the fiberglass. For whatever reason there are two layers to the transom wood, as can be seen in these two pics. The only reason I can figure is so that the outboard bracket could be mounted without having to fit "knees" to the inside which would take up space where the batteries and tanks fit, dunno, but it's worked all these years
 
Last edited:

wooky30014

Petty Officer 1st Class
Joined
Jun 8, 2012
Messages
288
Just an observation here about the bracket, it HAS to be original because there are no other markings or evidence of any other type of engine mount and obvious no transom "tub" or whatever they are called (the cutout where an outboard would be bolted up to) and the biggest is the old antique style cable and pulley steering system leftover still mounted on the stern, hiding between the two names and the rubber bungees is the wheel. That other bracket to the right appears to be another part of that system I don't plan on removing those antique pieces of marine historyRiff Raft Lives.jpg
 

wooky30014

Petty Officer 1st Class
Joined
Jun 8, 2012
Messages
288
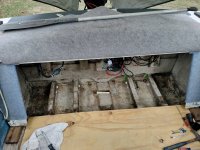
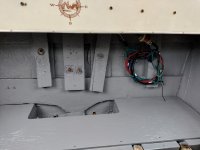
I know it's been a month, but betwixt the drizzle daze, the frog strangling rain, cooler temps, and other aspects of life in general I've been poking along and FINALLY got another hurdle jumped. The battery / gas tank compartment is cleaned up, painted, new compartment deck in place and some of the wiring clean-up started back in place. It's not perfect but works for me.
Battery Compartment (2).jpgWhere that bundle of wiring is hanging is where the battery switch panel is now. I've also started pulling some more of the mahogany out for a refinish (whoever slapped that minwax stain on as well as the white paint needs to be flogged LOL). Another part of this wiring clean-up is taking the Morse engine control out of the wooden box I built and flush mount it in the same general location with ALL cables, wiring and such hidden from view
 

wooky30014

Petty Officer 1st Class
Joined
Jun 8, 2012
Messages
288
Here are some more updates and pics, first the battery switch panel which shows the tilt relays mounted up high, they have seals so water shouldn't get in them anyway. I also have a pair of battery trays when the time comes. The tilt and bilge pump will be hooked directly to a battery, each having their own circuit breaker and the power going to the engine and helm will feed through the switch to the power point next to the switch (center wire out of the switch). This compartment will be lockable so the batteries and tanks won't grow feet as well as the drain plug will less likely spring a leak
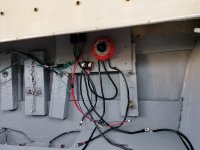
Switch Panel.jpg
I pulled the wood from around the portholes and yes, mahogany also. I sanded down to clean bare wood for refinishing with clear spar urethane. The stain or whatever someone applied was starting to flake so this isn't a wasted effort, you can see how dark it was
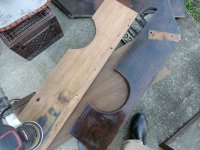
Sanding.jpg
Here I have 3 pieces with 4 coats of urethane applied, light sand after first coat, the grain is still easily seen. Sanding of these is complete, now its time for some new finish
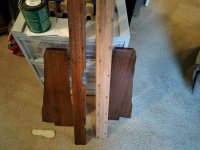
One Waiting For Varnish.jpg
I have one piece of mahogany that will be repurposed for replacing the bottom board of the helm windshield. The curve of the cabin roof wasn't taken into consideration so while the center fits tight against the roof the edges have a gap and is partly why it leaks. The front deck is flat so no gap with the cabin windshield

Oh, the notch midway on the one is where the morse shifter / throttle will fit in, the notch farther forward was there already and is where the steer cable and wiring comes through the gunnel into the helm
 
Last edited:

wooky30014

Petty Officer 1st Class
Joined
Jun 8, 2012
Messages
288
Looking good, Merry Christmas!
Thanks Willy, and a belated Thanks also to Captain Bill (had a brain cramp lol) and a very Merry Christmas to you as well. My REAL Christmas will happen in January when my son comes down for a few days
 

wooky30014

Petty Officer 1st Class
Joined
Jun 8, 2012
Messages
288
Working on the wiring bundle that will go up through the conduit I got, I'll also run a "mule" string with it so any additions later will be easily strung through. Watching the water-based urethane (no odors) is SO much fun (hint of sarcasm here šŸ˜:rolleyes:) actually its dry with no sticky within an hour so second coats go on soon after the "soak-in" coat. After several hours or overnight a quick sand with 320 grit (what I had laying around) to smooth it out so there are little if any snags for the foam brushes. An idea I had (yeah, dangerous activity sometimes lol) was to use wooden dowels to reconnect the two halves of the porthole wood, the metal corrugated fasteners had rusted in half (still there though).

Now for something comPLETELY different, looking ahead to the cabin bulkhead walls, both have water damage / rot at the bottom due to the leaky windshield but the majority of them are still good wood (no. that didn't sound right LOL). I have looked but can't find anyone who carries mahogany ply or 4X8 panels. I might end up getting cabinet grade Birch (similar grain) or similar and water seal after the cut to fit. This is still up in the air for now
 

cptbill

Senior Chief Petty Officer
Joined
Oct 6, 2012
Messages
762
Wise move with the mule line. That's the biggest problem with older boats(and other things) the special woods aren't allowed to be imported anymore, I mean if they'll raid a guitar shop in Nashville imagine what would happen to a wooden boat maker these days
 
Top