New Boat For Christmas

wooky30014

Petty Officer 1st Class
Joined
Jun 8, 2012
Messages
288
Wise move with the mule line. That's the biggest problem with older boats(and other things) the special woods aren't allowed to be imported anymore, I mean if they'll raid a guitar shop in Nashville imagine what would happen to a wooden boat maker these days
Yeah, the "mule" was an afterthought earlier when I did the initial rewire, the new conduit it 1" plastic pipe with 90 degree curved elbows for each end. Plan is to run all the wiring needed for now with a couple of extra lines run for later, there will be a common ground tied to the batteries with a grounded post at the switch and another in the helm.

On the mahogany, I've seen where individual boards of various sizes can be ordered / bought but no 4X8s and yeah I read a while back that (IIRC) it was Martin Guitar that was raided because of "illegal" ebony wood used for the fretboards. Even marine ply is difficult to find close by, it's available in some areas but the shipping of just a few sheets is the deal killer. I even thought about cypress due to its "no rot" properties but again hard to find stocked
 

wooky30014

Petty Officer 1st Class
Joined
Jun 8, 2012
Messages
288
WOW, it's been a number of years since I've seen the temps drop as much as they've done last night. We went from mid-40s to 19 degrees in less than 12 hours and we are holding at 22 degrees right now. This is especially unusual as it's usually mid to late January before we get this cold (with the possibility of snow). The Siberian Express 🌬️ roared in bringing the chill with it (SOOO glad we are under a new roof as the neighbors aren't faring as well)

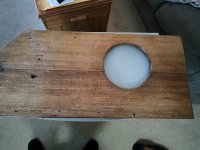
I've got the porthole panels, along with some of the other parts, done and ready to reinstall. I bored and pinned them with wood dowels.
Porthole Panel.jpgBilge pump is wired and ready, just WAY too cold juss now ☃️
 

wooky30014

Petty Officer 1st Class
Joined
Jun 8, 2012
Messages
288
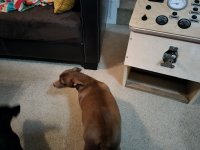
I've got another sub-assembly almost completed and ready to install, but first one of the Sailors that the Admiral already said won't be sailing with us
Seawomen Daisy and Darla
Seaman Daisy.jpg
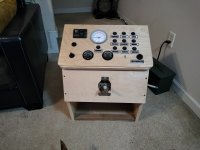
Here is a shot of the almost ready helm box. it'll have a bottom in it as well as an access door in the opening seen to reset breakers if need be. USB and cig lighter power ports will be to the left of the wheel and tilt switch to the right. It'll be urethane sealed all over. Oh, and this helm is an exact, though shorter, version of what was there before.
New Helm Box.jpg
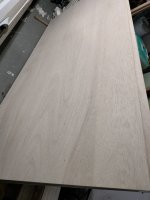
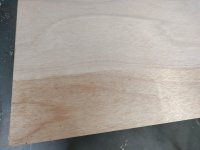
I went on a quest the other day and as soon as I got inside the sky opened up (yeah, a frog strangler), looking over the regular BCX plywood I just couldn't bring myself to by the crappy boards they were offering so I wandered around a little and found these
Birch Wood Panels.jpg
Cabinet grade Birch plywood and both sides look this good and no ink printing anywhere except the edges, no knots, and smoooooth as a baby's tookus (yeah, will need a light sanding between coats). These will remain high and dry in the garage and will be sealed with urethane after all the cuts are made. The present cabin bulkheads / walls (mahogany ??) will be repurposed for windshield frames and maybe trim on a planned seat box. I think this Birch has a similar grain as the mahogany, so it'll fit right in with the general insanity IMHO
 

wooky30014

Petty Officer 1st Class
Joined
Jun 8, 2012
Messages
288
Slow "runnings" due to the weather. We were in the middle of the bad storms that rolled through Georgia a couple of weeks or so ago. All good here, no damages at all, but all around us there were trees down EVERYWHERE (looked like a war zone) with some on folk's houses, barns, sheds, vehicles. It was a few days before I even needed to venture out for anything and it was still a "GEEZ" moment with two main roads still closed. Our power was out for about 30 hours but our trusty generator kept the fridge and TV up and running so we could keep track of the weather. Also used some of the other camping equipment for light and cooking.

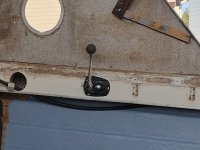
On to the project, again due to the weather not much getting done but the day before yesterday I did get out and paint some of the inside and got the shifter/throttle mounted where it needs to go. That hole is where the steer cable and electrics harness feeds to the helm enclosure
Paint And Shifter Mounted Edit.jpg
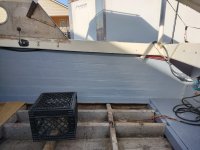
I'll do a good cleaning before reassembly and the seam will get a good bead of sealant so no more water will seep through. Painting is/was done after the temps got up enough and I have more OTW. (plus my "thin skin" doesn't like cold lol)
New Paint.jpg
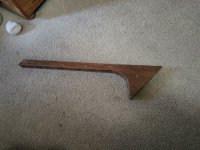
I also have been slowly dismantling the cabin walls, cut a cardboard template for the bottom edge so that when ready I can cut the new and have it fit correctly (I HOPE, "I cut it 3 times and it's STILL too short" :oops:). Going slow with it because of not sure how and where all the brass (bronze ?) screws are. The same with the upper windshield frame, I've got a new one piece knee / center support cut, original had a 3 inch extension at the top (don't ask me 🤷‍♂️ dunno)
Windshield Knee.jpg
and will rebuild the frame around it. I doing it this way to support the hardtop instead of removing it during. I'll get pics as I go and will use as much of the existing wood as I can.
 

wooky30014

Petty Officer 1st Class
Joined
Jun 8, 2012
Messages
288
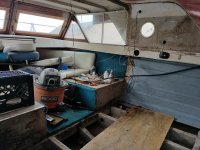
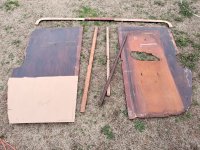
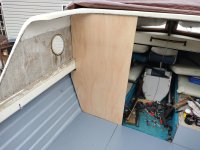
I got a little bit more done after waiting and waiting for the rain to quit (yeah, I know we need it) Anyway I got the cabin wall out and stripped down to just a piece of old wood to use as a template. I held both sides together and they are identical. Looks like I'll end up with a virtually brand new boat when I get her all refurbished, painted, varnished, sealed up, and back together
I've got a tarp stretched over the cabin and out to cover completely the open area, now to finish the painting when a warm day comes along
Open Cabin.jpg
The curved top piece will be refinished and reused and I marked and cut a cardboard template for the lower edge. I don't know why that hole was hacked up the way it was, that was where the stereo was mounted, oh well, my chance to make it better
Stripped Down Bulkhead.jpg
I'll wait to redo the windshield untill after the cabin wall w/door is completed and the deck reinstalled
 

cptbill

Senior Chief Petty Officer
Joined
Oct 6, 2012
Messages
762
Now that is some very nice work! The weather has not been great for us here, I'm still waiting for my trophy, I mean after all we did participate in winter this year
 

wooky30014

Petty Officer 1st Class
Joined
Jun 8, 2012
Messages
288
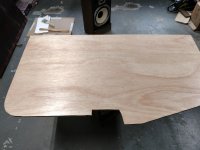
Thanks Cap, the NICE work is still ahead of me but here is what has been done today so far. I backed the hot rod out of the garage and set these new bulkheads / cabin walls out for some urethane (can also says Spar Urethane) I've tried both the oil based and water based and like the end result of water based overall with its fast drying, lack of odiferous emanation (it don't stink LOL), and easy cleanup (just water). Not showing both but they are (were) mirror images of each other except for me sometimes can't cut a straight line (close enough for me AND who else would even notice 😁)
I've got the edges done and first coat is now drying on both and me thinks that even though these replacements aren't mahogany they are going to look sharp as hell
The start, urethane bringing the grain out and resembles mahogany a little bit
First Coat Urethane Started.jpg
First coat drying, a light sand with 400 grit paper along the edge mainly before 2nd coat. And yes, that is a blown speaker cabinet, a pair I use as sawhorses, the good ones are upstairs hooked to my stereo with a pair of smaller Realistic speaker cabinets to be mounted somewhere inside the cabin
New Port Cabin Wall.jpgI'll get the two coats on then check for fitment and do any trimming if need be before any additional coats, 4 or 5 total. I'll even have enough wood from the sheets to even fashion a new door and even a new access door / panel for the battery /tank compartment (thinking a lockable bench seat box across the back, we'll see)

Thinking ahead, the new windshield frames will be this same plywood but 3/4 inch and debating whether to use the flip out hardware or not. Anyway, onward to apply the next coat to the panels
 

wooky30014

Petty Officer 1st Class
Joined
Jun 8, 2012
Messages
288
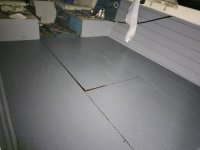
My my, how much can be done with proper weather. A while back I sealed the deck boards with epoxy but since that doesn't have much in the way of UV protection I painted the upper side of the deck and after they dried I set them in place. That was after finishing up the painting needing completion inside. The new cabin wall have been coated with urethane and are ready to be fitted
Deck boards placed but not screwed down yet, getting dark at this point
Deck down.jpg
 

cptbill

Senior Chief Petty Officer
Joined
Oct 6, 2012
Messages
762
Well it's coming along great. I on the other hand have not touched mine in months, got a bathroom remodel and pretty soon I will need to get the motorhome ready. Don't know if where going west for a couple weeks or up to Groton Ct for our son in laws navy retirement (28 years on subs) Depends I guess on whether they have the ceremony(he's got something like 90+days of leave to use)
 

wooky30014

Petty Officer 1st Class
Joined
Jun 8, 2012
Messages
288
Well it's coming along great. I on the other hand have not touched mine in months, got a bathroom remodel and pretty soon I will need to get the motorhome ready. Don't know if where going west for a couple weeks or up to Groton Ct for our son in laws navy retirement (28 years on subs) Depends I guess on whether they have the ceremony(he's got something like 90+days of leave to use)
Similarly, in a way, we've got a water line in the garage that the fix needs to be completed, we're going to give the guy who came out first crack at finishing, only fair I figure. We found out the other day two things, my son will be coming back to Ga in July and begin his practice in Greensboro / Lake Oconee area ANND he's proposed to his gal pal and she's accepted, not sure yet of the date.

Congrats on your son's retirement, maybe he can cruise on TOP of the water now
 

cptbill

Senior Chief Petty Officer
Joined
Oct 6, 2012
Messages
762
Congratulations on a daughter in law! The son parts not to bad, the daughter part sucks ( as far as weddings go) Anyway there's always to much to do and never enough time or energy
 

wooky30014

Petty Officer 1st Class
Joined
Jun 8, 2012
Messages
288
Thanks, Yeah, this will be his 2nd, the first one we thought was ok but as time went on . . . . . . a narcissist, everything had to be centered on her. But that chapter is closed now (WHEW). His new gal, we love her a bunch. A funny tale about when they met, she thought he was joking about our last name, Beveridge (sounds like the drink, juss not spelt the same 😁) I knew she'd fit right in the day we met her, she came in and I go to give her the first hug and she says "But I don't have a bra on" :oops: They'd been camping and clothes were all wet from rain. My quick witted reply was "That's ok, I'm not wearing one either" :giggle: We ALL cracked up laughing
 

wooky30014

Petty Officer 1st Class
Joined
Jun 8, 2012
Messages
288
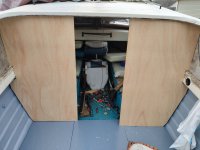
Got a LOT done (for me anyway) betwixt the sprinkling and showers today. I got the port and starboard deck screwed down, the center is in place but I had to fashion a (don't know the correct and proper name for it) splice board to connect where the split is, NOT going to use the 2X6 piece that sat on the center keel board and held in place by the deck screws.

I also took the new cabin walls out and set them in place (I shoulda had the famous The Wall album by the Floyds Of Pink playing 😎).
Build The Wall.jpgAnyway, having to do a little bit of trimming so they'll fit right and have a square and plumb door opening, right now it's a bit off, by 1/2 inch. The gap at the lower portion will have a new board cut to cover said gap.
Port And Starboard Walls.jpg
And yeah, I just noticed the bottom edge of the Starboard wall isn't placed correctly, I had just set the board there so it wouldn't fall over for the pic. It'll be right there where the blue carpet starts 😉 After the trimming and they fit to my satisfaction I'll recoat with urethane
 

SOG3

Petty Officer 3rd Class
Joined
Aug 24, 2015
Messages
78
Yeah, cptbill, the more I do (which means the closer I get to different parts and areas) the more that this vessel amazes me, mainly her reported age and no rot that I can find. Original woodwork of a species I still don't know. Stringers, deck, transom all are solid with original looking glass work on their surfaces. She looks like she's cruising right along while sitting on the trailer in the backyard, can't wait to "splash" her and go for a long awaited ride on the lake
 

wooky30014

Petty Officer 1st Class
Joined
Jun 8, 2012
Messages
288
Man you are mastering some great skills!
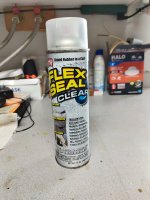
Thanks Cap, I'm trying. I got the deck all screwed down now, screw heads and generally will get another coat of grey. Now for a 64 dollar inquiry, this spar urethane I've been using, supposed to seal the wood for indoor and outdoor BUT I just found a little bit of delam on the wall boards, 4 coats btw now on them and this is from just one damp night with a tarp covering the "vitals". What to do, I don't think they have clear spray-on rubber. I'd hate to see this come apart while still under construction
 

cptbill

Senior Chief Petty Officer
Joined
Oct 6, 2012
Messages
762
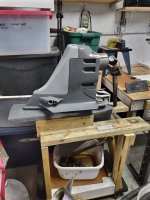
Actually they do, I don't know how clear it is. I think a west system or some other epoxy might be better On another front I finally got one of my drives done and the lower unit on the other is done, still working on the upper in-between bathroom tile.
 

Attachments

  • IMG_20230211_113440_hdr.jpg
    IMG_20230211_113440_hdr.jpg
    2 MB · Views: 1
  • IMG_20230211_113506_hdr.jpg
    IMG_20230211_113506_hdr.jpg
    1.9 MB · Views: 1
  • IMG_20230211_113513_hdr.jpg
    IMG_20230211_113513_hdr.jpg
    1.9 MB · Views: 1

wooky30014

Petty Officer 1st Class
Joined
Jun 8, 2012
Messages
288
Yeah, I forgot all about FlexSeal LOL, concentrating too much on the problem, I'll get a can of that, should still look good and just thought about adding a molding to the joint gaps. I've got some Total Boat CPES here but read it has no UV protection

I'm not a big fan on having to do the mechanicals but I do it because I'm able to AND I make sure the fixes are done correctly. OH, juss thought (yep, dangerous activity here sometimes) if you know of anyone needing a Volvo 270 drive, 70's vintage, I've got a working one that needs seals and gaskets, bell housing for a Slant6 Chrysler (I hope I'm not violating any rules by mentioning it)
 

wooky30014

Petty Officer 1st Class
Joined
Jun 8, 2012
Messages
288
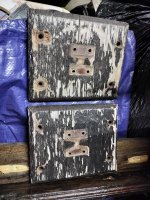
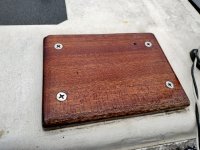
Ok boyz n gurls and children of all ages, I've been tinkering and doing little things betwixt the rain and now unseasonably warm for February, up into the 70s. I've got the new cabin walls in place and screwed down, this was after cutting a new roof "bow" to go with the original. Cabin walls are sandwiched between the roof bows. I sealed all with epoxy and will go back later with a urethane coating for the UV necessities. I believe I'll change to epoxy that DOES have UV protection included (I'm learning SO much about all this stuff) I did finish a bit out "OUT with the old and IN with the NEW" and did what I believe was a "towing eyes" delete. Wood plates at the stern with "S" hooks in a metal plate bolted to the center, either side, was looking a bit raggedy SOOO . . . . .
Out With The Old.jpg
And IN with the new, installed this morning and already been "baptized" in the drizzle this afternoon. Wood sanded smooth, epoxied, then 3 good coats of spar urethane
In With The New.jpg
OH and I had someone tell me that this wood I have here is Teak and not Mahogany, I seriously have no idea what breed it is, all I know for certain is some of it is still good and some is having to be replaced with what I can get. I also have been working in the drizzle under the tarp and today I got the steer cable hooked back up to the helm (can I get a WOOO HOOO ?? LOL) and some pilot holes drilled to mount the helm enclosure. I had to do a slight modification (nothing new here lol) because this cable is SOOO stiff and was having trouble getting the gland nut (or whatever its called) started. Now to start running the new wiring out of the helm and whatever wiring to the enclosure. I'll post the pics when its in place. I also cut panels for the new cabin door, it will be foldable with piano hinges instead of just one door panel so it will be more out of the way
 
Top