My Walleye Project - 70's Sea Nymph SS160 1668

jasoutside

Supreme Mariner
Joined
Dec 20, 2009
Messages
13,269
Re: My Walleye Project - 70's Sea Nymph SS160 1668

Agreed ^^^^, PMC worked the most beautiful foam board job I've seen on iboats:encouragement:

All I'll say about expanding foam is it's awesome but there is no drainage.

From here the great foam debate may very well rage, but I'm out.
 

Watermann

Starmada Splash of the Year 2014
Joined
Jan 12, 2013
Messages
13,798
Re: My Walleye Project - 70's Sea Nymph SS160 1668

I'm on board with the rigid foam board and since we have the exact same boat, I can also tell you exactly how much you'll need to buy to fill the void under your lower deck.


lokonn

Chief Petty Officer
Joined
Aug 8, 2012
Messages
443
Re: My Walleye Project - 70's Sea Nymph SS160 1668

Foam board works out well, especially after you get into the groove. You can start adjusting your cuts pretty quickly.
 

jvanhees

Petty Officer 1st Class
Joined
Mar 20, 2013
Messages
284
Re: My Walleye Project - 70's Sea Nymph SS160 1668

Scan thru PMC's thread, he puts lots of rigid insulation foam in, and stood the pieces upright to maximize how much he could get below decks. Rather then laying the sheets in flat............

Thanks JB for pointing me in the right direction.

Agreed ^^^^, PMC worked the most beautiful foam board job I've seen on iboats:encouragement:

All I'll say about expanding foam is it's awesome but there is no drainage.

From here the great foam debate may very well rage, but I'm out.

No need for debates gents, and no worries Jas! Going with the foam board..

I'm on board with the rigid foam board and since we have the exact same boat, I can also tell you exactly how much you'll need to buy to fill the void under your lower deck.


Rob, that is awesome. How much did you use, and of what width? I am going to refresh myself on your build in the mean time... :)

Foam board works out well, especially after you get into the groove. You can start adjusting your cuts pretty quickly.

I saw this neat trick online, of cutting it with a sharpened putty knife against a straight edge...is that crazy?
 

Watermann

Starmada Splash of the Year 2014
Joined
Jan 12, 2013
Messages
13,798
Re: My Walleye Project - 70's Sea Nymph SS160 1668

2" thick and all you need is 3 of the 4 x 8 sheets. As you can see I cut them like deck supports and put them in nice n tight. The easiest and fastest way for me to cut that stuff was using my skillsaw with an old blade in backwards. It's a time consuming mess. I did mine outside the garage so it took time running out to make cuts, then back inside to fit and measure for the next run. I think around page 5 of my SN thread has the foaming of the hull.

Edit: Yes it is crazy, try cutting that stuff with anything sharp and in about 6 inches it is no longer sharp. Way too much work, you'll see. :D
 
Last edited:

jvanhees

Petty Officer 1st Class
Joined
Mar 20, 2013
Messages
284
Re: My Walleye Project - 70's Sea Nymph SS160 1668

Got some work done this weekend. First, ripped old transom out....not in too bad of shape :)rolleyes:) but took about 1.5 hours to get out.


Last edited:

jbcurt00

Moderator
Staff member
Joined
Oct 25, 2011
Messages
25,057
Re: My Walleye Project - 70's Sea Nymph SS160 1668

But hey, it's all in 1 piece. Nice............... Be sure to measure the available space for the new wood. My tinny would only allow a 1.25" thick transom..........
 

jasoutside

Supreme Mariner
Joined
Dec 20, 2009
Messages
13,269
Re: My Walleye Project - 70's Sea Nymph SS160 1668

Dood, that's one of the best looking transoms we've seen around here!

Here's what one of mine looked like...
P1080619.jpg
 

jvanhees

Petty Officer 1st Class
Joined
Mar 20, 2013
Messages
284
Re: My Walleye Project - 70's Sea Nymph SS160 1668


Then I went and got some foam, and some plywood for the flooring.

So, to PMC, Waterman, JAS, all you Iboaters who did foam that specific "upright" way, I applaud you.:clap2: After starting to cut it with the wrong tools, I gave in to the easy route. Sorry JB.:blue: To be honest, Im not all that upset considering the time and mess it saved me. I will have to do the foam the upright way when to comes to the StarCraft! :D I am not going to lie...finishing this and starting the StarCraft is about all I can think about. This is definitely a learning experience none the less.
Getting some foam in the easy way...


Cut the first floor deck board...and needed 2 more 4 x 8 sheets as this boat floor is 57" wide....only giving me one piece of floor per 4x8 sheet.


jvanhees

Petty Officer 1st Class
Joined
Mar 20, 2013
Messages
284
Re: My Walleye Project - 70's Sea Nymph SS160 1668

Not to happy that the PO cut out/cut off 3 important pieces of the boat that could have had the rivets drilled out...

This is Watermans


This is mine obviously. Red = Cut off rear deck support. Green = cut off aluminum flap. My guess is that this was to protect steering and control cables. Blue = cut off CONSOLE!!!! I mean they are all jagged edges now. Lame :mad:


Another shot


So I can make a new deck support....or forget the rear deck.......or forget rear deck and console and make it a tiller.
 
Last edited:

jvanhees

Petty Officer 1st Class
Joined
Mar 20, 2013
Messages
284
Re: My Walleye Project - 70's Sea Nymph SS160 1668

But hey, it's all in 1 piece. Nice............... Be sure to measure the available space for the new wood. My tinny would only allow a 1.25" thick transom..........

That is true, and will help in using it for a template when cutting out the new one. looks to be just shy of 1.5"......so that would mean laminating two 3/4" pieces together if my math is correct!


Dood, that's one of the best looking transoms we've seen around here!

Here's what one of mine looked like...
P1080619.jpg

Touch? sir!

Thought mine was decent, then looked at the rotted stuff below it and thought not. But I guess there is much worse!
 

jasoutside

Supreme Mariner
Joined
Dec 20, 2009
Messages
13,269
Re: My Walleye Project - 70's Sea Nymph SS160 1668

or forget rear deck and console and make it a tiller.

Oh sheesh, where's teamster when you need him?

He's likely yank his clothes off and streak through iboats if he heard you say that!
 

Watermann

Starmada Splash of the Year 2014
Joined
Jan 12, 2013
Messages
13,798
Re: My Walleye Project - 70's Sea Nymph SS160 1668

Hey look at you go! I have a suggestion for your lower decking. Where the 2 pieces of decking meet, you need to put in a support that each piece over laps. I used 2" wide 1/16" angle aluminum. Once cut to fit, I cut out the center angle top fit over the center support. On the ends I cut out the angle and folded it over to the inside of the side support and then riveted it down.

In the pic below you can see the 2 decking supports in place.


Also it looks like you need a new transom cap like I fabricated for mine.
 

Watermann

Starmada Splash of the Year 2014
Joined
Jan 12, 2013
Messages
13,798
Re: My Walleye Project - 70's Sea Nymph SS160 1668

Checked some more at your bucket and it looks like you did do the support piece at the deck seams. Forgot to mention that the transom job on these boats is way easy with 1 sheet of 3/4" cut in half, glued up and then cut to fit. All I had problems with was the tight bottom channel likes to mar up the wood when you seat the new one in.
 

jvanhees

Petty Officer 1st Class
Joined
Mar 20, 2013
Messages
284
Re: My Walleye Project - 70's Sea Nymph SS160 1668

Oh sheesh, where's teamster when you need him?

He's likely yank his clothes off and streak through iboats if he heard you say that!

Knew I would hear about that comment! Figured there would be more harassment. But the day is young...

Checked some more at your bucket and it looks like you did do the support piece at the deck seams. Forgot to mention that the transom job on these boats is way easy with 1 sheet of 3/4" cut in half, glued up and then cut to fit. All I had problems with was the tight bottom channel likes to mar up the wood when you seat the new one in.

Oops forgot a picture. Yep I figured those needed to be in there. Glad to hear the transom is a breeze... It is nice having someone(Rob) who already restored the exact same boat!!!
 

barato2

Commander
Joined
Dec 7, 2010
Messages
2,956
Re: My Walleye Project - 70's Sea Nymph SS160 1668

just linked to this thread from your pix of the Starcraft. i think someone will be looking for an 18-22' cabin boat in a year or 2 when those kids start to get bigger.........:D
 

crankbait cowboy

Chief Petty Officer
Joined
Mar 25, 2013
Messages
585
Re: My Walleye Project - 70's Sea Nymph SS160 1668

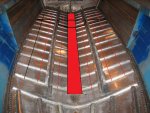
congrads on the family. lots of talk of drainage issues with the pink foam. a plan i have when i am ready is to epoxy a 1/4 inch marine board and lay in bottom of hull over limbar holes (red ) and then put in the two inch pink foam on end as waterman did. i would probable drill some hole in the marine ply first, and put some light material runners on ribs so foam sits on ribs, not all the way to floor, leaving an area for h20 to seep or run to. may be an idea for you, or mayfoam.jpg also be a flawed concept but thought i would throw it out there for ya. nice project and keep on keeping on.
 

jvanhees

Petty Officer 1st Class
Joined
Mar 20, 2013
Messages
284
Re: My Walleye Project - 70's Sea Nymph SS160 1668

just linked to this thread from your pix of the Starcraft. i think someone will be looking for an 18-22' cabin boat in a year or 2 when those kids start to get bigger.........:D

Ha your probably accurate Barato! Ill let the admiral decide the starcraft is too small for all 4 of us, let her make that statement to me when it happens, and go from there.....we'll see if that plan works :joyous:

congrads on the family. lots of talk of drainage issues with the pink foam. a plan i have when i am ready is to epoxy a 1/4 inch marine board and lay in bottom of hull over limbar holes (red ) and then put in the two inch pink foam on end as waterman did. i would probable drill some hole in the marine ply first, and put some light material runners on ribs so foam sits on ribs, not all the way to floor, leaving an area for h20 to seep or run to. may be an idea for you, or mayView attachment 219168 also be a flawed concept but thought i would throw it out there for ya. nice project and keep on keeping on.

Good plan CC, by the looks of mine the water will first flow inward toward the center stringer under the foam, then back to the stern where the bilge is... The way I laid the foam in, there shouldnt be any blockage. Ive been watching your project too, nice work you are making good progress
 

jvanhees

Petty Officer 1st Class
Joined
Mar 20, 2013
Messages
284
Re: My Walleye Project - 70's Sea Nymph SS160 1668

Got the main floors cut. Also fit the bulkhead in there like its supposed to. Didnt realize how much space there will be under the casting deck---without that there to kind of separate the boat out...wow.


This bulkhead needs to be cleaned, along with the inner walls of the hull. I have some JJV's I will try on it I think.


Forgive my lack of terminology---this peice is done now too. The trolling motor deck :laugh:


jvanhees

Petty Officer 1st Class
Joined
Mar 20, 2013
Messages
284
Re: My Walleye Project - 70's Sea Nymph SS160 1668

HERE GOES NOTHIN!!!


Also got the flooring coated with spar urethane. Not sure what I am going to do as far as carpet, or what for the flooring.


Top