My 84 4winns horizon 195 project.

Pmt133

Chief Petty Officer
Joined
Jan 6, 2022
Messages
598
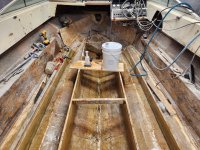
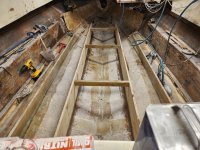
Today is a rather small yet big update. Stringers are bedded on peanut butter.
20240427_163633.jpg
Let me tell you it's no small task to bed them on your own. And, I used a damn level too! Building them into the sled you see was a good idea as it keeps them parallel all the way up.

They are vertical and the bubble is in the lines. Close enough. I did float them how the factory did, some places are a thin bit of peanut butter keeping it off the hull and others quarter inch void filled or so. Since the strength comes from the glass, I'm not too concerned... but maybe i should be?

One interesting thing, mine are straighter than factory. I also axed doubling up the 3/4 up front. I'll build that up with trim instead. Again, don't really think it was needed but rather done to extend the 10 foot timber.

I also figure them being a half inch in any direction from where they were originally located won't cause any major issues either.

Overall, only can go up from here!
 

Pmt133

Chief Petty Officer
Joined
Jan 6, 2022
Messages
598
So I have a question... should I cut the stringers to height before I tab them or tab them then cut to height? I worry about minor delamination if I were to cut the glass to height buy think I am over thinking it as they would still get capped....
 

todhunter

Canoeist
Joined
Sep 15, 2020
Messages
1,316
I did 2 each way, and much preferred cutting them to height before installing. I also preferred routing the top edge before installation to facilitate an easier capping job once installed. I basically put a full radius on the stringers using a 3/8" radius bit on both sides of the 3/4" stringers.
 

Pmt133

Chief Petty Officer
Joined
Jan 6, 2022
Messages
598
Guess I'll cut them down before I tab them. They are already bedded. :(

I'm thinking 2 layers of 1708 for tabbing is adequate but I have enough material to do 3 layers. I was thinking a 5 inch (10 total, 5 on the stringer, 5 on the hull surface), 7 inch and 9 inch overlay from the centerline of the filet would be very overkill. 2 is probably plenty no? And then for capping I was figuring 2 layups of CSM is plenty. It's the 1.5 Oz. I will radius the cap with the router.
 

kcassells

Fleet Admiral
Joined
Oct 16, 2012
Messages
8,732
You can also glass the stringers/bulkheads on a work table and install. Then just need to do tabbing in the boat. I found it much faster and easier.
 

todhunter

Canoeist
Joined
Sep 15, 2020
Messages
1,316
2 layers of tabbing is plenty. I think I did 6" and 10" (that's total, not per side) for all my tabbing. But I did glass the sides of my two tall stringers on the bench. I capped with 1708, but 2X CSM will work too. Just know that getting glass to wrap 180 is tough, so the bigger the radius, the easier your life will be.
 

Pmt133

Chief Petty Officer
Joined
Jan 6, 2022
Messages
598
I'll break out the router and round the top. The 1708 does conform nice so I think I can get it with that but I have a ton of CSM and feel that would work fine for getting them capped too. Doesn't seem to be structural so much as it is water proofing. Most of the old stringers weren't capped anyway. Coincidentally that part of them was fine.

I wish I knew about pre tabbing... I say neat trick but it is just a good idea. Live and learn.... but this is why I'm a novice.

Anyway, I plan on getting back on it Wednesday. I took yesterday to do my brake job on the truck as it was needed. I think I'll do some extra tabbing around the engine box to help with the weight plus mounts then just do 2 layups the rest of the way up. Again I keep thinking to build it stronger but like... it was fine with how bad it was originally so anything is going to end up being better.

I appreciate all the feed back guys. I'm seeing the light at the end of the tunnel finally. I'm not saying I'm there yet. But I'm rapidly approaching the point where I'm only moving upward.
 

BillWilliams

Petty Officer 3rd Class
Joined
May 23, 2021
Messages
76
Don't forget to add the relief portion on the top of the hole for the outdrive to allow the tiller arm to swing full left and right. I noticed in an earlier picture you had the hole cut out but the left and right relief at the top of the hole wasn't there.
 

Pmt133

Chief Petty Officer
Joined
Jan 6, 2022
Messages
598
Don't forget to add the relief portion on the top of the hole for the outdrive to allow the tiller arm to swing full left and right. I noticed in an earlier picture you had the hole cut out but the left and right relief at the top of the hole wasn't there.
It's on the list. I won't be doing that until I drill the transom bolt holes. Good eye and thank you!
 

Pmt133

Chief Petty Officer
Joined
Jan 6, 2022
Messages
598
So here's a question for later. I'm trying to decide how to cleat the deck supports... I'm thinking 2x2 or 2x4 ripped in half up top. My thought is to avoid any direct penetration into the stringer from the deck. So my thought is this:

Cap the stringers. Rip cleats/supports. Screw and glue with either PL or thickened resin to the stringer. Then I'm thinking maybe to glass over the cleat as well? I'm thinking that's overkill as once the deck is bedded down the adhesive is what is holding it and that'll also be on the stringer cap. So then I'm figuring glue clamp and screw the cleat and bed the screws in 5200 that are holding the cleat and be done with it then get the deck in. I've seen people do it all sorts of ways but for how my lay out is configured, that seems to be the easiest way...

Thoughts?
 

Pmt133

Chief Petty Officer
Joined
Jan 6, 2022
Messages
598
I ended up not cutting the stringers to height for now. I did mark them. I went with 2 layups of 1708 at 12 inches and 16 inches which is way more than what was there. I think I overcooked myself last night... I left light headed and nauseous just not feeling good. I'll probably take it easy today.
20240501_203737.jpg
I think it looks good.
 

tpenfield

Moderator
Staff member
Joined
Jul 18, 2011
Messages
18,069
Subscribing in . . . .

I would take a second look at the fuel tank before you put it in. Boats rarely sit level in the water (bow slightly up) and are certainly not level underway. So, the vent fitting, if it does not have the internal tube going to the front, may have trouble breathing when the tank is near full.

What may happen is that the tank will puke fuel out of the vent tube while at rest, and will have difficulty pulling air in while under way.

Best practices for the fuel tank designs are either an internal tube (as mentioned) or the vent fitting at the forward section of the tank and then the vent hose is run to it.
 

Pmt133

Chief Petty Officer
Joined
Jan 6, 2022
Messages
598
Subscribing in . . . .

I would take a second look at the fuel tank before you put it in. Boats rarely sit level in the water (bow slightly up) and are certainly not level underway. So, the vent fitting, if it does not have the internal tube going to the front, may have trouble breathing when the tank is near full.

What may happen is that the tank will puke fuel out of the vent tube while at rest, and will have difficulty pulling air in while under way.

Best practices for the fuel tank designs are either an internal tube (as mentioned) or the vent fitting at the forward section of the tank and then the vent hose is run to it.
Luckily putting gas in the tank is the last (and at the rate it's going around here, one of the more expensive) steps in the process. :ROFLMAO:

All joking aside, it's much easier to modify it now before any fuel is in it than it would be later on. The measurements from the original gas tank false floor were pitched to the front slightly but the boat isn't sitting how it would in the water despite that pitch. Also when it was full full with the old tank, when you'd take off with it either on the trailer or in the water it would occasionally spit fuel out the vent. I don't want to make that worse. There is also only about 2 foot total rise from the topic the tank to the vent anyway so it ain't difficult to force that fuel out the vent to begin with...

I plan on adding the Parker vent splash guard thing (cant remember the name, LG100 is the model) anyway for exactly that reason but I think I'm going to call the shop and just ask what they think before it gets installed as then it's a simple matter of 2 cuts and a little more welding. They did quote the price with it originally but never charged...
 

eggs712

Petty Officer 1st Class
Joined
May 8, 2012
Messages
348
The styrene fumes are nasty; it makes me feel hungover the next day if I get too much exposure. I bought some organic vapor cartridges since my cabin boat is has poor ventilation, it does help a lot.
 

Pmt133

Chief Petty Officer
Joined
Jan 6, 2022
Messages
598
The styrene fumes are nasty; it makes me feel hungover the next day if I get too much exposure. I bought some organic vapor cartridges since my cabin boat is has poor ventilation, it does help a lot.
They work great until you start smelling them through the cartridge lol. I went a step too far last night but like... you know how it can be once you get "in the zone" and you don't want to stop.
 

todhunter

Canoeist
Joined
Sep 15, 2020
Messages
1,316
So here's a question for later. I'm trying to decide how to cleat the deck supports... I'm thinking 2x2 or 2x4 ripped in half up top. My thought is to avoid any direct penetration into the stringer from the deck. So my thought is this:

Cap the stringers. Rip cleats/supports. Screw and glue with either PL or thickened resin to the stringer. Then I'm thinking maybe to glass over the cleat as well? I'm thinking that's overkill as once the deck is bedded down the adhesive is what is holding it and that'll also be on the stringer cap. So then I'm figuring glue clamp and screw the cleat and bed the screws in 5200 that are holding the cleat and be done with it then get the deck in. I've seen people do it all sorts of ways but for how my lay out is configured, that seems to be the easiest way...

Thoughts?
HERE is how I did my cleats. I recommend just buying some mahogany or other rot-resistant wood. This way it will take a screw and you don't have to worry about glassing over it. I just resin coated my cleats, PB'd them to the stringers, then thru-bolted with SS hardware coated in 5200.
 

Pmt133

Chief Petty Officer
Joined
Jan 6, 2022
Messages
598
HERE is how I did my cleats. I recommend just buying some mahogany or other rot-resistant wood. This way it will take a screw and you don't have to worry about glassing over it. I just resin coated my cleats, PB'd them to the stringers, then thru-bolted with SS hardware coated in 5200.
That looks like the route I think I'll go then. I also see you pre drilled your foam holes (my plan as well). Seems to have worked well that way you'd say? I have an Irrational fear of drilling through the hull even though I know that is basically impossible almost everywhere....
 

todhunter

Canoeist
Joined
Sep 15, 2020
Messages
1,316
That looks like the route I think I'll go then. I also see you pre drilled your foam holes (my plan as well). Seems to have worked well that way you'd say? I have an Irrational fear of drilling through the hull even though I know that is basically impossible almost everywhere....
Yeah, it worked well. Marking the deck surface for where to install screws to make sure they all hit a cleat took some head scratching, but I got it done.

Yes, I'd recommend pre-drilling your foam holes. Save the plugs and PB them back in place after the foam cures.
 
Top