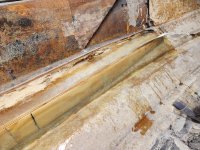
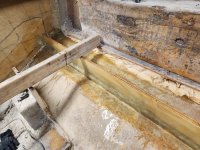
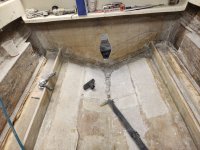
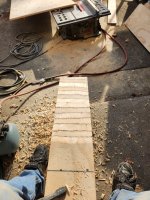
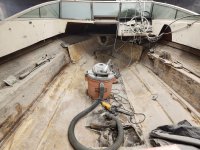
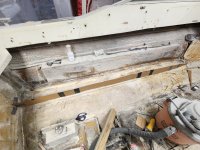
My 84 4winns horizon 195 project.

kcon

Petty Officer 1st Class
Joined
Dec 10, 2016
Messages
303
Really clean work, impressive!
Love the bubble. I epoxied my deck to my hull/stringers in a 50 degree warehouse and I did a plastic bubble too, got it up to 85 degrees with 4 plug in heaters, love a good bubble!
 

Pmt133

Chief Petty Officer
Joined
Jan 6, 2022
Messages
598
Really clean work, impressive!
Love the bubble. I epoxied my deck to my hull/stringers in a 50 degree warehouse and I did a plastic bubble too, got it up to 85 degrees with 4 plug in heaters, love a good bubble!
It is ideal. The plastic is rather thin but hey... it works and keeps everything warm. I have a 5k plug in heater and its at temp in 20 minutes.

And thank you. I keep getting worried I didn't roll it enough or I should've used the fin roller more but I didn't saturate it and just used enough for it to turn translucent then worked it with the regular paint roller... I think I'm worrying too much. It's probably already better than stock. :ROFLMAO:
 

Pmt133

Chief Petty Officer
Joined
Jan 6, 2022
Messages
598
Did a lot of grinding yesterday. Hoping to start getting stringers in today. I also want to template the false floor.20240412_192448.jpg
My idea is... glass in the stringers then make the false floor one continuous board from the engine box to the bow. Then glass the bulk heads on top of that. It seems the bulk heads were a source of water intrusion underneath the false floor and I'd like to eliminate that. I don't see an issue there doing that.
 

Pmt133

Chief Petty Officer
Joined
Jan 6, 2022
Messages
598
Worked on the grinding some more. Templated the outside stringer... tree knocked out the power so I'm early done for the day... was hoping to get the outside stringers in but it can wait. I also glued the first main stringer.
20240413_122818.jpg
20240413_150551.jpg
 

Attachments

  • 20240413_150551.jpg
    20240413_150551.jpg
    1.6 MB · Views: 1

Pmt133

Chief Petty Officer
Joined
Jan 6, 2022
Messages
598
In case anyone was wondering, I found the problem. :ROFLMAO:
20240413_150857.jpg

Lost a lot of time this weekend. Had a call for a MVA accident Friday that ate most of the day up and power is still out to the best of my knowledge... thats a big setback. Hopefully I get some good time in Wednesday.
 

Pmt133

Chief Petty Officer
Joined
Jan 6, 2022
Messages
598
This felt like progress... I got the outer stringers bedded in and added a half layer of glass on the transom and continued grinding the hull. Some more minor cutting and I'll be over the hump so to speak.
20240417_182316.jpg
I am still gassed from the weekend so I doubt I will do much tomorrow. Maybe I get the stringers tabbed in. Looks like I'll need some more cabosil and I ordered some more milled fibers. I just cracked 6 gallons of resin so far.

The extra glass or layer of 1708 on the transom was that there was minor taper on the top. I edged it to the second tabbing layer to even it out and the whole transom is 2-1/8 now.

The stringers are slightly below deck at the front 2 feet but I think 2 layers of CSM, which the whole length will be capped with, plus a topping of one layer of 1708 will true it all up. We're talking about an eighth low. Progress.
 

todhunter

Canoeist
Joined
Sep 15, 2020
Messages
1,316
A stiff batch of PB can easily fill the gap you're talking about between the deck and stringers. Pipe a tall bead on top of the stringer, lay on the deck, and add weight / screw it down.
 

Pmt133

Chief Petty Officer
Joined
Jan 6, 2022
Messages
598
I agree. Though I was shocked at how close everything was when i measured it all. Guess it was a Wednesday boat. :ROFLMAO:
 

Pmt133

Chief Petty Officer
Joined
Jan 6, 2022
Messages
598
Made some more progress.
20240423_180838.jpg
There are some air bubbles on the outer stringers but given the original ones were only tabbed in on one side, I think I'm fine. It's already more structural than the original.

Snapchat-620645933.jpg

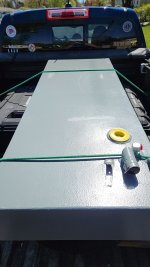
I also picked up the fuel tank. Only thing I'm nervous about is while the vent is on the back side like the original, the original had a tube inside that ran to the front of the tank. Being the boat sits level I don't think having the vent on the rear should be an issue but, you never know. Should be fine, right?

I also like that they weld 1/4 plate in for the fuel sender. Those threads always strip lol. Next visit will be pulling the false floor and getting the main stringers ready. May cap the outer while I'm there too.
 

kcassells

Fleet Admiral
Joined
Oct 16, 2012
Messages
8,732
Nice tank, just need to have pitch for vent.
Stringer heights were too low on my rearend for venting. So stayed towards bow for me.
 

Pmt133

Chief Petty Officer
Joined
Jan 6, 2022
Messages
598
Nice tank, just need to have pitch for vent.
Stringer heights were too low on my rearend for venting. So stayed towards bow for me.
Good to know. If I were to drop a level on my tank under most conditions the bubble would be in the center lol. So I shouldn't worry about it. On the trailer the rear is the highest point.
 

Pmt133

Chief Petty Officer
Joined
Jan 6, 2022
Messages
598
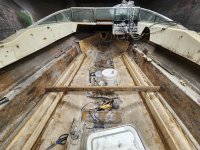
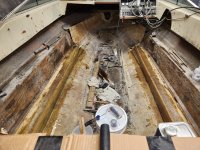
Today I finally made the leap of faith... no more messing around, just rip it all out. I finally can say, I think I have crested the hump.

Some shots of my glassing of the outer stringers. These are rock solid.
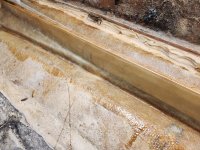
20240426_114538.jpg
20240426_114542.jpg
20240426_114546.jpg

And a couple shots of everything removed.
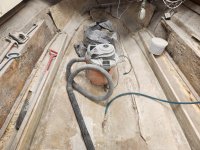
20240426_212502.jpg
20240426_212509.jpg
There was actually standing water under the false floor. The foam was like mud. I must have pulled 200lbs out of just that alone. This boat is going to fly lol.

A couple of book keeping things...
My transom is flat within 1/8 inch per mercruiser spec. I am 2.060 inches at the top and 2.180 at the thickest spot at the bottom. Spec is 2-2.25 inches far as I can find. Should I glass on another layer to be safe for the thinner spots or just leave it alone? I think I'll leave it personally...

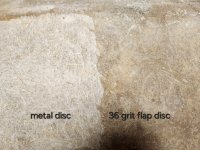
Grinding, I've switched to this metal sanding disc. You can see on the floor it leaves a rough exposed finish. On the right side of the last picture you can see where I stopped and that transition is where I worked with a 36 grit flap disc. I think the present finish offers a better bond for layup compared to the flap disc as it's like laying up on exposed glass... better mechanical and chemical bond?

Also, for the back engine mounts. I originally did those with epoxy. I know there are some compatibility issues putting poly on epoxy. But if I ground through that tabbing to the glass underneath (you could see the color change and material change) would that mean I'm good to go there and shouldn't worry about bond?

And to further that question, there are some areas where the CSM is thicker than others. Most of the hull was ground to the roving layup but these thicker CSM areas that are clean and bonded well and flat... should I grind down to the roving or am I safe to lay up on that surface?
 

todhunter

Canoeist
Joined
Sep 15, 2020
Messages
1,316
Wow, your pics bring memories of mine flooding back. Your stringers look great, and congrats on getting the rest of it ripped out.

I wouldn't worry about putting any more glass on the transom. The inside skin is likely where the variability in thickness is coming, and that's not the sealing surface. So long as you aren't bottoming out the threads on the transom assembly studs when you bolt it on (and you won't be with the transom thickness being in spec), you should be fine.

If you like the metal disc, go for it. As long as it's as-rough or rougher than the 36 grit disc, it'll be fine.

Not sure on the epoxied engine mount question. Would it be too much effort to just re-make them an use poly instead?

If you can tell the CSM is bonded well and there are no voids underneath it (you begin to get a good eye for this, the more you grind), I wouldn't worry about grinding further. The surface may not be super even, but the 1708 you tab with will easily be able to conform to it, ensuring a good bond.
 

Pmt133

Chief Petty Officer
Joined
Jan 6, 2022
Messages
598
Wow, your pics bring memories of mine flooding back. Your stringers look great, and congrats on getting the rest of it ripped out.

I wouldn't worry about putting any more glass on the transom. The inside skin is likely where the variability in thickness is coming, and that's not the sealing surface. So long as you aren't bottoming out the threads on the transom assembly studs when you bolt it on (and you won't be with the transom thickness being in spec), you should be fine.

If you like the metal disc, go for it. As long as it's as-rough or rougher than the 36 grit disc, it'll be fine.

Not sure on the epoxied engine mount question. Would it be too much effort to just re-make them an use poly instead?

If you can tell the CSM is bonded well and there are no voids underneath it (you begin to get a good eye for this, the more you grind), I wouldn't worry about grinding further. The surface may not be super even, but the 1708 you tab with will easily be able to conform to it, ensuring a good bond.
10-4 on the transom. Worst case, I could fab up a 1/8 inch spacer if I have to from aluminum if the threads bottom out.

Yes. The metal disc visually and physically leaves a rougher finish. It seems the 36 leaves more resin providing the dull look towards the bottom right of the last photo. The metal disc is the whiter rougher material toward the rear. I'll grab a better photo of what I am talking about.

For the mounts. I am rebuilding them. I was more concerned about where on the hull they were tabbed in.. residual epoxy if you will? Just want to make sure the new mounts and stringers are solid which they should be if I ground through the epoxy tabbing. IE removing all visible epoxy is enough for using the poly to rebuild.

For the voids in the CSM, there were some places with voids as there was some mold from water. Those have been ground. But other places I've ground out are coming clean straight through so I'm just roughing them uo to "good" glass so to speak. Anything questionable comes out imo.
 

Pmt133

Chief Petty Officer
Joined
Jan 6, 2022
Messages
598
This is what I mean between the two discs. The picture is labeled. I feel the metal disc is the better surface for bonding...20240427_090649.jpg
 

AussieB

Seaman Apprentice
Joined
Mar 23, 2018
Messages
32
You're doing a nice job and the detail that you are putting into the thread is really good.
 
Top