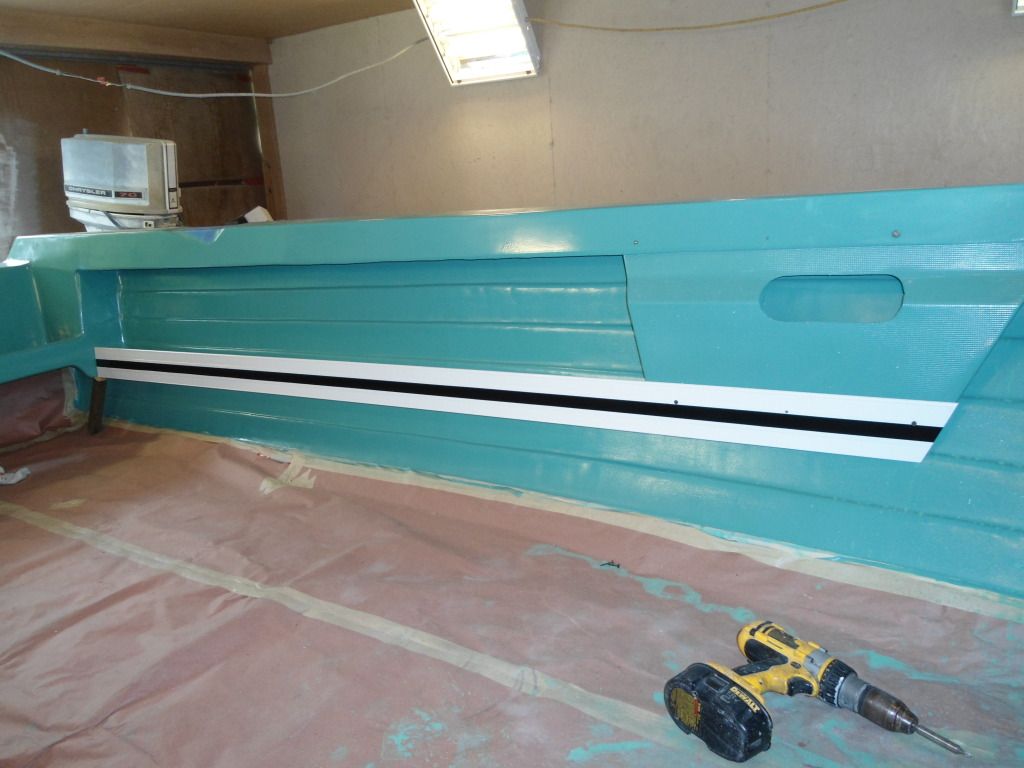
MFG rebuild getting started pics

Trooper82

Commander
Joined
Nov 21, 2011
Messages
2,648
Re: MFG rebuild getting started pics

Nice!!!

That is going to be one sharp boat when you finish SP!!!
 

sphelps

Supreme Mariner
Joined
Nov 16, 2011
Messages
11,462
Re: MFG rebuild getting started pics

Thanks Troop, jbc .. Been thinking and I need to come up with some type of wood 1x4 or6 to make the bottom of the gunnel ski-rack. It will lay flat and attach to L-brackets that bolt thru the lower rub rails then screw into the trim I just painted . What are your thoughts on the veranda type composite vinyl trim boards that they use on ext house trim . They say that it will not rot and is pretty light weight . I was also

thinking on just using some PT and painting but am afraid it would effect the aluminum brackets and trim.
 

Decker83

Commander
Joined
Apr 5, 2011
Messages
2,593
Re: MFG rebuild getting started pics

Real nice spray job. Did you take out the filter when you sprayed the trim.

Looks good as always.

Don't put the PT agaisnt any aluminum parts.
 

sphelps

Supreme Mariner
Joined
Nov 16, 2011
Messages
11,462
Re: MFG rebuild getting started pics

I just used the red disposable filter plus the filter at the compressor ..
 

jbcurt00

Moderator
Staff member
Joined
Oct 25, 2011
Messages
25,034
Re: MFG rebuild getting started pics

+1 for the vinyl trim, it comes in white that won't stain and is workable w/ woodworking tools

It is not particularly screw friendly esp if the needs to hold fast under a load. Like weighted w/ skis and mashing the throttle.......

But that isn't a deal breaker:) Bolts ;)
 

sphelps

Supreme Mariner
Joined
Nov 16, 2011
Messages
11,462
Re: MFG rebuild getting started pics

^^^ Thats what I was thinnin and most of the weight will be carried by the angle brackets that are about16 or 18 inches apart. And if it starts to go south on me, would be no problem to replace..
 

sphelps

Supreme Mariner
Joined
Nov 16, 2011
Messages
11,462
Re: MFG rebuild getting started pics

Just finished up putting the last 2 coats of black paint on . I used the wait time to lay some csm on the seat mount wood pieces and I started marking up the foam to cut the radius corners. I cut 1 out with an electric knife and it worked ok . I think tomorrow I will cut 2 pieces of ply and make a template of the seat foam . Then sandwich the foam in between the plywood and use it for a guide to cut the foam .That way the cuts will all be consistent ... No pics so you'll have to take my word for it..:)
 

sphelps

Supreme Mariner
Joined
Nov 16, 2011
Messages
11,462
Re: MFG rebuild getting started pics

Here is a shot of the trim piece as it will sit in the gunnel..
DSC00722.jpg

I made a video of me cutting foam but for some reason it won't load to my photo bucket.. :confused:
 

jbcurt00

Moderator
Staff member
Joined
Oct 25, 2011
Messages
25,034
Re: MFG rebuild getting started pics

Looks great. Breaks up the blue & it ties the side pocket to the gunwale

Looks like the Chrysler is keeping close tabs on your progress:)
 

sphelps

Supreme Mariner
Joined
Nov 16, 2011
Messages
11,462
Re: MFG rebuild getting started pics

Thanks guy's this was the original color scheme so I just kept it the same.
If I could find the time t work on the Chrysler I think it would look much better than the 85 force on there. Painted to match the boat would look great. Only problem is it's not running and no t/t..
 

Decker83

Commander
Joined
Apr 5, 2011
Messages
2,593
Re: MFG rebuild getting started pics

Its getting better all the time. A little better all the time. :D
 

sphelps

Supreme Mariner
Joined
Nov 16, 2011
Messages
11,462
Re: MFG rebuild getting started pics

If this went thru I apologize for the amateur content ...:facepalm:
 

Decker83

Commander
Joined
Apr 5, 2011
Messages
2,593
Re: MFG rebuild getting started pics

SP That was a great vid. Really liked how you designed the jig for the foam. Looked like it did a real clean job.
 

jbcurt00

Moderator
Staff member
Joined
Oct 25, 2011
Messages
25,034
Re: MFG rebuild getting started pics

If I could find the time t work on the Chrysler I think it would look much better than the 85 force on there. Painted to match the boat would look great. Only problem is it's not running and no t/t..

I suspect that with some of your fabrication & paint work skills, a few removals from the Chrysler hood, and some additions to the Force hood, it might work visually, if not accurate....

I'm just sayin';)
 

Woodonglass

Supreme Mariner
Joined
Dec 29, 2009
Messages
25,927
Re: MFG rebuild getting started pics

As and FYI you actually want the foam to be about 1/2 wider than the wood so it kinda wraps over the edges when you pull down on the vinyl to staple it. You don't have to be all that accurate with the cuts. laying that piece of plywood on top of the foam, marking it with a marker with a 1/2" allowance, and cutting it free hand would work just fine IMHO. Your method is great, but time consuming. I did not go to that much effort. I used 1/2" Poly batting as a final layer and then glued the wal-mart plastic over it all and it gave everything a nice rounded finished look. That's just how I did it. To each his own. ;)
 

sphelps

Supreme Mariner
Joined
Nov 16, 2011
Messages
11,462
Re: MFG rebuild getting started pics

Thanks Wood ! The ply template is a little larger than the seat backing. The foam is about 1/4 to 3/8 larger than the wood backing. My concern was keeping the cut somewhat square with as thick as the foam is. Did you put the 1/2" poly backing over the whole seat or just on the back of the wood backing ?
 

GT1000000

Rear Admiral
Joined
Jul 13, 2011
Messages
4,916
Re: MFG rebuild getting started pics

That is one smart hamster you got there...:)
 

Trooper82

Commander
Joined
Nov 21, 2011
Messages
2,648
Re: MFG rebuild getting started pics

Now that is one right smart setup you made there SP!

I like it...bet they all came out exactly the same too...
 
Top