MFG rebuild getting started pics

sphelps

Supreme Mariner
Joined
Nov 16, 2011
Messages
11,462
Re: MFG rebuild getting started pics

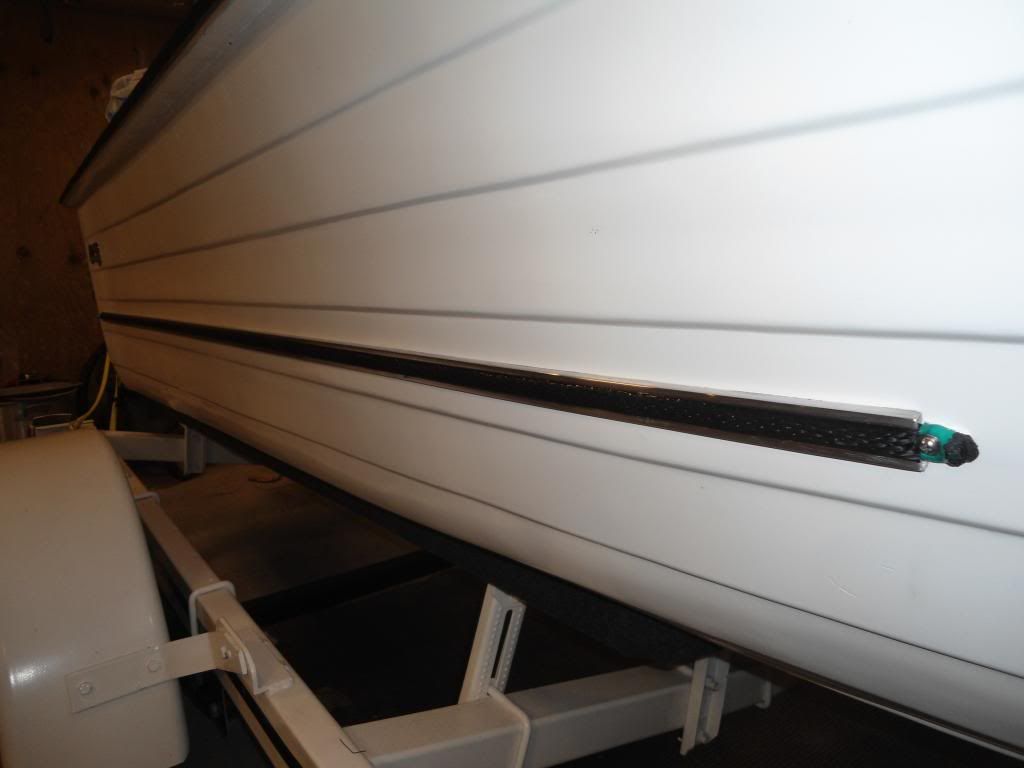
The ends will be screwed at the caps . Then I got a plan for the rest .. I'll post some pics on what I come up with later on . ;)
Hey lokonn , I need some speaker boxes fabbed up . How about building me some with the fleece and poly when ya get a chance . :joyous:
 

tallcanadian

Captain
Joined
Sep 7, 2006
Messages
3,245
Re: MFG rebuild getting started pics

Polypropylene rope stretches easy but overtime it may start to sag. I wouldn't pull too hard, but I do agreed with the above comments and taut would be good enough. It's good choice of rope too because it floats. Good for extra flotation..:D:D
 

GT1000000

Rear Admiral
Joined
Jul 13, 2011
Messages
4,916
Re: MFG rebuild getting started pics

Super nice boat tunes and awesome GoPro!
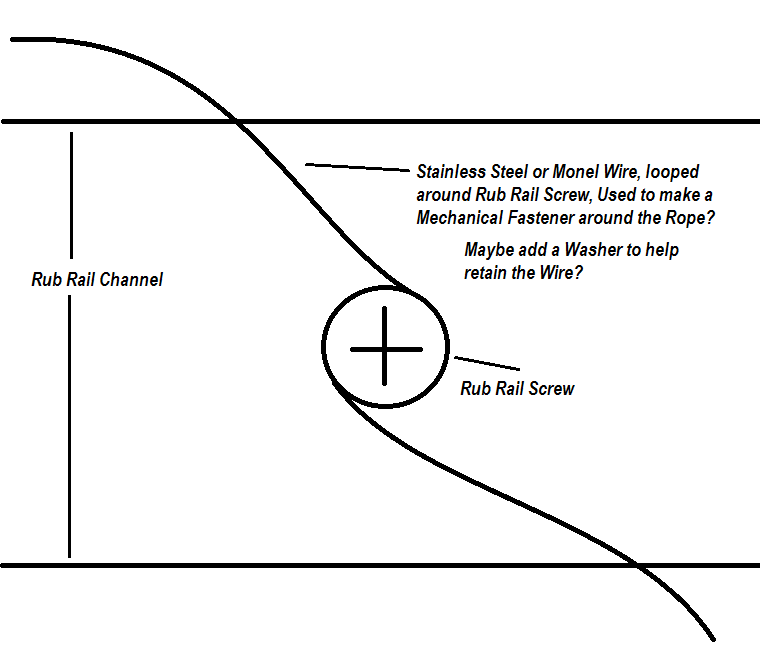
Prolly already too late, but here's my take on fastening the rope in the rub rail channel...

Install the rub rail screws with a loop of wire under the head, use a washer if necessary to retain, install the rope then twist the ends together and tuck them in the weave of the rope and it will virtually disappear.

You can most likely get away with doing this every 2-4 retaining screws...maybe even if you did it to every one, you could avoid the silicone all together...? ...or not...


Have Fun!:D
 

jbcurt00

Moderator
Staff member
Joined
Oct 25, 2011
Messages
25,034
Re: MFG rebuild getting started pics

That's ^^ a great idea, using the screws holding the rub rail on the boat as a base for the keeper wire for tying the rope..

Did you suggest something similar in the way way back when the rope rub rail was 1st mentioned. Seeing it posted shook a vague recall loose................
 

lokonn

Chief Petty Officer
Joined
Aug 8, 2012
Messages
443
Re: MFG rebuild getting started pics

Tell me what you want them to look like, we'll see what we can do.
 

sphelps

Supreme Mariner
Joined
Nov 16, 2011
Messages
11,462
Re: MFG rebuild getting started pics

Gt has it .. I am using black coated s/s fishing leader wire every other screw . You have to kink the wire and wrap it around the screw head . I will place a nice bead of caulk in the groove then pull the rope in taut . The wires stick out top and bottom . Here is the trick I came up with . after the rope is taped in place take a large sewing needle and push it down through the center of the rope . Thread the upper wire through the eye and pull it through to the bottom of the rope . Twist the wire with needle nose pliers snug up under the bottom and snip off the extra wire . You will not know it was there and not going around the rope will keep it's shape .. :)
 

sphelps

Supreme Mariner
Joined
Nov 16, 2011
Messages
11,462
Re: MFG rebuild getting started pics

Tell me what you want them to look like, we'll see what we can do.

Just joking with ya ... or am I :D.. Got the new stereo and it came with 4 speakers . I had only planed for 2 speakers so I need to figure a spot for the other 2 . Gunna warm up the hamster wheel ..
 

sphelps

Supreme Mariner
Joined
Nov 16, 2011
Messages
11,462
Re: MFG rebuild getting started pics

Here is another video of the r/r install if ya got some time to kill ...
 

jbcurt00

Moderator
Staff member
Joined
Oct 25, 2011
Messages
25,034
Re: MFG rebuild getting started pics

Looks great & sounds/looks like you got it well handled :watermelon:
 

Decker83

Commander
Joined
Apr 5, 2011
Messages
2,593
Re: MFG rebuild getting started pics

Great vid..
Very well planned out.. Looks awesome.. Job well done.
 

friderday

Chief Petty Officer
Joined
Apr 1, 2012
Messages
463
Re: MFG rebuild getting started pics

looks great. love the wire idea...genius! what pains me about your video is the drill, caulking gun, & other tools sitting on top of that beautiful bow deck...I know, I know it's tough...but I would be so anal about even a mosquito farting near it!
 

lokonn

Chief Petty Officer
Joined
Aug 8, 2012
Messages
443
Re: MFG rebuild getting started pics

You sure made that look simple. No caulk on your fingers and no holes in them either from that needle. Looks really good!
 

sphelps

Supreme Mariner
Joined
Nov 16, 2011
Messages
11,462
Re: MFG rebuild getting started pics

Thanks everyone ! Not having the r/r done has been bugging me for a while now . Almost done . Still have the port side lower one to install and the end caps . Missing 2 caps so I will need to start searching around to find the right size .
friderday, I don't sweat the paint job too much any more . After the first few scratches ya just kinda go mind numb over it after that .
Heck It's only paint .. And it's not a perfect paint job by any means .. :)

Really digging the way the first lower r/r turned out . It was a little more difficult . All the fasteners are through bolted to hold up the gunwale shelves . I needed an extra set of hands.

Hope everyone has a great rest of the year !!
 

Woodonglass

Supreme Mariner
Joined
Dec 29, 2009
Messages
25,927
Re: MFG rebuild getting started pics

I don't sweat the paint job too much any more

BOY!!! Do I understand this!! When I think back on how Anal Retentive I was about getting my hull so perfectly prepped for paint and making sure it was PERFECT and there were no Runs, Drips or Errors and NOW I feel exactly the same way!!!! Everyone and Anyone getting ready to paint their hull should be able to KNOW and FEEL this way but I KNOW there is NO WAY I or YOU can get them to understand this. They just have to experience it for themselves.

It's a process!!! It looks nice for a couple of days though!!!!:D
 

friderday

Chief Petty Officer
Joined
Apr 1, 2012
Messages
463
Re: MFG rebuild getting started pics

you are so right, woody....remember that new truck of mine? well I was visiting the local trailer parts store the other day & while carrying some bunk brackets & avoiding a massive rain puddle & talking on the phone & thinking "what's for dinner" & well you get the picture...I doinked my passenger door with the brackets. seriously, only a speck, but it consumed me so much, I could hardly function for about an hour..I got that icky feeling in my gut that long ago warned me I was either in love or too drunk..no worries...I'm over it. Just grateful it wasn't one of my kids who did it or I'd be in jail!! Great advice though...try not to sweat it..anyways...looks super-deee-duper, Sam!!!!
 

Woodonglass

Supreme Mariner
Joined
Dec 29, 2009
Messages
25,927
Re: MFG rebuild getting started pics

Yeah, I THOUGHT THIS was what it was all about...
attachment.php


But found out later, ThIS

IMG_3778.jpg


Is what it's REALLY all about!!!!

Sorry Sam didn't mean to HiJack your Thread, I'll delete the pics if you want me too!!!!
 

sphelps

Supreme Mariner
Joined
Nov 16, 2011
Messages
11,462
Re: MFG rebuild getting started pics

Feel free to hijack anytime Woody ! And your right that is what it's all about .. :)
Wow the pic of the BF's hull ya never get tired of looking at .. :cool:
That pics like 3 years old now ain't it ?
 

Woodonglass

Supreme Mariner
Joined
Dec 29, 2009
Messages
25,927
Re: MFG rebuild getting started pics

Yup 3yrs old but she don't look that good Now and I DON"T CARE!!!! My Granson's Smile still looks just as BIG!!!!
 

sphelps

Supreme Mariner
Joined
Nov 16, 2011
Messages
11,462
Re: MFG rebuild getting started pics

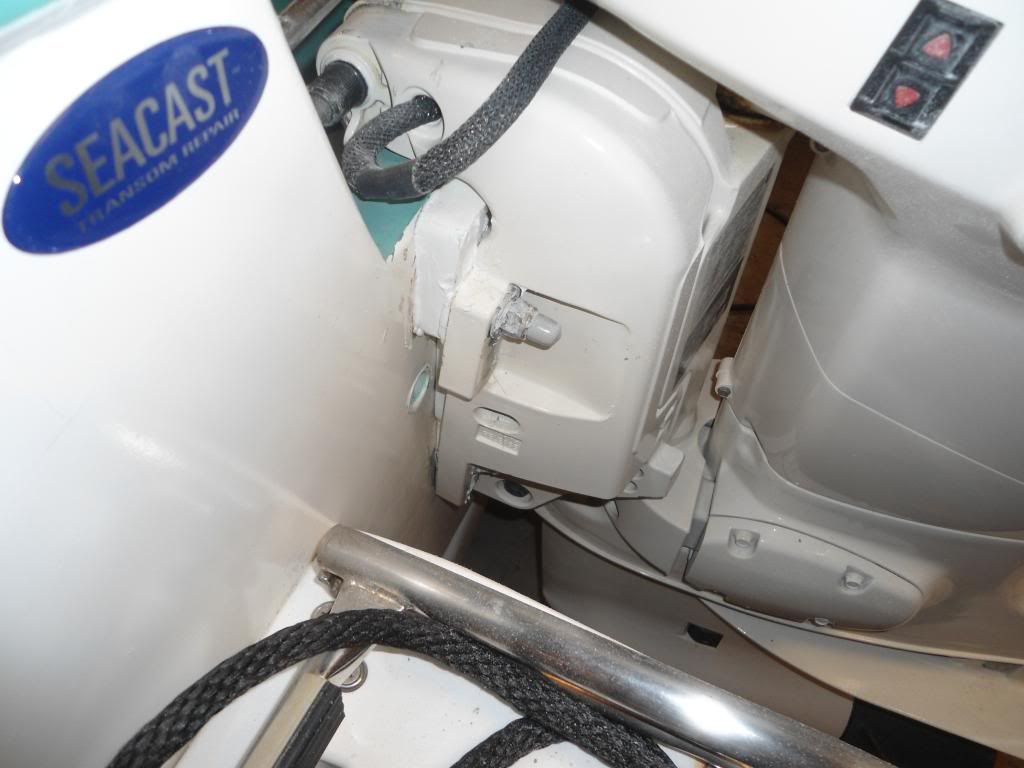
Do you guys see any issue's with the way I installed these transom wedges ? Normally it would be slid down further on the bracket but this is as far as I could shim it out at the top without grinding out even more fiberglass for the steering arm . I had to grind a good 1/4 " of the glass out where the arm was hitting the raised part of the transom . About a 2 " path . I never hit smurf so I am sure it did not weaken it enough to be a problem .

Got the last of the rope r/r installed today After I took her out of the garage for a bath . Installed the antenna for the new radio and started mulling over the installation instruction . I really need a trained spider monkey for all the crawling around under the bow .. :rolleyes::D
Hope everyone had a great New Years day !!
 
Top