Nice looking work. The weather is crazy here too, and they are calling for some major snow on tuesday here a the Jersey Shore area. Glad you go the transom assembly apart. I forgot to mention the special socket require to remove the shift cable. I have never done a bellows on a Alpha Gen2 but did one for a friend on a Gen 1 (slightly different) and have done my own Bravos which I think is similar to yours. Just take your time and follow the Merc Instructions in the repair manual if you don't have it, it and tons of info are over in the MerCruiser forum. I understand budgets also, but I would not consider anything but an OE Merc part for the drive shaft bellows if it fails it will sink your boat. To me that is not worth saving a couple $s. Just my opinion. Look forward to seeing this thing come together. have a great weekend


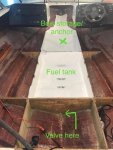
My understanding is that you should NOT allow fuel to drain to the bilge. Could cause a KABOOM!!!! Any fuel coffin drain should be piped from the compartment to the outside via the transom or side of hull. A valve could be incorporated for this in the bilge opening so you could open it periodically to see if any fuel was present.


Exacatamundo!!!! Great solution!!!:thumb::nod:This is what I'll plan....@Woodonglass, kcassells
That scissor jack deal is brilliant.
Ok, I totally missed your sig pic before. I know EXACTLY where that photo was taken. My Bayliner was docked there several times. Awesome.

Maybe some resin in the holes that you drilled for the conduits. . . .
Looking at the care and detail that you are doing on this re-build, you can see that most production boats are just 'slapped together' by comparison.