Chaparral 2000 SL Sport floor, and more?? [SPLASHED Sept 2017]

ripazka

Petty Officer 1st Class
Joined
Jul 30, 2016
Messages
246
Looks good man! I like your idea of capping. Keep it up :)
 
Last edited:

Baylinerchuck

Commander
Joined
Jul 29, 2016
Messages
2,726
No Title

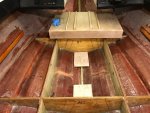
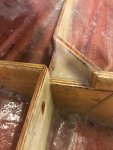
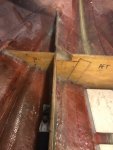
Last coat of faring compound went on tonight. Just a light smear hide a few voids and blend the edges. Should be able to lightly sand and then I'm ready for gel coat. Also prepped a couple "oops" spots for a little gel. (Darn sharp sawzall blade). Already patched those from the inside, just need to touch up the underside.

Also finished capping the stringer/bulkhead assy, and added fillets to the ladder reinforcement wood.

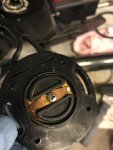
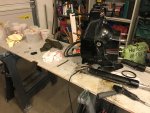
Started working on the bell housing a little. I may have discovered why the trim was intermittent at times. The trim limit switch was really nasty inside. I was replacing both senders any way. As I was doing that I found out i need a special tool to pull out the hinge pins. So back to ordering parts. I'm going to replace all the bellows since I need to separate the gimbal ring from the bell housing. The drive shaft bellows seem pretty stiff. Time to order more shtuff.
 

Attachments

  • photo260001.jpg
    photo260001.jpg
    161.4 KB · Views: 14
  • photo260002.jpg
    photo260002.jpg
    153.8 KB · Views: 14

mr300z87

Senior Chief Petty Officer
Joined
Sep 15, 2010
Messages
694
Now your into some things I can help with. I heard a 1/2 Allen or hex works on the hinge pins although I bought the Merc tool. Another tool you will need is a flexible driver to get at the hose clamps. Also do yourself a favor and buy MerCruiser parts not after market especially the senders. I would also recommend putting the transom housing on the boat before trying to assemble and maybe even disassemble the drive shaft bellows can be a bear and near impossible with the housings rolling around on the the bench. You will also need bellows adhesive, and a trick I learned here on Iboats is to use MerCruiser power tune spray as a lubricant on the bellows retaining ring. Good luck and keep plugging away. Spring will be here soon although this past week was like winter again here in NJ.
 

Baylinerchuck

Commander
Joined
Jul 29, 2016
Messages
2,726
Now your into some things I can help with. I heard a 1/2 Allen or hex works on the hinge pins although I bought the Merc tool. Another tool you will need is a flexible driver to get at the hose clamps. Also do yourself a favor and buy MerCruiser parts not after market especially the senders. I would also recommend putting the transom housing on the boat before trying to assemble and maybe even disassemble the drive shaft bellows can be a bear and near impossible with the housings rolling around on the the bench. You will also need bellows adhesive, and a trick I learned here on Iboats is to use MerCruiser power tune spray as a lubricant on the bellows retaining ring. Good luck and keep plugging away. Spring will be here soon although this past week was like winter again here in NJ.

Yeah I tried a hex bolt and turning it with vice grips to no avail. I ordered the proper tool. I assume these are right hand thread. Also I must admit I am buying some aftermarket parts. At this point in this restoration I can't justify the extra cost. I know all about pay me now, or pay me later as a maintenance professional. Unfortunately I have a budget I need to stick to and aftermarket parts help me stay within those means. I appreciate the advice and hope you keep following along to offer more.
 

JASinIL2006

Vice Admiral
Joined
Feb 10, 2012
Messages
5,673
Now your into some things I can help with. I heard a 1/2 Allen or hex works on the hinge pins although I bought the Merc tool. Another tool you will need is a flexible driver to get at the hose clamps. Also do yourself a favor and buy MerCruiser parts not after market especially the senders. I would also recommend putting the transom housing on the boat before trying to assemble and maybe even disassemble the drive shaft bellows can be a bear and near impossible with the housings rolling around on the the bench. You will also need bellows adhesive, and a trick I learned here on Iboats is to use MerCruiser power tune spray as a lubricant on the bellows retaining ring. Good luck and keep plugging away. Spring will be here soon although this past week was like winter again here in NJ.

+1 on this! I had better luck with the Merc tool, too. (Along with a generous dose of heat to loosen the pins.) Also, the flex driver is really handy. I found a set with flex drivers in three different lengths that was perfect. The best advice, which you not above and which I heard from Bondo is to use the PowerTune spray to push on the retaining ring. I couldn't believe how easy that made it!
 

JASinIL2006

Vice Admiral
Joined
Feb 10, 2012
Messages
5,673
Yeah I tried a hex bolt and turning it with vice grips to no avail. I ordered the proper tool. I assume these are right hand thread. Also I must admit I am buying some aftermarket parts. At this point in this restoration I can't justify the extra cost. I know all about pay me now, or pay me later as a maintenance professional. Unfortunately I have a budget I need to stick to and aftermarket parts help me stay within those means. I appreciate the advice and hope you keep following along to offer more.

I understand about being on a budget. After doing it once, I'd rather not do it again, at least not anytime soon. Just be sure the aftermarket parts you get are high quality. Changing the bellows was the biggest PIA job I've taken on in boat ownership. Worse than grinding fiberglass, IMHO!
 

Baylinerchuck

Commander
Joined
Jul 29, 2016
Messages
2,726
No Title

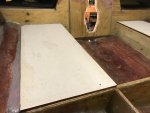
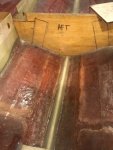
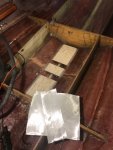
Feel like I'm making progress. Got off to a slow start today due to feeling under the weather. But I had a vacation day scheduled and wasn't about to waste it laying around.
-Got the final sanding done on the faring compound I spread on the transom. Ready for gel coat.
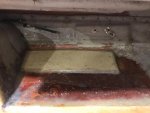
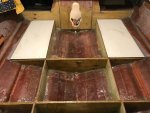
-Sanded the deck pieces I cut for either side of the bilge, soaked the edges in resin. Glued and screwed cleats to the stringer where the deck pieces would attach. Used hairy PB to glue and screw deck pieces in, then filleted with hairy PB.
-Glassed in ladder support with 1708.
-Cut a couple of supports for the fuel tank. Set the fuel tank in place to check measurements.
-Used leaf blower to blow all the fiberglass dust outa my garage. You're welcome neighbors who live down wind from me.

It was really nice today, almost 70. Tomorrow, snow in the forecast. Grrrrr!!!
 

Attachments

  • photo260208.jpg
    photo260208.jpg
    156.8 KB · Views: 21
  • photo260209.jpg
    photo260209.jpg
    125.6 KB · Views: 21
  • photo260210.jpg
    photo260210.jpg
    130.1 KB · Views: 21
  • photo260211.jpg
    photo260211.jpg
    142 KB · Views: 21

tpenfield

Moderator
Staff member
Joined
Jul 18, 2011
Messages
18,040
Those nice smooth top edges of the stringers and bulkheads look mighty fine :D
 

Baylinerchuck

Commander
Joined
Jul 29, 2016
Messages
2,726
Those nice smooth top edges of the stringers and bulkheads look mighty fine :D

Why yes they do. The little trick you taught me was better than my expectations. I'm glad I bought lots of clamps though.....it was a PITA to keep the plastic smooth if I didn't have a clamp every 1.5 to 2 inches. I am very pleased so far! I raise a beer to you sir!!
 

Baylinerchuck

Commander
Joined
Jul 29, 2016
Messages
2,726
Looks great. Just wondering why the gaps in the tank support base.

I left the gaps to ensure there was plenty of space for water to hit the bilge. Maybe I'm over thinking it, but in the event that condensation forms, I want it to drain below the tank.
 

Baylinerchuck

Commander
Joined
Jul 29, 2016
Messages
2,726
Finished glassing in the fuel tank supports. Should be ready for gel coat!!

IMG_0413.JPG

Also got the special hinge bolt tool to separate the gimbal ring from the bell housing. Pulled the bellows off. Looks like I'll need to make a very deep 9/16" socket to finish removing the shift cable. It doesn't look like installing bellows is going to be fun!!
 
Last edited:

mr300z87

Senior Chief Petty Officer
Joined
Sep 15, 2010
Messages
694
Nice looking work. The weather is crazy here too, and they are calling for some major snow on tuesday here a the Jersey Shore area. Glad you go the transom assembly apart. I forgot to mention the special socket require to remove the shift cable. I have never done a bellows on a Alpha Gen2 but did one for a friend on a Gen 1 (slightly different) and have done my own Bravos which I think is similar to yours. Just take your time and follow the Merc Instructions in the repair manual if you don't have it, it and tons of info are over in the MerCruiser forum. I understand budgets also, but I would not consider anything but an OE Merc part for the drive shaft bellows if it fails it will sink your boat. To me that is not worth saving a couple $s. Just my opinion. Look forward to seeing this thing come together. have a great weekend
 

Baylinerchuck

Commander
Joined
Jul 29, 2016
Messages
2,726
http://forums.iboats.com/forum/boat...-sport-floor-and-more?p=10353537#post10353537

Well you need to keep a daily EYE on your bilge area. If fuel gets in there ya know. Kaboomy. Might be a coast gaurd/insurance thingy.
I dink that area is supposed to be closed.
A drain plug perhaps that can be pulled to see if fuel is leaking. Let the others chime in. I do see your reasoning.

Well if that was the case then this Chap was illegal the day it rolled out of the assembly line. There was a drain hole in the aft of the tank compartment that drained into the bilge. Honestly, even if it was sealed, the gas would find its way to the bilge. Where else would it go?
 
Top