Can the base of engine work? Two to bolts under engine are rusted and can

achris

More fish than mountain goat
Joined
May 19, 2004
Messages
27,468
I need to rebuild the bellows and it is last step to take of the bellows. Can anybody guide me to disconnect the shift cable in engine side?
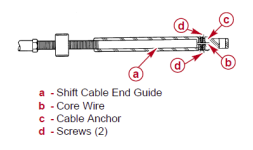
You should already have the shift cable disconnected from the shift plate, yes?

Loosen the 2 grubscrews on the end of the shift guide.
1651623871199.png
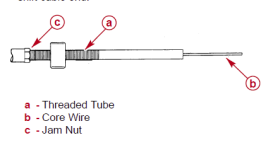
Pull the guide off. Loosen the jam-nut and then unscrew the threaded tube from the cable.
1651623993124.png
Now tie a length of cord to the end of the cable and with the bell housing pulled back, start pulling the shift cable out. Pull it all the way so you have the cord. Disconnect the cord and fit up your new shift cable bellows. Re-attach the cord and with a helper, feed the cable back in and guide it through with the cord...

What I would do with the cable pulled this far apart is the pull the inner out as well and clean it (and the inside of the shift slide) and squirt a SMALL amount of silicone spray on it before putting it back in.

Chris.......
 

liusigou

Chief Petty Officer
Joined
May 11, 2015
Messages
541
You should already have the shift cable disconnected from the shift plate, yes?

Loosen the 2 grubscrews on the end of the shift guide.
View attachment 359861
Pull the guide off. Loosen the jam-nut and then unscrew the threaded tube from the cable.
View attachment 359862
Now tie a length of cord to the end of the cable and with the bell housing pulled back, start pulling the shift cable out. Pull it all the way so you have the cord. Disconnect the cord and fit up your new shift cable bellows. Re-attach the cord and with a helper, feed the cable back in and guide it through with the cord...

What I would do with the cable pulled this far apart is the pull the inner out as well and clean it (and the inside of the shift slide) and squirt a SMALL amount of silicone spray on it before putting it back in.

Chris.......
Thank you Kris.

The shift cable end guide (a) cannot be pulled off after I removed the two grubscrews(the head is square)
 

achris

More fish than mountain goat
Joined
May 19, 2004
Messages
27,468
If you can't remove the guide (I have NEVER had one I can't remove) then you'll need to cut the cable and start with a new one.

Chris ...
 

liusigou

Chief Petty Officer
Joined
May 11, 2015
Messages
541
I'd like to buy a set of Gimbal Bearing installer puller an Alignment tools in Ebay or Amazon for further using. Could any body suggest which brand is better? Some brand in Amazon has a bad customer review and some even cannot work. Give me a link please?

Thank you so much

 
Last edited:

liusigou

Chief Petty Officer
Joined
May 11, 2015
Messages
541
Do you know why we should make a hold on the alignment tools? Definitely we are a professional mechanic if we can make a hold on smoothy cylinder surface

I found the customer questions as following, Drill a hold is just marking a place, I think it is not necessary.

Do you agree?

/***********************************
Question:
What do these reviewers mean when they say you have to drill through the bar to install the gimbal bearing?
Answer:
The distance to the bearing varies with your boat, so you measure before removing bearing, then drill through the alignment tool to place the install ring at the proper depth for installing the new bearing. The removal of the old bearing is very easy with thos tool!
By Allen C. Hile, Jr. on August 28, 2019
********************/
 

Attachments

  • make_a_hole_on_the_alignment_tools.png
    make_a_hole_on_the_alignment_tools.png
    980.3 KB · Views: 14
Last edited:

achris

More fish than mountain goat
Joined
May 19, 2004
Messages
27,468
No. Needs to be drilled for the pin to hold the bearing driver in place.
 

liusigou

Chief Petty Officer
Joined
May 11, 2015
Messages
541
No. Needs to be drilled for the pin to hold the bearing driver in place.
Hi Achris, Why does the manufacturing make a hole? if manufacturing cannot do so, that mean dealer or shop have to prepare thousand bearing driver for the installing different engine. How can I know the place I should make a hold at?
 
Last edited:

achris

More fish than mountain goat
Joined
May 19, 2004
Messages
27,468
Hi Achris, Why does the manufacturing make a hole? if manufacturing cannot do so, that mean dealer or shop have to prepare thousand bearing driver for the installing different engine.
The standard Mercruiser special tool set has a driver bar and installation cups as a separate tool, not as part of the alignment bar. The aftermarket driver is one that was designed to be used with the alignment bar as the driver rod. That wasn't how Merc envisaged it, so no hole from the factory.

And one more thing. That thing about them not drilling the hole because of the different sizes according to the boat... It's complete rubbish. Have a look at how the gimbal bearing and transom housings are and you'll see they are all the same, not different lengths, between the bell housing and the bearing...
The aftermarket people aren't drilling the hole because it takes time, and that costs them money... Merc don't drill the hole because they are expecting the work to be carried out by certified service centres, who have all the right tools, and that includes the right driver rods for the installing tool. (BTW, I have a separate installer tool for gimbal bearings, one I designed myself and had my friend turn up on a lathe.)

Chris.....
 
Last edited:

liusigou

Chief Petty Officer
Joined
May 11, 2015
Messages
541
Did you check for rotten stringers?

If your stringers are rotten, and you are trying to bandaid the issue with a block of wood, is like pulling new pants over soiled underwear after you poop your pants. May look good for a moment
Tomorrow I will buy a engine hoist and move away the engine and check the base and stringer.
 

liusigou

Chief Petty Officer
Joined
May 11, 2015
Messages
541
Now I understand the alignment, the engine is high if the bottom of the alignment tool touch more to coupler and the engine is low if the top of alignment too touch more to coupler. But my question is which screw should I turn to adjust the height.
 

Attachments

  • PXL_front_mount (1).jpg
    PXL_front_mount (1).jpg
    2.4 MB · Views: 11
  • mmexport1650936161423.jpg
    mmexport1650936161423.jpg
    687.6 KB · Views: 11

achris

More fish than mountain goat
Joined
May 19, 2004
Messages
27,468
Now I understand the alignment, the engine is high if the bottom of the alignment tool touch more to coupler and the engine is low if the top of alignment too touch more to coupler. But my question is which screw should I turn to adjust the height.
No, the engine is LOW if the bottom of the alignment tool touch more to coupler (so you need to make the front RISE), and the engine is HIGH if the top of alignment too touch more to coupler (you need to make the front DOWN).

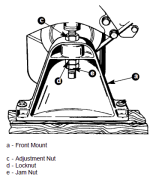
You don't turn the screw to adjust, you turn the nut ('c' in this picture) while holding the screw so it does not turn...

Loosen the jam nut about 10 turns. Back the lock nut away from the front mount about 9 turns, then use the Adjustment nut to raise or lower the engine. Once you get it right, run the locknut up and tighten it (without turning the screw), then run the jam nut up and lock it against the lock nut.
1651807680108.png
 

liusigou

Chief Petty Officer
Joined
May 11, 2015
Messages
541
No, the engine is LOW if the bottom of the alignment tool touch more to coupler (so you need to make the front RISE), and the engine is HIGH if the top of alignment too touch more to coupler (you need to make the front DOWN).

You don't turn the screw to adjust, you turn the nut ('c' in this picture) while holding the screw so it does not turn...

Loosen the jam nut about 10 turns. Back the lock nut away from the front mount about 9 turns, then use the Adjustment nut to raise or lower the engine. Once you get it right, run the locknut up and tighten it (without turning the screw), then run the jam nut up and lock it against the lock nut.
View attachment 359979
Thank Achris for your replying.

But it is difficult to understand your guide as following:

the engine is LOW if the bottom of the alignment tool touch more to coupler (so you need to make the front RISE), and the engine is HIGH if the top of alignment too touch more to coupler (you need to make the front DOWN).
 

achris

More fish than mountain goat
Joined
May 19, 2004
Messages
27,468
the engine is LOW if the bottom of the alignment tool touch more to coupler (so you need to make the front RISE), and the engine is HIGH if the top of alignment too touch more to coupler (you need to make the front DOWN).
Yes, that's correct. If you put the alignment bar in and there is more marks on the bottom, then the front of the engine is low, and you need to make the front of the engine up. Nothing confusing.

Chris......
 

liusigou

Chief Petty Officer
Joined
May 11, 2015
Messages
541
Somebody has mentioned the rubber(No.2) and spacer (No.3) for the rear mount. Are they bad or still works for my rubber and spacer?Should I replace them?

My front mounting bolts are obvious rusted. But in the engine front mount diagram, it does not show the bolts fixed the engine on the boat. Does it mean I cannot buy it online store and I should go some store to buy it?
 

Attachments

  • engine_frong_mounting_diagram.png
    engine_frong_mounting_diagram.png
    292.9 KB · Views: 16
  • flyywheel_house.png
    flyywheel_house.png
    178.3 KB · Views: 15
  • PXL_20220424_162913527.jpg
    PXL_20220424_162913527.jpg
    4 MB · Views: 14
  • mmexport1650841579588.jpg
    mmexport1650841579588.jpg
    601.7 KB · Views: 14

Scott Danforth

Grumpy Vintage Moderator still playing with boats
Staff member
Joined
Jul 23, 2011
Messages
49,856
the lag bolts are just galvanized lag bolts available at your local hardware store. those are not supplied by Mercruiser
 

liusigou

Chief Petty Officer
Joined
May 11, 2015
Messages
541
I bought a used 2T engine hoist and I can check the base carefully. It seems that I have to rebuilt the base. Fibreglass job. Can I DYI?
 
Top