'65 Lyn Craft Seabreeze 1500 Sport Runabout

buxmj

Petty Officer 1st Class
Joined
Jun 9, 2018
Messages
294
Hey Sam, as always thanks for the insight, that does make sense. Yes, there was no foam and no fore to aft stringers, just lateral bulkheads, I will post a deconstruction pic later but what is even more scary is that the bulkheads were dimensional lumber so they didn't contact the hull once the spacing was taller than the stringer so really there wasn't much if any support along the keel. I have already cut one more stringer than was there before and they all will contact the hull all the way across. I also am planning on pouring 2 lb foam, let me know if I should use 6 lb. I have the 1/4" ext ply cut and can go that route. I will lay them in there tomorrow and take pics and see what you all think. I definitely want to make it better and stronger, the original transom was only an inch thick and the outer transom skin is PAPER thin, the new transom is inch and a half and I will add to the outer skin before I put the new transom in.
 

Baylinerchuck

Commander
Joined
Jul 29, 2016
Messages
2,726
Just don’t let any of the wood contact the hull. Hold it up at least 1/4” and use thickened reinforced resin to fill the gap.

I think 2lb or 4lb foam in that boat is good. 6lb would be a waste of money IMO.
 

buxmj

Petty Officer 1st Class
Joined
Jun 9, 2018
Messages
294
Hey Chuck, I have some 1/4" rubber mat I am cutting up to use as spacers.

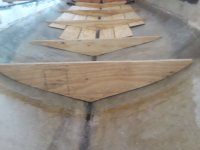
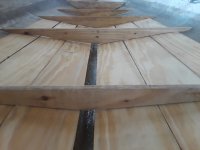
I put all the wood in as it was originally built, the deck is ready to go down but I want to make sure the hull is as strong as possible. I think I am going to put a stringer down the middle and notch the bulkheads to tie it all together.

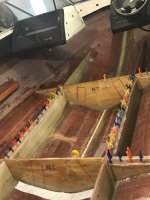
The first pic is from the bow looking back, the 2nd pic is from just in front of the transom looking forward, the deck ends at that last bulkhead.

What do you guys think? Should I rebuild like the original with an added stringer or lose the 1/4" plywood and add a few more layers of 1708 for strength? There will be flotation foam whichever way I go.
 

Attachments

  • 20201111_114528a.jpg
    20201111_114528a.jpg
    133.6 KB · Views: 7
  • 20201111_114608.jpg
    20201111_114608.jpg
    2.1 MB · Views: 7

sphelps

Supreme Mariner
Joined
Nov 16, 2011
Messages
11,462
I think I would go with extra glass or fabricated hull stiffeners and not put the 1/4” ply on the bottom .
That just looks like a place for rot to start . LOL !
 

Baylinerchuck

Commander
Joined
Jul 29, 2016
Messages
2,726
+1 on getting rid of the 1/4”. If it didn’t have foam in it before, you’ll be surprised at how much the foam will stiffen that boat up.
 

buxmj

Petty Officer 1st Class
Joined
Jun 9, 2018
Messages
294
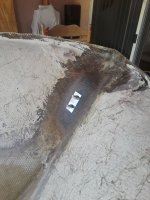
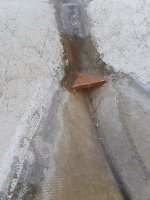
Thanks for the feedback guys and yes I agree I am not going to use the 1/4 ply on the hull floor. I have already added 2 layers of 1708 and will add at least one more layer, maybe 2, I should have plenty of 1708. I went ahead and installed the Coosa block for the bow eye and put that back on in anticipation of the tropical storm that didn't happen, just a lot of rain and some wind, thankfully. There is no weight to that hull right now, would have been like an upside down umbrella being picked up and thrown around. The Coosa block started as a 15"x 2"x 3/4", cut it in half, used a circular saw to cut the angles, mixed some PB and made a sandwich, covered 2 spare bolts with masking tape to hold it in place and now it sits with 2 layers of 1708 over more PB. I will use sealant and lock washers on both sides later after paint on the inside and outside.

Buck
 

Attachments

  • 20201107_140001a.jpg
    20201107_140001a.jpg
    158.4 KB · Views: 6
  • 20201116_124144a.jpg
    20201116_124144a.jpg
    316 KB · Views: 6

todhunter

Canoeist
Joined
Sep 15, 2020
Messages
1,311
Thanks for the feedback guys and yes I agree I am not going to use the 1/4 ply on the hull floor. I have already added 2 layers of 1708 and will add at least one more layer, maybe 2, I should have plenty of 1708. I went ahead and installed the Coosa block for the bow eye and put that back on in anticipation of the tropical storm that didn't happen, just a lot of rain and some wind, thankfully. There is no weight to that hull right now, would have been like an upside down umbrella being picked up and thrown around. The Coosa block started as a 15"x 2"x 3/4", cut it in half, used a circular saw to cut the angles, mixed some PB and made a sandwich, covered 2 spare bolts with masking tape to hold it in place and now it sits with 2 layers of 1708 over more PB. I will use sealant and lock washers on both sides later after paint on the inside and outside.

Buck
Nice job with the Coosa. Where did you get the small piece? Or did you have a full sheet? I've thought it would be nice to use a small piece of Coosa in my bilge for where the bilge pump mounts, but can't justify buying a large piece just for that.
 

sphelps

Supreme Mariner
Joined
Nov 16, 2011
Messages
11,462
Bow eye looks great!
Yeah we had to prep our job sight for the storm that never was also .. LOL !
 

buxmj

Petty Officer 1st Class
Joined
Jun 9, 2018
Messages
294
Nice job with the Coosa. Where did you get the small piece? Or did you have a full sheet? I've thought it would be nice to use a small piece of Coosa in my bilge for where the bilge pump mounts, but can't justify buying a large piece just for that.
Thanks Tod and Sam, sometimes I surprise myself with things turning out well instead of needing to turn chicken $*&% into chicken salad from something I totally screwed up, lol. The guy I buy resin from is a boat repairman, restorer and he gave me the scrap. Maybe there is a restorer near you that has some scraps laying around? It is so easy to work with but boy is it expensive. Do wear gloves, it likes to irritate you with the itchies since it is so easy to machine, learned the hard way.
 

buxmj

Petty Officer 1st Class
Joined
Jun 9, 2018
Messages
294
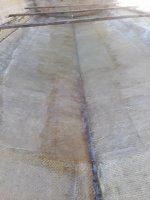
More progress! I think I can finally say the inside bottom of the hull is ready to go. There are 4 layers of 1708 down the middle and 3 everywhere else, I also added PB in the keel to give it more strength. The PB also enabled me straddle the keel with that last layer of 1708. It should be safe to stand on now also. Going to start putting the stringers in this weekend.
 

Attachments

  • 20201120_151814a.jpg
    20201120_151814a.jpg
    220.9 KB · Views: 4

buxmj

Petty Officer 1st Class
Joined
Jun 9, 2018
Messages
294
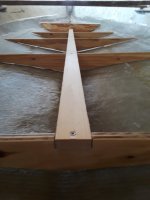
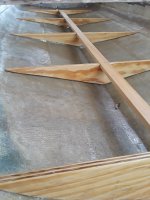
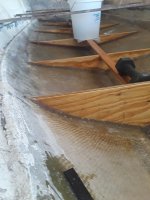
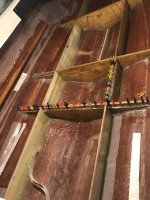
I needed a way to stand the bulkheads up while I tabbed them in, decided to add a permanent piece of cypress. Let me know what you guys think, I will be adding pour foam and this is more than what was there before, plus having added 3 to 4 layers of 1708 should give it plenty of strength. There was no fore to aft stringers, just side to side bulkheads, I have added one more than before and they will all contact all the way across with PB. I will add my 1/4 inch rubber spacers when I get ready to PB then tab them in.
 

Attachments

  • 20201122_141959.jpg
    20201122_141959.jpg
    778.1 KB · Views: 2
  • 20201122_142042a.jpg
    20201122_142042a.jpg
    291.7 KB · Views: 2

buxmj

Petty Officer 1st Class
Joined
Jun 9, 2018
Messages
294
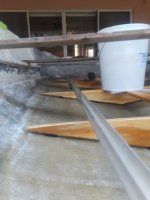
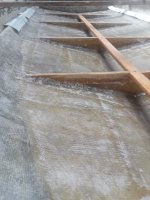
I got the bulkheads PB'd and filleted in. The bucket has a tow chain in it and I have 2 10 lb weights on the ends. I put them there so I wouldn't bump the whole grid out of place. I had to put a little more space under the middle bulkhead to lift it, glad I checked with a straight edge, I thought that one needed weight to keep it down, it is all pretty straight, at least I hope so, no turning back now. I am done for today, going to tab them in tomorrow.
 

Attachments

  • 20201124_092142.jpg
    20201124_092142.jpg
    688.8 KB · Views: 6
  • 20201124_134732.jpg
    20201124_134732.jpg
    910.7 KB · Views: 6

buxmj

Petty Officer 1st Class
Joined
Jun 9, 2018
Messages
294
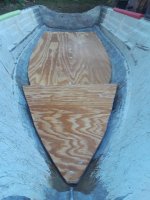
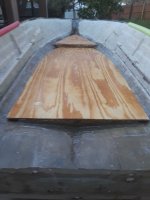
Hope you all had a great Thanksgiving break. I made a lot of progress on my project this last week. I now have the deck in! It was so frustrating to get the 1708 to lay down over the top of the bulkheads, twice I took off soaked pieces and threw them away, couldn't get the air pockets out. The bulkheads do have 2 layers going up to the top edge and one layer up over. I thought I was getting good at this glass thing, it is so easy when it is mostly flat! I also added a support piece in the front for the forward deck, there wasn't one there before. The two deck pieces have one layer of CSM on the bottom side and is coated with resin for now on the top. After the foam, PB and tabbing around the edges I will add two layers of CSM. My foam should arrive tomorrow and hope to have that poured this week and do the PB around the edges this weekend, woohoo. It was nice to take the spacer boards out and now I can walk in the boat, feels solid!
 

Attachments

  • 20201129_144125.jpg
    20201129_144125.jpg
    1.2 MB · Views: 6
  • 20201130_151339.jpg
    20201130_151339.jpg
    1.2 MB · Views: 6
  • 20201130_165358.jpg
    20201130_165358.jpg
    977.3 KB · Views: 5
  • 20201130_165429.jpg
    20201130_165429.jpg
    761.9 KB · Views: 6

sphelps

Supreme Mariner
Joined
Nov 16, 2011
Messages
11,462
Nice to have a dance floor installed I'll bet !
Don't feel bad .. Your not the only one to have installed glass just to get frustrated and snatch it out ... Been there ..LOL!! I've done that and had a glass mess all over me and the dog ..It's usually when you realize that you forgot to add the hardener ...
 

kcassells

Fleet Admiral
Joined
Oct 16, 2012
Messages
8,720
Nice to have a dance floor installed I'll bet !
Don't feel bad .. Your not the only one to have installed glass just to get frustrated and snatch it out ... Been there ..LOL!! I've done that and had a glass mess all over me and the dog ..It's usually when you realize that you forgot to add the hardener ...
You're past it now but you can prior add a slight bevel to the tops to roll over easier.2nd option is to run the glass up the sides only. Come back and just glass the flat tops. Trim off with multi tool.
Looks nice!
Yup like Sam, been there done that.
 

Baylinerchuck

Commander
Joined
Jul 29, 2016
Messages
2,726
More advice.....1708 would be a real PITA to get to lay down over the top of a stringer, and is really not necessary. Save the 1708 for the tabbing. CSM should be used for this since the goal is to waterproof, not build bulk or strength. @tpenfield gave me an idea that really worked well and will save a ton of aggravation. Rough up the CSM a bit by rolling it over a corner, or pulling on it from end to end to loosen the glass fibers slightly. Wet it out, lay it over the edge of the stringer. Use strips of plastic sheeting to cover the wetted out CSM, then clamp with spring clamps. While the resin kicks, you’ll need to pull down on the plastic some and reclamp to minimize air bubbles. Once kicked, and small air bubbles can be penetrated with a drill, and filled with resin through a syringe.
 

buxmj

Petty Officer 1st Class
Joined
Jun 9, 2018
Messages
294
Thanks guys for all your advice. I had rounded over all the top edges but it still was very difficult but is done now. I am thinking this will help others in the future. My bulkheads (no stringers) were coated before with resin then 2 layers of 1708 up the sides with the 2nd layer to the top and it just took forever to get the third layer over the top to lay down and yes a total PITA. I finally got it and did use CSM on one of them.

Hoping to drill the holes and get the foam poured tomorrow afternoon.
 
Top