1990 Sea Nymph FM160B Restoration

Watermann

Starmada Splash of the Year 2014
Joined
Jan 12, 2013
Messages
13,787
Is it were me dealing with that mess, I would remove the splashwell, bracing and inside piece of transom skin. Main reason is both skins will need to be cleaned and pitting can be repaired at least on the outer skin anyway. I would also prime and paint the inner surfaces of those 2 skin pieces. .
 

Frey0357

Petty Officer 1st Class
Joined
Mar 13, 2014
Messages
313
Is it were me dealing with that mess, I would remove the splashwell, bracing and inside piece of transom skin. Main reason is both skins will need to be cleaned and pitting can be repaired at least on the outer skin anyway. I would also prime and paint the inner surfaces of those 2 skin pieces. .

Thanks Watermann, I think your recommendation is good. If I take out the splashwell I dont have to worry about how to get the wet wood pulp out, because I can just scoop it out.....thanks for confirming what I already was thinking! I keep second guessing myself on this project, maybe I am in denial of the work needed...lol

thanks again!

Frey
 

TruckDrivingFool

Lieutenant Commander
Joined
Jul 30, 2007
Messages
1,818
When I looked at it last night it looked like it tapered top to bottom in the sides but it musta been an optical illusion as I don't even see it in the pics now.

All those screws :eek: poor wood never stood a chance.

I think you and WM have the best plan of attack to clean it out

The speedo should be a tube and not any big deal to cut and splice back with a vacuum T but the transducer seems to depend on how good you think you can splice it. In the end though you may want to think about just pulling them all the way out to rerun them. I have no room to talk though as on the Jet I the ducer cable through the SW drain also. :rolleyes:


Looking at the pocket where the wood was makes me wonder if anyone has done/documented a seacast transom on a tinny. I see on their website
[h=2]Aluminum Boats[/h]
For use in aluminum boats just apply our Aluminum Adhesive Bonder prior to pouring!
 

Frey0357

Petty Officer 1st Class
Joined
Mar 13, 2014
Messages
313
No Title

Ok, so a little more work completed on the SN last night! :D

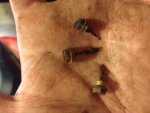
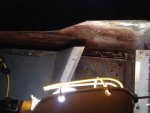
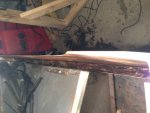
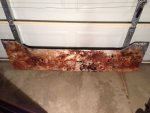
Transom= OUT! See Pics...

Ever wonder what the result is of wood screws that are placed into soaked wood, such as a transom? Check out that Pic, the threads are completely gone and most of the screws were completely erroded away!

I was able to remove the inner transom (aluminum sheet) that was just floating (screws had dissolved....) and that made it easy to simply pull out the large pieces, and vacuum out the small shredded bark that was the transom.

I actually feel relief that this "mess" of a transom is coming to a close and the "Rebuilding" stage is around the corner!!!:happy:

Frey
 

Attachments

  • photo231174.JPG
    photo231174.JPG
    112.5 KB · Views: 2
  • photo231175.JPG
    photo231175.JPG
    81.5 KB · Views: 2
  • photo231176.JPG
    photo231176.JPG
    86.3 KB · Views: 2
  • photo231177.JPG
    photo231177.JPG
    107.9 KB · Views: 2

Frey0357

Petty Officer 1st Class
Joined
Mar 13, 2014
Messages
313
When I looked at it last night it looked like it tapered top to bottom in the sides but it musta been an optical illusion as I don't even see it in the pics now.

All those screws :eek: poor wood never stood a chance.

I think you and WM have the best plan of attack to clean it out

The speedo should be a tube and not any big deal to cut and splice back with a vacuum T but the transducer seems to depend on how good you think you can splice it. In the end though you may want to think about just pulling them all the way out to rerun them. I have no room to talk though as on the Jet I the ducer cable through the SW drain also. :rolleyes:


Looking at the pocket where the wood was makes me wonder if anyone has done/documented a seacast transom on a tinny. I see on their website

Thanks Truck! I was able to pull the transducer out after snaking backwards from the console back, and the speedo "cable" I simply cut after finding a "T" that was already in the boat. I have actually found that I do not believe that it was the PO who ran the cabling thru the transom in this fashion but SN was the culprit. I will actually run the cabling in the same way, only I will use one of those cable covers (not sure what you call those - black plastic thing) to do it right.

Frey
 

Frey0357

Petty Officer 1st Class
Joined
Mar 13, 2014
Messages
313
Update: Last night I finally removed the front casting deck and bow where the trolling motor rests...sorry no pics (it was too late and phone battery died!). The structure under there is quite impressive with many metal supports traveling front to back and right to left, I dont want to mess with those.....;).

I also began some of the cleanup work needed prior to rebuilding and tossing in some gluvit or similiar product to seal seams and rivets. They were not leaking, but I dont want to have a leak develop and have to take this apart any time soon! While I got some work completed with the handheld grinder with wire cup brush attachment on some surfaces, I soon quit thinking there must be a better way of cleaning this up!

Here is my question for the experienced builders out there...please....I need to clean the rivet and seam areas prior to coating with Gluvit. Is there a chemical or solution that will help to clean this up so that I am not grinding away at those precious rivets....and possibly creating a leaking situation? It seems to me that the wire cup brush is very aggressive on these areas, is there a better attachment also for this? Oh, I should mention that what I am cleaning up is old water residue, mixed with oil, sand/dirt, and overall grime (dark brown in color), and in some areas the spray in foam is very difficult to remove from the small cracks and crevices...

Thanks in advance all!

Frey
 

Woodonglass

Supreme Mariner
Joined
Dec 29, 2009
Messages
25,927
I'd use a TriSodiumPhosphate (get it @ Lowes, really good de-greaser) warm water wash and chuck up one of these in my electric drill...http://www.walmart.com/ip/21983092?w...205072&veh=sem
I'd then finish up with a Mild Acid wash of a 50/50 mix of White Vinegar and Warm Water then rinse with Warm water with a some baking soda mixed in. You'll be ready to apply the Gluvit epoxy once she's nice and dry. I'd use some air to blow out the seams etc... to ensure all the water was gone. But hey, I'm NOT a "Tinner Guy" so what do I know!!!:noidea:;):nod:
 
Last edited:

Frey0357

Petty Officer 1st Class
Joined
Mar 13, 2014
Messages
313
I'd use a TriSodiumPhosphate (get it @ Lowes, really good de-greaser) warm water wash and chuck up one of these in my electric drill...http://www.walmart.com/ip/21983092?w...205072&veh=sem
I'd then finish up with a Mild Acid wash of a 50/50 mix of White Vinegar and Warm Water then rinse with Warm water with a some baking soda mixed in. You'll be ready to apply the Gluvit epoxy once she's nice and dry. I'd use some air to blow out the seams etc... to ensure all the water was gone. But hey, I'm NOT a "Tinner Guy" so what do I know!!!:noidea:;):nod:

Wood, you are a funny fella! I did get a degreaser to spray on yesterday and worked on it until late last night, came out good. PO must have repeatedly spilled oil in this boat or something, cause it was everywhere! Just needed something to cut it.....I rinsed with plain water, but I think I need to go back and rinse with water and baking soda....I want to make sure it's not eating my boat 😱.

More t come this weekend if the rain stops!
Frey
 

Frey0357

Petty Officer 1st Class
Joined
Mar 13, 2014
Messages
313
Removed the splashwell over the weekend, 10 rivets drilled out and she came free! No pics lately, but I should get some tonight.....although boring stuff! :faint2:

Still cleaning out hull and removing the crud around the rivets and seams so that sealer (gluvit) can be applied.

Once that is applied its onto the rebuilding stages! :D

Coming first Transom Replacement
- Wood purchased, needs to be cut and glued and cut to final size, then sealed...

Foam Replacement
- Foam purchased (at least the first 4 pink sheets....), needs to be cut to fit, starting in the stern of the boat...

Flooring sealed and refitted
- Next purchase...

Carpet
- Next purchase...

Coming along, just slowly....then again I have all winter!

Frey
 

Frey0357

Petty Officer 1st Class
Joined
Mar 13, 2014
Messages
313
IMG_1685_zpsxg98tbjv.jpg
IMG_1838_zpsdp9bgid9.jpg


So, like many of you before me I have pitting on the aluminum in my transom area. I plan to fill those in with JB Weld. After feathering the JB weld into the areas is it best to sand smooth? Is the JB Weld simple to sand? Is a grinder the best method to flatten this, or hand sander? Any help here would be great! Thanks all!

Sorry for the pics, I was practicing with my photos to make them bigger...

Frey
 
Last edited:

TruckDrivingFool

Lieutenant Commander
Joined
Jul 30, 2007
Messages
1,818
No help as usual as I've not done the pit filling just wanted to say I really like the first photo. Something about a blue sky boat profile pic. :D

Those clear water pics make me jealous, only once after an extra long cold winter with a very late iceout have I been blessed with that kind of gin clear water locally. It lasted about two weeks until the spring rains finally brought back enough churn and sediment to turn it back to it's typical murky brown. :blue:

I can't remember if you said the condition of the foam in the rear but think it'll be interesting to see how/if it sits differently after your resplash.
 

Frey0357

Petty Officer 1st Class
Joined
Mar 13, 2014
Messages
313
No help as usual as I've not done the pit filling just wanted to say I really like the first photo. Something about a blue sky boat profile pic. :D

Those clear water pics make me jealous, only once after an extra long cold winter with a very late iceout have I been blessed with that kind of gin clear water locally. It lasted about two weeks until the spring rains finally brought back enough churn and sediment to turn it back to it's typical murky brown. :blue:

I can't remember if you said the condition of the foam in the rear but think it'll be interesting to see how/if it sits differently after your resplash.

Yes, Truck that lake is incredible! Some have stated that it is the 2nd most beautiful lake in the US! Torch Lake...look it up....:highly_amused:

As for the foam, some of it was saturated, some not. I am sure I remove 100lbs. of that nasty stuff! I took a palm sized piece out of the floor, and squeezed it - water just pored right out of it....:jaw: Not to mention the transome was totally soaked pulp.....should sit up much more proud after re-launch!

Frey
 

Frey0357

Petty Officer 1st Class
Joined
Mar 13, 2014
Messages
313
Evidence that I'm making a little progress....;)

IMG_1841_zpsykmwbm4o.jpg

A lot of clean up (oil residue) has resulted in this:
IMG_1842_zpskoteklm3.jpg


External transom grinding has resultedin this (Sorry, not sure why it's upside down!):
IMG_1843_zpsbvjgzpvo.jpg


IMG_1844_zps5yqxhuyv.jpg


Frey
 

Frey0357

Petty Officer 1st Class
Joined
Mar 13, 2014
Messages
313
When JB Weld sets up, does it sand easily, or does it require power sanders?

thanks,
Frey
 

64osby

Admiral
Joined
Jul 28, 2009
Messages
6,816
JB Weld sands easiest at about 24 hours and as it gets harder it gets harder to sand IMO.

Best to apply it like drywall compound with a plastic spreader and avoid most of the sanding.
 

Frey0357

Petty Officer 1st Class
Joined
Mar 13, 2014
Messages
313
Thanks 64, that is very helpful. I am planning on applying with a flat spreader (plastic) to equal less sanding, and I wanted to know if it was difficult to sand after it hardens. Makes sense that the longer you wait the harder it is....:D

Frey
 

drpepper68

Petty Officer 3rd Class
Joined
Sep 8, 2014
Messages
75
Rick - I'm all about saving a few bucks when the time is right for the right product. It is good to know that this bimini top is in use on your boat and the explanation of how you use it makes sense (it may help someone else, even me!). Got a pic of that top in use on your boat?

Frey

I live on amazon and it will be coming in on my next order. :) Thanks Rick.
 

Woodonglass

Supreme Mariner
Joined
Dec 29, 2009
Messages
25,927
Thanks 64, that is very helpful. I am planning on applying with a flat spreader (plastic) to equal less sanding, and I wanted to know if it was difficult to sand after it hardens. Makes sense that the longer you wait the harder it is....:D

Frey
If you dip your spreader in Acetone when you are applying the JB Weld it will make it spread smooth as SILK and you won't have to sand it at all!!!!:nod:
 
Last edited:

Frey0357

Petty Officer 1st Class
Joined
Mar 13, 2014
Messages
313
Thanks Wood, great tip! I have not had much time this week to work on the boat, but once I do, I will try this out....

Frey
 

jigngrub

Fleet Admiral
Joined
Mar 19, 2011
Messages
8,155
My winter project:
-Remove the outboard, rebuild transom
-Small tweaks to interior, clean it up a bit
-Fix or possible remove the live well (dont use this...)
-Check foam and flooring, seems a little soft in some areas
-Consider painting or cleaning up the exterior, kinda beat up from PO (dock rash, or something)

You may want to consider vinyl deck covering instead of carpet, I removed all of the carpet in my boat and went with vinyl and couldn't be happier, and I'll never have carpet in a boat again!

http://forums.iboats.com/forum/boat...-repair/521750-97-tracker-pro-deep-v-facelift
 
Top