1990 Bayliner 2651 resto

Scott Danforth

Grumpy Vintage Moderator still playing with boats
Staff member
Joined
Jul 23, 2011
Messages
47,296
I would make test drills into the flotation boxes and the bulkhead in front of the motor. My bet is you have more demo work ahead
 

Drivewayboater2

Petty Officer 1st Class
Joined
Aug 21, 2019
Messages
259
Update 10-9
Last week did some testing with epoxy. Mixed up different batches with cabosil and made some test bonds with scrap wood. Learned quite a bit. Working time to thickening.
This past weekend the grinding continues. Found some voids in the transom and filled with thickened epoxy. Gave a good wipe down with acetone before filling voids. My big concern is the flatness of the transom before clamping the new wood. I’m gonna put a solid sheet of ply on the outside of transom when clamping.
Sealed the transom plate with resin. Cut out keyhole and test fit to transom.
Big question is how far should I grind back for glassing the new transom wood. 6 inches good enough? I intend to tab in around the entire piece first with 8 inches of CSM then 2 layers of 1708? This the right approach?
C11AEE78-994D-4998-975B-72696E204F83.jpeg5E393985-5906-44ED-B6E1-04D8F737A88C.jpeg1CA19B06-383C-47B1-898E-0FF1D3EF4368.jpegC11AEE78-994D-4998-975B-72696E204F83.jpeg5E393985-5906-44ED-B6E1-04D8F737A88C.jpeg1CA19B06-383C-47B1-898E-0FF1D3EF4368.jpegD1750AD1-27A3-492E-A31C-E20AC1D5DB67.jpegC1D8E7FC-EC09-4A83-9CA4-A86FB1720BAB.jpegFF27D6F2-B3AD-4B34-9822-693312827B43.jpeg706AB850-1745-405D-AE8C-F2F568626E5C.jpeg065F3C09-5CC8-4D6B-9089-C9A852B06784.jpegC7BE0A6D-84C2-4FC1-A08B-781A60FB40D4.jpeg7EACB41B-644A-46C2-9BF0-FB8255CC0426.jpeg
 

Scott Danforth

Grumpy Vintage Moderator still playing with boats
Staff member
Joined
Jul 23, 2011
Messages
47,296
1708 is for use with poly as the CSM stitches to it requires the styrene in the resin.

For epoxy, you would use 1700
 

kcassells

Fleet Admiral
Joined
Oct 16, 2012
Messages
8,575
Scott is correct. Poly needs csm. EEpppoooxxxy does not.
Epoxy does not contain styrene to break down csm. You can use epoxy but the end result relates to costs. 1708 costs more than 1700 and epoxy costs
more than poly.
Epoxy will still make the bond, but you are using more epoxy that costs more to wet out.
I made the same original mistake when I started my rebuild.
So, the glass costs more and there is more required to soak it out. No biggy you just need to switch to 1700 at some point.
 

Drivewayboater2

Petty Officer 1st Class
Joined
Aug 21, 2019
Messages
259
Update 10-21
had decent weather last weekend mixed up some thickened epoxy and set the inside transom piece. Thanks to all for the tricks and tips. Been setting up all week.
1700 arrived yesterday. Hope to get at least on layer on it this weekend.

EABB802B-29F6-401E-B17A-E173203FD97C.jpeg34AD59B9-3626-4C4F-9E22-7DF6BE42EF8A.jpegE0BA592E-143F-4692-BD20-5A15CBDF5BB7.jpeg9EFDEB84-F129-407D-98CB-8FE9546F4F41.jpeg
 

Drivewayboater2

Petty Officer 1st Class
Joined
Aug 21, 2019
Messages
259
Update 10-22
Removed the clamps from the transom. Seems like he bond was good and even. Using the outside plate helped keep things square and even. straight edge was very close to flat… maybe a 16th of an inch out.
today the temp allowed me to attempt my first fillet around the new transom core. used the plastic bag approach to push the epoxy in the large gaps. Finishing off the radius with a plastic spoon was okay. If I was a baker it would have been a bit cleaner result. I’m sure those that view the pics will say sand clean and smooth. the dremel tool will help there. 8722D528-F27E-4156-BCAC-83E816CFEDC9.jpeg0A01184B-6808-411E-AEE4-500F5985BF36.jpeg41AB66EA-F959-474F-9513-E92A1F0E4155.jpeg1C2ADBC6-42BB-41AB-A1A6-68F5147B2BC2.jpegA00C7624-A62E-4D67-B891-8AA62C11FB2A.jpeg27E0946E-69E2-4BEA-80F4-155D17ED66E8.jpeg837C8F6C-D11D-4925-B1D0-B191D00E4377.jpeg89F63121-B03C-48E1-98E2-B6DD54B022A2.jpeg
 

Attachments

  • 6C547EA2-CBE8-488F-8458-7407B075E8F8.jpeg
    6C547EA2-CBE8-488F-8458-7407B075E8F8.jpeg
    1.7 MB · Views: 15

kcassells

Fleet Admiral
Joined
Oct 16, 2012
Messages
8,575
Fill the drain completely with pb.
The idea is to keep any water away from the transom wood.
Fill entire drain hole with PB, then drill out for your garboard drain to insert.


1666523633305.png
 

Drivewayboater2

Petty Officer 1st Class
Joined
Aug 21, 2019
Messages
259
Definitely will completely fill that area. Will put pvc tubing in up against existing garboard drain and Fill in the entire cavity.
Any suggestions on tabbing in the transom with 8/9” strips of 1700 around the edges before going over the entire transom with 2 layers of 1700?
can I do a wet on wet when using epoxy? Meaning doing the tabbing and layers all in one session?
any advise would be appreciated.
 

kcassells

Fleet Admiral
Joined
Oct 16, 2012
Messages
8,575
I ran my glass entirely over transom with a 3"+ over edges and the second cover 3" over the prior. I might have even done another over that. Old and forgetful I am.
Wet on wet is the strongest application. Either works. It's called chemical bond vs. mechanical bond.
Round out all sharp edges and glass hair to roll the glass without issues.
 

Drivewayboater2

Petty Officer 1st Class
Joined
Aug 21, 2019
Messages
259
Took advantage of warm weather here in the northeast and tried my first attempt at tabbing. Must say went better than expected. Did some tests first since Im using 1700 and epoxy resin. Wasn’t sure how much was needed to completely soak the cloth. Was much less than anticipated. 247E84CF-C492-4150-BB3E-83E23FEF25DE.jpeg0F5BAC82-B050-4C8B-886A-5FA363C996F7.jpegEC0B9E10-FE2F-443A-B5AC-E764AE30B59B.jpeg589A8FFB-55D1-43BA-A95B-3DACBA315207.jpeg
 

88 Capri (2022 SOTY)

Senior Chief Petty Officer
Joined
Aug 25, 2019
Messages
792
Took advantage of warm weather here in the northeast and tried my first attempt at tabbing. Must say went better than expected. Did some tests first since Im using 1700 and epoxy resin. Wasn’t sure how much was needed to completely soak the cloth. Was much less than anticipated. View attachment 372720View attachment 372721View attachment 372722View attachment 372723
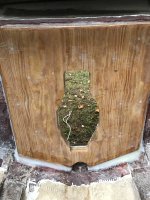
I really wish I would have thought about chamfering the edges, I see how much easier it would have been.
Looking great!
 

Drivewayboater2

Petty Officer 1st Class
Joined
Aug 21, 2019
Messages
259
A little 3/4 round bit with the router made it easy. I was really surprised how easy it wetted out and rolled on around the corners. Had to baby sit it a little but there’s no air bubbles at all. I did sand and add more thickened epoxy to the edges before laying in the tabbing. those pieces went on wet on wet. Very happy with the result. The next challenge will be getting a solid piece of 1700 ( after adding more tabbing) to lay into some of the compound angles. Trial and error with careful cuts before setting out the cloth will be my focus.
appreciate the kind words.
 

Drivewayboater2

Petty Officer 1st Class
Joined
Aug 21, 2019
Messages
259
Update 11-19
With temps too low, not much fiberglassing could be done. The next best thing was to tackle to bow pulpit. It was delaminating and needed attention. Removed it from the boat. Drilled out all rivets. Removed the aluminum trim. It was heavy! At least 50 lbs.

Started by removing the aluminum trim
CBA2A4BA-F9EC-4161-B402-282233A1156B.jpegD8D1D6AC-826D-44EA-8CB5-3F68EAFC1068.jpeg

Then it was time to remove the underneath layer of glass. Multi tool made it easy

549EAFC4-2176-4094-ADA3-602F3EEF72B3.jpeg00990C03-D25F-4958-81E4-9E2A7CFCA201.jpeg4A16D706-7E5C-4859-B913-603C968CF9E9.jpeg

Started at the thickest part and worked forward. The wood was soaked and rotten. Removed piece by piece. Chisel and hammer. Bit by bit removing the rot.


260E3A6F-1127-4CD0-8430-D1723A5AABC8.jpeg44BE4EA5-3BFC-442C-9D4C-DF0EDF8BB55E.jpeg70336DD1-8D90-4B89-B10B-3A1A6AE4F169.jpeg

Got down to just glass on the thickest part. Then removed to entire fiberglass piece underneath revealing the rotted wood . Seams like a straight forward process. Remove old rotted wood. Reset new wood and reglass the entire bottom. Should be an easy indoor winter project. 0FF77BF9-11E7-49F5-AADB-2F9AE672166A.jpegAD5469F9-216F-4591-A669-68CF78DB2B1D.jpeg
 

eggs712

Petty Officer 1st Class
Joined
May 8, 2012
Messages
329
Looks identical to my pulpit that has lots of stress cracks. I'm glad we have such similar boats so I can piggyback on occasion!
 

Drivewayboater2

Petty Officer 1st Class
Joined
Aug 21, 2019
Messages
259
anytime! Indeed stress cracks will be addressed when putting it back together.
dug out the two layers of very wet and heavy plywood. they did come out in relatively solid pieces so I at least have a template. Interesting how the used pvc tubing to run the nav light wires.
053DB987-2041-4969-B6FD-26CF988D4F5D.jpegView attachment 372926

once wood was removed it was super light. The aluminum trim wasn’t sacrificed and should be usable again.

44E186A2-86FD-40B0-839D-585FBF59C659.jpegA3169D20-CED6-4119-9137-29813F7121C1.jpeg
 

kcassells

Fleet Admiral
Joined
Oct 16, 2012
Messages
8,575
So now make a nice fit of plywood to fit. I always like chipping out the wet stuff.
 

Drivewayboater2

Petty Officer 1st Class
Joined
Aug 21, 2019
Messages
259
Indeed… that’s the plan…I did see another job posted here on iboats. Seems like a straight forward repair. something that can be done in the shop this winter… working with epoxy is awesome… very little vapor issues.
any heads up on what I should be careful of? I’m considering laying a layer or two of 1700 before laying in new wood. Just want to be sure it’s rock solid before putting in new wood and encasing with glass from the bottom.
 

kcassells

Fleet Admiral
Joined
Oct 16, 2012
Messages
8,575
Sand the crap out of it then wipe with acetone prior to install. Make template, looks like you have one from the tear out. Glass the side 1st being set in pb and let dry.
Apply pressure, squeeze out pb, make filets then glass the ply.
 

mickyryan

Rear Admiral
Joined
Apr 18, 2016
Messages
4,210
when i did my pulpit for my trophy i ran a rubber hose to where i would mount a light , made it easy to get wire though and used arjay6011 pourable to fill it instead of wood i did do it with wood first but wasnt pleased with it so went pourable since it was alrready like a mold :)
 
Top