Thanks! Agreed… I just wasn’t keeping track of the kick off time. Things were getting hardened up before I had a chance to make it smooth.. oh well.Looking good. So yep, sand, wipe, scratch up, acetone.
Sometimes I'll cut up a rubber/plastic spreader/scraper apply pb and run it smooth with the tool while applying. Eliminates a lot of bumps and points.
 I’ll be more careful with the second layer.
I end up doing the same thing all the time!Thanks! Agreed… I just wasn’t keeping track of the kick off time. Things were getting hardened up before I had a chance to make it smooth.. oh well.
I’m good at sanding/grinding
I had the same problem but thinking about it I believe I made my mixture too dry also which compounded the problem. I was trying to conserve resin a bit I believe because it uses so much.Thanks! Agreed… I just wasn’t keeping track of the kick off time. Things were getting hardened up before I had a chance to make it smooth.. oh well.
I’m good at sanding/grinding
")


Looking great! As you mentioned "baby steps" that is a good thing because hurrying only brings possible mistakes and re-do'sHappy new year to all.
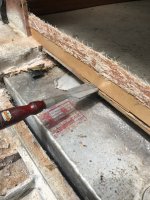
update 1-7-23 the holidays came and went. Made a bit of progress on the bow pulpit. Decided to beef up the anchor roller area and fill in all gaps around the first layer of wood with thickened epoxy. Still have to cut off excess fiberglass.
I milled out the area for the nav light wiring as I’m waiting for a new nav light to arrive.
second layer of wood has been fitted AGAIN! That’s ready to be epoxied in. Hope to get a little more accomplished tonight. Baby steps.
View attachment 374199View attachment 374200View attachment 374201View attachment 374202View attachment 374203
Thanks…. Indeed slow but sure…. Think and rethink before mixing epoxy… did make a bit of headway today. Post coming soon.Looking great! As you mentioned "baby steps" that is a good thing because hurrying only brings possible mistakes and re-do's
). Set wiring in tube before putting second layer in….. laid in second layer of ply… set it with thickened epoxy. Clamped in for the night… Boom. Another step completed.


Thank you sir!VERRRRy Nice!


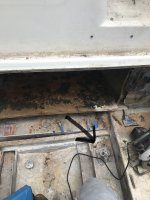
did you sink boat in salt water? It looks like it was submerged for some time???Looking good. So yep, sand, wipe, scratch up, acetone.
Sometimes I'll cut up a rubber/plastic spreader/scraper apply pb and run it smooth with the tool while applying. Eliminates a lot of bumps and points.
Thanks …..Yes baby steps. Hope to cut out tank this weekend.I'm looking at what your doing and I'm having flashbacks! I had the fiberglass on my tank too, not like it was attached though
Any progress is good progress!