1990 Bayliner 2651 resto

Drivewayboater2

Petty Officer 1st Class
Joined
Aug 21, 2019
Messages
266
It's hard to say without pictures. Once you start cutting out the rot, you should be able to see more of what you're really dealing with.
Gotcha… I found an old pic from this forum. This is from a 20ft capri but the layout of the transom is similar to mine. This is similar to what I’m thinking needs to be done. Thoughts?
 

Attachments

  • A8904C56-A025-409D-ABA1-6700933B445C.png
    A8904C56-A025-409D-ABA1-6700933B445C.png
    4.2 MB · Views: 43

eggs712

Petty Officer 1st Class
Joined
May 8, 2012
Messages
334
Gotcha… I found an old pic from this forum. This is from a 20ft capri but the layout of the transom is similar to mine. This is similar to what I’m thinking needs to be done. Thoughts?
I think you're on the right track then. If no other transom wood is rotten or beginning to rot, I'd replace what's there.

By the way, I'm restoring a boat very similar to yours, so I hope you keep posting as our boats may have a lot in common. Not to diverge from your topic too much, but where did you source your fore hatch from?
 

Drivewayboater2

Petty Officer 1st Class
Joined
Aug 21, 2019
Messages
266
I think you're on the right track then. If no other transom wood is rotten or beginning to rot, I'd replace what's there.

By the way, I'm restoring a boat very similar to yours, so I hope you keep posting as our boats may have a lot in common. Not to diverge from your topic too much, but where did you source your fore hatch from?
Ill be digging in to it shortly. And I’ll keep the post going. Actually your post prompted me to start this post😀.
The fore hatch was on the boat. The plexiglass was cracked and the bedding was shot. Sooooo all I needed to do was was remove broken plexi. No easy task. the glazing / bedding was like concrete. Went slow and was real careful. A new paint job and whalla. Not leaks and it looked great.
That hatch and the glass windows and side windows were the first things I needed to complete on the boat. Water was getting in. Since then no leaks. even after power washing 😂..
 

Baylinerchuck

Commander
Joined
Jul 29, 2016
Messages
2,726
Now that the engine, Y pipe and inner transom ring have been removed it gave me full access to the transom. Taking core samples seems that the bottom third is suspect. To be expected on a boat of her age. I anticipated this would be a candidate for replacing. Looking at other transom replacement’s on this forum they show having to replace the entire section of the transom. On this boat it seems like the center transom section is the only 2” thick part of the transom that would need replacing. It’s roughly 3ft wide by 3 ft tall. OR does the entire transom need to be replaced.
At this point anything that’s rotten needs to be replaced. If the center section is the only rotted area replace it. This looks like a nice boat and you’re off to a great start.
 

tpenfield

Moderator
Staff member
Joined
Jul 18, 2011
Messages
17,711
Following . . .

Not much about the structure of the boat (yet) . . . Is that part of the plan? I would suspect you will find a bunch of the structure that needs attention.
 

Drivewayboater2

Petty Officer 1st Class
Joined
Aug 21, 2019
Messages
266
Following . . .

Not much about the structure of the boat (yet) . . . Is that part of the plan? I would suspect you will find a bunch of the structure that needs attention.
Ted, correct the structure portion is up next. once engine was removed it was time to tear into the transom. Found some interesting things. Yes rot was there and it looks like there was no tabbing of the actual back transom plate. see lower left and lower right of transom. there’s a gap!
 

Attachments

  • C8DB49AF-E4EF-4FFE-A22C-7F8E86CA194B.jpeg
    C8DB49AF-E4EF-4FFE-A22C-7F8E86CA194B.jpeg
    2.5 MB · Views: 32
  • 1CA5E75D-8C2B-41AF-B115-67C37BB6D99F.jpeg
    1CA5E75D-8C2B-41AF-B115-67C37BB6D99F.jpeg
    1.7 MB · Views: 32
  • 966FA014-4094-4C46-B7C6-7F829B07E756.jpeg
    966FA014-4094-4C46-B7C6-7F829B07E756.jpeg
    1.4 MB · Views: 31
  • 2482C78F-AD44-4651-A22E-E9683A9C18AB.jpeg
    2482C78F-AD44-4651-A22E-E9683A9C18AB.jpeg
    2.4 MB · Views: 31
  • 7755F3C9-40A1-4A30-81BC-A7A4EFA2CD7C.jpeg
    7755F3C9-40A1-4A30-81BC-A7A4EFA2CD7C.jpeg
    2.5 MB · Views: 32
  • E0089D4B-0AED-4E40-BBCD-09F1B69C48FE.jpeg
    E0089D4B-0AED-4E40-BBCD-09F1B69C48FE.jpeg
    2.3 MB · Views: 33

Drivewayboater2

Petty Officer 1st Class
Joined
Aug 21, 2019
Messages
266
In addition the key hole has fiberglass/ gelcoat wrapped into it. I’ve never seen this on any rebuilds of original Bayliners. Has anyone come across this? i assume it should be cut away when removing the transom wood.
 

Baylinerchuck

Commander
Joined
Jul 29, 2016
Messages
2,726
In addition the key hole has fiberglass/ gelcoat wrapped into it. I’ve never seen this on any rebuilds of original Bayliners. Has anyone come across this? i assume it should be cut away when removing the transom wood.
It would make sense that as the bilge area is being sprayed with gel, they would hit the key hole as well. When I restored my Chaparral, I made sure I wrapped the keyhole in glass and a nice layer of gelcoat. The transom needs to be strong and water proof.
 

tpenfield

Moderator
Staff member
Joined
Jul 18, 2011
Messages
17,711
You will find as you proceed that Bayliners were not well made in that era and much of the wood structure was minimally coated with resin/glass/gelcoat. The boat was intended to last about 15 years, so you get the idea of it being past its intended life.

Since it is a cruiser (rather than a runabout) some of the structure going forward may be hard to reach. There have been a few Cruiser-style 'cut & gut' restorations. . . . @bigdirty comes to mind,which I beleive was a 25 foot Crownline.

You can (and probably will) make it better than it ever was.
 

Drivewayboater2

Petty Officer 1st Class
Joined
Aug 21, 2019
Messages
266
Update…. Let the demolition continue!
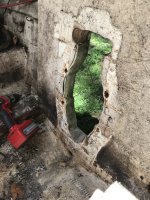
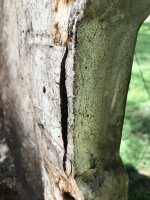
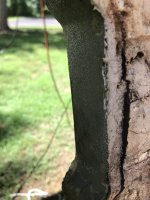
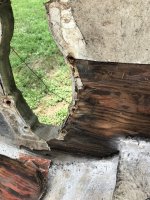
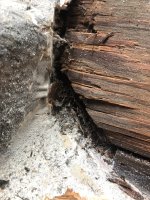
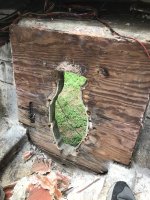
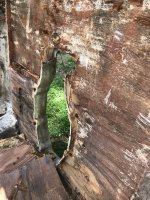
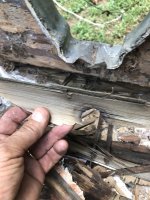
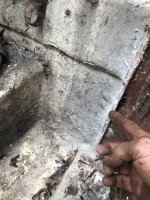
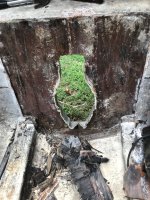
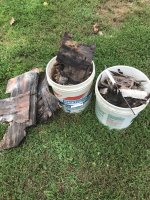
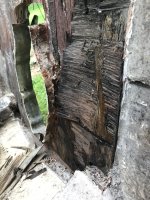
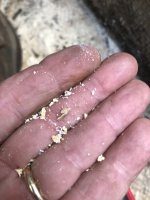
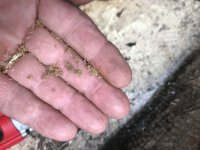
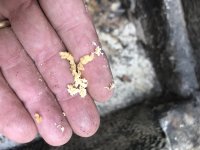
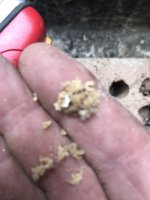
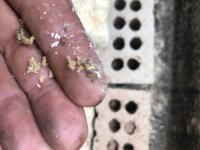
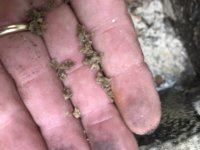
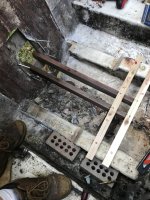
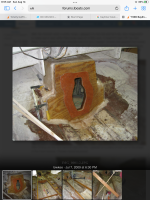
After the initial layer of fiberglass over the transom was removed the wood underneath did appear suspect. Todays work was to get through every layer to the fiberglass outer skin…First as to remove the first layer of wood, the second layer of FG and the final layer of wood. So me, my hammer, multi tool, monkey bar, and chisel had at it for 3 hours removing the transom bit by bit… went better than expected. I was pleased since it’s 90 degrees out and I was a sweaty mess. In the spirit of safety I did wear a respirator when I was digging in the fiberglass with the multi tool. As I went through each layer it revealed some interesting things…. The transom wood was slapped together using scraps. One pick shows the the inner layer of wood wasn’t made up of a single piece.. it was done in sections. The bottom piece at the drain hole looked like an afterthought. No glass, maybe chopstrand and no resin. Just wood.

I’ve read that this was common on these vessels… slap ‘em together and get them out the door.

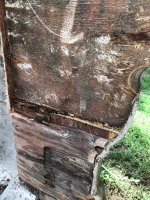
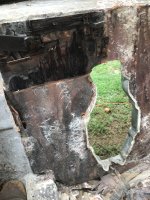
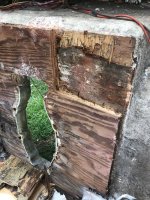
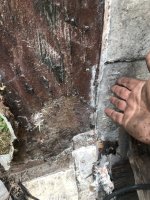
I also point out that there seems to be no more wood on either side of the main transom section. Is this true? Looks like it’s only got fiberglass layed up thick. Or should I be digging further left and right? Any help guidance would be appreciated .
 

Attachments

  • FBB6A914-860D-49D4-9B35-479967AB327A.jpeg
    FBB6A914-860D-49D4-9B35-479967AB327A.jpeg
    2.8 MB · Views: 29
  • F47A9581-9699-4D25-9D26-5FA7659BAEFD.jpeg
    F47A9581-9699-4D25-9D26-5FA7659BAEFD.jpeg
    2.7 MB · Views: 27
  • 5DCD5405-A7AD-4E01-A5BC-08751EB8E2DB.jpeg
    5DCD5405-A7AD-4E01-A5BC-08751EB8E2DB.jpeg
    1.9 MB · Views: 27
  • 43005CCF-4FE1-4307-B949-45213A1B2D6B.jpeg
    43005CCF-4FE1-4307-B949-45213A1B2D6B.jpeg
    1.4 MB · Views: 27
  • C5613D0D-7DDD-4236-8E5F-AE03F39BBE96.jpeg
    C5613D0D-7DDD-4236-8E5F-AE03F39BBE96.jpeg
    2.1 MB · Views: 26
  • 860D8BF1-953F-4C16-9E09-495B2BCEC703.jpeg
    860D8BF1-953F-4C16-9E09-495B2BCEC703.jpeg
    2.6 MB · Views: 27
  • AB66A089-9E25-4AC9-BF4F-3FA224A13CE6.jpeg
    AB66A089-9E25-4AC9-BF4F-3FA224A13CE6.jpeg
    2.4 MB · Views: 27
  • CBCBB494-F4D7-4D09-8D8B-74BA86308170.jpeg
    CBCBB494-F4D7-4D09-8D8B-74BA86308170.jpeg
    2.7 MB · Views: 28
  • 1E478E2F-78A7-4B62-B3CA-D3C05391A49C.jpeg
    1E478E2F-78A7-4B62-B3CA-D3C05391A49C.jpeg
    2.5 MB · Views: 29
  • 23ACD1C0-656C-4780-902B-54EF69014622.jpeg
    23ACD1C0-656C-4780-902B-54EF69014622.jpeg
    3.4 MB · Views: 29

Drivewayboater2

Petty Officer 1st Class
Joined
Aug 21, 2019
Messages
266
Another question…. the outer fiberglass wrapped in to the inner transom wood. Im thinking that this should be cut flush. I intend to resin the new transom keyhole … seems difficult to try and fit the new transom with this in the way. Am I on he right track here?
 

Attachments

  • 3AFE9CCE-BF96-41D3-A60F-FCC933DC668F.jpeg
    3AFE9CCE-BF96-41D3-A60F-FCC933DC668F.jpeg
    2.1 MB · Views: 12

buxmj

Petty Officer 1st Class
Joined
Jun 9, 2018
Messages
294
The thing that I changed after the first grinding session is that I put rubber gloves on under the leather work gloves. Do wear leather work gloves, those flap discs will remove skin quick! I also put on a bucket hat then put the hood of the tyvek suit over the hat and folded the brim of the hat up. With good eye protection and a respiratior I didn't get any itchies after the first session, only had a little on my hands anyway but once I wore the rubber gloves under the work gloves, no itchies. Be ready to take a water balloon off each hand though after you have been grinding for a while.
 

Drivewayboater2

Petty Officer 1st Class
Joined
Aug 21, 2019
Messages
266
A little update… not much boating time this weekend had to take the daughter to “move in weekend“ to college. What an adventure.

I managed to get the balance of the electrical out of the engine bay. Removed motor mounts and trimmed the inside glass of the transom almost flush. Next is to decapitate the motor mounts and see it they need to be replaced( probably yes is my guess) Much more grinding to be done. Found that bulkhead behind the fuel tank is toast. No surprise there. Tank will be coming out for an evaluation and/or replacement if it’s not looking good.

did some more paint removal and wet sanding on the outside of the transom. Used a great soy bean based remover. Pic below. Not intending to remove all bottom paint with it but this product worked great. its gel like and if you cover with Saran Wrap and let it sit for an hour or two it really was easy to remove paint with a small spackle knife.096DD67F-AC1B-4BDA-9280-9BBFA0909D40.jpeg72E4EF62-4C2F-4BE6-B2D9-19FECAE63B86.jpegC0491081-9866-4AEE-8754-F5B51B098DF3.jpeg72E4EF62-4C2F-4BE6-B2D9-19FECAE63B86.jpeg99E0528A-8494-4216-84EE-97B64ACF611B.jpeg3978F474-F5CB-4BAD-B0E7-15DE9DD5FC88.jpegE7E8ED26-91D0-45B5-B80A-4CDD40482F90.jpeg39425336-6FEF-49B2-911C-423A25094714.jpeg56D8E275-3E12-45F1-816C-40837643E124.jpegE6779CF2-B8F8-4351-A7BD-286E8C15944F.jpegE4E2A75B-3A92-4BAA-8EFA-E5120EFBCA92.jpeg
 

Drivewayboater2

Petty Officer 1st Class
Joined
Aug 21, 2019
Messages
266
Saturday 9-3 update.
dug a bit more into the stringer motor mounts and Im looking for advise. Drilled some core holes in motor mount. starboard side 1” below mount and then another and inch above hull… did the same on port side. Take a look at the shavings. This look acceptable? The lighter samples are from the top.. darker samples from the bottom.
that said I started cutting back the fiberglass from the stringers at the transom. Oh boy not so good. i will share those pics in the next post.
 

Attachments

  • D4C9F191-5BA2-48D0-AC97-D123AFAC974E.jpeg
    D4C9F191-5BA2-48D0-AC97-D123AFAC974E.jpeg
    946.5 KB · Views: 8
  • 15F7CAB4-DEAC-4A89-AFFD-B0FC2D021FF0.jpeg
    15F7CAB4-DEAC-4A89-AFFD-B0FC2D021FF0.jpeg
    1.1 MB · Views: 6
  • BE3887D9-EAE3-498F-BA25-212DCF2BE854.jpeg
    BE3887D9-EAE3-498F-BA25-212DCF2BE854.jpeg
    1.3 MB · Views: 6
  • D75E1928-1254-4476-9E25-D23E46BCCC35.jpeg
    D75E1928-1254-4476-9E25-D23E46BCCC35.jpeg
    1.1 MB · Views: 5
  • 64D12A9F-1BF1-46FC-8DF5-4374C6A044AF.jpeg
    64D12A9F-1BF1-46FC-8DF5-4374C6A044AF.jpeg
    766.2 KB · Views: 5
  • F0F5278F-0DFF-4758-A6CC-7FF194161724.jpeg
    F0F5278F-0DFF-4758-A6CC-7FF194161724.jpeg
    958.8 KB · Views: 7
  • 7AEEE399-7B24-4639-AA0A-076FEA3032D2.jpeg
    7AEEE399-7B24-4639-AA0A-076FEA3032D2.jpeg
    915.7 KB · Views: 7

Drivewayboater2

Petty Officer 1st Class
Joined
Aug 21, 2019
Messages
266
Port side stringer not so bad but did feel wet… starboard side was toast . I didn’t want to cut too far back. If needed can I decapitate the the top of stringer leaving the outer fiberglass skin? And replace the rotted wood inside? seems like there’s thick layer of glass already there. Saw a post on here doing just that. … gut the bad wood…replace with linear fir and reglass everything. Is this an acceptable practice or do I have to cut out old glass and start from scratch? Any advise would be appreciated. 9262B6A0-F39E-40C3-B7C0-1F76CA7120C9.jpeg0A3E30D5-5080-4684-82BF-B5D2D728E13B.jpeg7A50525B-0E5B-4FDA-9349-3F29DF9188A6.jpeg73E834CD-4B30-4AE2-B79F-514248485D41.jpegF206074D-086B-4C79-9149-2B2EB875942F.jpeg310F43F9-9620-4046-8461-1010257B92A9.jpeg
 

Drivewayboater2

Petty Officer 1st Class
Joined
Aug 21, 2019
Messages
266
After much contemplating I will be cutting the tops off the engine mount stringers and replacing core. Before I went further I found a video on you tube where someone built a jig to get the proper( well close) measurements of stringer height and length relative to the transom. Bolts to the transom and extends to strips that are at the proper height. Motor mount lag hole placement marked and the height is fixed..The the front strips are removable to get the jig out the back. Kinda cool. pic below.

So Coosa , plywood, linear fir? Whats the best to use When rebuilding the mounts. I’ve seen so many variations. Also can I bed it back in with poly instead of epoxy? Then do I use CSM and 1708 over the top once the core is replaced? Any help would be appreciated.
 

Attachments

  • 2ECC964F-F281-437A-A92F-CAD9D11FCBD8.jpeg
    2ECC964F-F281-437A-A92F-CAD9D11FCBD8.jpeg
    2 MB · Views: 10
Top