198x SS-150 rebuild

SHSU

Lieutenant Junior+Starmada Splash Of The Year 2019
Joined
Mar 8, 2017
Messages
1,721
Pictures? I can't read.... lol

SHSU
 

Rasdiir

Petty Officer 2nd Class
Joined
Jul 18, 2011
Messages
167
So it's been a fairly cold autumn, lots of rain and wind too. Combine that with a ton of long days at work and my pace can best be described as "glacial".


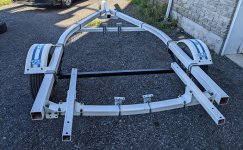
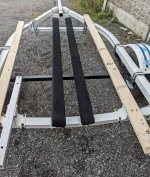
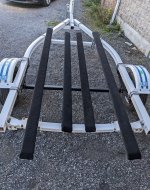
I managed to get the last of the paint off the hull (took care of the last bit in the picture last night), and also got the trailer painted and 75% reassembled. The paint was still a bit soft over a week after painting, but I think that is due to the humidity. I picked up a bunch of 3/8 bolts to attach the bunks to the brackets and some bunk carpet is on order, which should be here in a week or so. Although this small hull doesn't need it I am going to install four bunks to aid with loading, so I ordered a piece of 18" x 18' carpet, which should be enough to do 4x 8ft bunks if I leave the bottom open. Tomorrow I will install the bunk brackets, and this weekend I will get the boards and stainless staples. After that I can install the winch tower and then touch up all the nicks in the paint from installing the ubolts.

I will not be doing the trailer wiring until the boat is closer to complete, and I also still have to strip, repaint, and install the fenders. I also messed up and forget to install the fender brackets under the leaf spring bolts (which are too close to the leaf spring bushing bolt), so those will all have to be loosened a 1/4 turn at a time and then reinstalled, again at 1/4 turn per time. I guess it's only fun if you're working for it, so I can assure you I am having tons of fun!
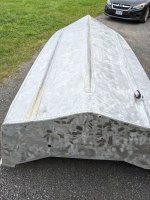
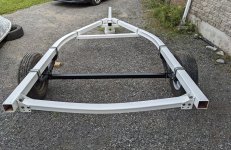
PXL_20220911_164747161.jpg
PXL_20220911_164644384.jpg
 

SHSU

Lieutenant Junior+Starmada Splash Of The Year 2019
Joined
Mar 8, 2017
Messages
1,721
Nothing like a Turtled Hull

SHSU
 

Rasdiir

Petty Officer 2nd Class
Joined
Jul 18, 2011
Messages
167
Spring has sprung here in Ontario and it's time to return to this project! I realized I never provided a final update on the trailer bunks, but I did get them installed last October before the boat was put to sleep for the winter. I still have to repaint the scratches from the reassembly, strip and refinish the fenders, install a new hitch, and do the electrical.


Pulled it out today, slapped some duct tape over the transom bolt holes, and my daughter and I did a leak test by launching the hull and looking for water. Found one corrosion hole and two holes where the PO went through the hull when screwing down the floor. I'm sure there are a few more corrosion holes under the ribs too, but those couldn't be seen from inside and I have a good idea where they are from the PO slapping some black gunk on the outside. I will be putting together a large order of aluminum angle and sheets from a supplier a couple of hours away, and I'm hoping to go pick it up next week or the week after so I can start riveting patches and braces on.


Here's the trailer pics as of last autumn.

PXL_20220924_204257101.jpg

PXL_20221001_151514057.MP.jpg


PXL_20221009_172613981.jpg
 

Moserkr

Chief Officer + Starmada Splash Of The Year 2021
Joined
Nov 23, 2020
Messages
869
Trailer looks great! Glad you are back at it after winter has past.
 

Rasdiir

Petty Officer 2nd Class
Joined
Jul 18, 2011
Messages
167
Not much movement in the last few days, but I did get a few items done

I ordered Bayshore marble grey carpet for the sides and made some templates out of thick packing paper. I will ensure to leave 3-4" extra around all sides and cut to fit in location.

I removed the rivets holding the floor brace in the bow so I could get at the bottom holes made by the PO's floor screws. I also drilled out the tiny holes from the screws and prepared them for new rivets.

And finally I compiled my aluminum requirements for the patches, floor braces, and seat/storage frames and got a quote, so now I just need to finalize and go pick it up. That part will have to wait a bit, as I need to wait for funding (pay cheque lol) and I'm also gone all next week for work. Once I have the aluminum it will be on to riveting! The first step will be to get a buddy to help install the rivets to fill the PO's mistakes, then I will install the carpet and put the outside angle braces on for the front seats. After that it will be on to rib removal and hull patching, with a large side of JB Weld to fill in some lesser pitting.

Cheers, Jared
 

Rasdiir

Petty Officer 2nd Class
Joined
Jul 18, 2011
Messages
167
Back from my work trip and decided to do a bit of riveting practice before I start the patching. Now that I have turned up the air pressure and used painter tape over the head I am getting good solid connections with no smiley faces, so I just need my patches and should be good to go! I had to revise my metal quote as I had specified 0.125 for the sheets that will be used for the patches and chine tabs, after doing a bit more reading I changed that to 0.063 and requested a new quote. Once that comes in I'll need to take a road trip to pick it up, but after that it is full steam ahead with patching and bracing.

The carpet also arrived and I have my templates made for the bow sections, so I will also work on getting that cut and installed once I have riveted a few holes. How is everyone doing their bow carpet, are you using one solid piece that wraps right around the bow or two sections that meet at the bow seam? Because of the ribs in the bow I don't think I will be able to get a very neat seam where they meet, any tips?

Here are some pictures of my rivet practice:
PXL_20230506_160909163.jpgPXL_20230506_160919770.jpg
 

Rasdiir

Petty Officer 2nd Class
Joined
Jul 18, 2011
Messages
167
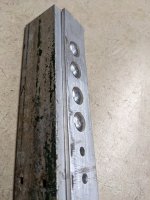
Finally went and picked up my sheet and angle aluminum, and got the 12x chine braces cut (slowly and a bit wobbly with my jig saw but it worked!) and bent. I decided that since this is a 15' boat, and these are just extra reinforcement that probably aren't even needed, that I will do a brace between every second rib instead of between every rib, which will save me a ton of sheet and doing an extra 96 rivets. Next step is to drill out the holes for these braces and then install. Do you guys use 5200 between the hull and these braces or just on the rivets?

I drilled out a bunch of side and rib rivets where I will need to do some patches, then I kept everything in place with small bolts. I still need to remove all the rivets on half of one rib so I can lift it up to drill the holes for the new rivets that have the tails behind the rib, since the originals were 5/32 and my replacements are 3/16. I recruited my daughter to handle the bucking bar and riveted 4 of the PO's screw holes in the bottom too, she was a natural and did an excellent job, although I don't think she is interested in helping with the rest of them hahaha.

I also gave my fender to my welding buddy to patch up the two small cuts (still haven't figured out why the PO did that?). I need to get a pneumatic pop riveter and a bunch of blinds so I can attach the floor bracing to the ribs once the patching is done. I also need to cut and sand the 1/4 sheet that I will be using on the outside of the transom as a motor pad.

Questions:
  • Do you guys use 5200 between the hull and the chine braces or just on the rivets?
  • Should the bow carpet be one solid piece that wraps right around the bow or two sections that meet at the bow seam?
Cheers, Jared
 

jimmbo

Supreme Mariner
Joined
May 24, 2004
Messages
13,442
Welcome. It seems the government is more interested in collecting tax on the boat than anything else. The 90hp should be fine with proper transom repair.
I have never paid a Penny to register/license a Boat in Canada, new or used
 

SHSU

Lieutenant Junior+Starmada Splash Of The Year 2019
Joined
Mar 8, 2017
Messages
1,721
  • Do you guys use 5200 between the hull and the chine braces or just on the rivets
I would just do the rivets, no need as a glue.

  • Should the bow carpet be one solid piece that wraps right around the bow or two sections that meet at the bow seam?
Its a matter or personal preference. I did one solid sheet.

SHSU
 

BOYS & TOYS

Petty Officer 2nd Class
Joined
Mar 1, 2008
Messages
144
I have never paid a Penny to register/license a Boat in Canada, new or used
Neither have I because it is free. Like I said the government is more interested in collecting tax. I have definitely paid tax on boats though
 

Rasdiir

Petty Officer 2nd Class
Joined
Jul 18, 2011
Messages
167
I would just do the rivets, no need as a glue.


Its a matter or personal preference. I did one solid sheet.

SHSU
No glue it is, I didn't think it would be required but thought I should check with the experts. One piece carpet seems cleaner to me too, did you form it around the ribs and other non-flat areas or just span any gaps?

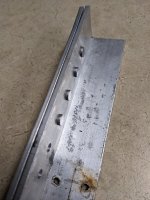
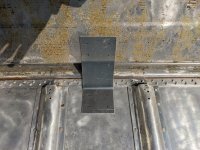
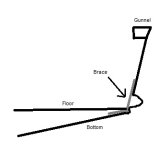
As I was test fitting my braces I realized that they will interfere with my plan to carpet the sides. Since the SS-150 didn't come with side panels I had a choice between full carpet on the whole side or fabricate panels. I originally wanted to make panels since I love the look and I thought a white vinyl covering would nicely contrast the planned navy blue top paint, but they will also take up some space in an already small interior. If I wanted to carpet all the way down to the floor I was going to fold it right into the chine depression, but the braces will interfere. How can I carpet around the braces?

If there's no good way to carpet I'm back to either side panels or maybe just a piece of angle that attaches to the floor and side and covers up that gap. Only problem with that is the gap is about 2-3" up off the floor and that big of an angle might look bad.

Does any of that make sense? I have added a picture and a drawing below

PXL_20230522_130102062.jpg
Brace drawing.jpg
 

Moserkr

Chief Officer + Starmada Splash Of The Year 2021
Joined
Nov 23, 2020
Messages
869
It wouldnt be hard to add side panels if you run a strip of angled AL along the floor as an attachment point. Its more money and time though. If it were me, Id go with paint instead of carpet. Much more appealing to me but you would have to strip that old glue. Or just add more glue to carpet and cover it up. You definitely beefed up the floor and sides with those chine braces. So its not about adding structure, more looks. If its structure you want, add full side panels and tie them into as much stuff as possible. I added more lateral supports to my gunnel sides, then ran woods from the transom so consoles, tying it into everything along the way. But i did not add chine braces as you did.
 

jimmbo

Supreme Mariner
Joined
May 24, 2004
Messages
13,442
There's no added Bracing with that, just 8 more holes to leak
 

Moserkr

Chief Officer + Starmada Splash Of The Year 2021
Joined
Nov 23, 2020
Messages
869
There's no added Bracing with that, just 8 more holes to leak
Its pretty common to add the chine support brace to boats that didnt have it. Starcraft started doing it, from the factory, to the larger boats because of chines splitting under heavier power sometime in the 80’s I believe. Going to disagree with you on that statement.
 

jimmbo

Supreme Mariner
Joined
May 24, 2004
Messages
13,442
I will stand on my Statement that that is is no Bracing
 

SHSU

Lieutenant Junior+Starmada Splash Of The Year 2019
Joined
Mar 8, 2017
Messages
1,721
I am with @Moserkr, paint the side and not carpet. I did the Nautolex on the sides, while it looks good but has been a pain in keeping areas glued together. Next rebuild will just be paint.

SHSU
 

Rasdiir

Petty Officer 2nd Class
Joined
Jul 18, 2011
Messages
167
I am with @Moserkr, paint the side and not carpet. I did the Nautolex on the sides, while it looks good but has been a pain in keeping areas glued together. Next rebuild will just be paint.

SHSU
You guys make a good arguement, but I already have the carpet so I'll give it a try! I plan on running it up under the gunnel and then securing it at the top with some sort of mechanical fastening, so that should stop it from peeling down at least.

Edit: Forgot to ask this last night, but what glue is everyone using? I saw another thread where someone did a comparison and they recommended Lepage contact cement, any reason not to go with that?
 
Last edited:

Rasdiir

Petty Officer 2nd Class
Joined
Jul 18, 2011
Messages
167
If someone with a SS-160 has the time could I get a measurement from the bottom of the gunnel to the top of the front seat frame (not the cushions)?

The 1984 SS-150 apparently didn't come with front seats, just a small triangle of wood, so I will be framing them out with angle. Since I want to do all riveting prior to painting I need to install the top frames against the hull now. The SS-160 measurements might be slightly different, but should give me a frame of reference.

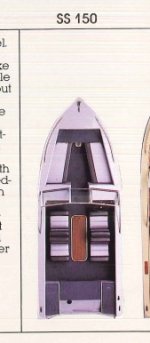
Since my description of the original SS-150 front end sucks here's pictures of a 1983 SS-150 from the brochure. I'm pretty sure mine is a 1984, but I couldn't find that or the 1985 brochures, and by 86 they appear to have added seats to the sides of the bow and left the triangle board for the front.

1983:
1983 SS150 brochure pic.jpg

1986:
1986 SS150 brochure pic.jpg
 
Top