Rasdiir
Petty Officer 2nd Class
- Joined
- Jul 18, 2011
- Messages
- 181
That they do, although the more I dig into this boat the more I appreciate that the PO at least had some idea. I have found quite a few reasonably well filled pits and scratches throughout the boat, and he took the time to make a fairly good floor and transom, attempt a transom brace, and use SS hardware. I think things could be a lot worse.PO make restorations such an adventure. lol
SHSU
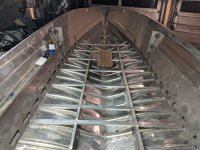
So I spent a bit more time with the nylon cup and wire wheel and am pretty much finished stripping the transom, just a tiny bit on some rivet heads and around the seams left. I found a ton of minor corrosion on the outside that will be easy to fill, and 4 small spots that are right through. The rivets heads that hold on the transom tray have a bit of damage, should I replace these? (you can kind of see them on pic 2 below).
I also got the wood transom out, and did a quick run with the wire wheel on the inside of the skin. The pitting is more significant here, with many spots that are almost through, especially around the rear u-bolt holes and behind the upper part of the knee brace. Since the pitting is fairly spread out and the deep holes are not large I don't believe there will be a structural problem. Should I be looking into a more substantial repair than filling with jbweld? My current plan is to finish cleaning the pits with the wire wheel and the dremel, get some vinegar in the holes, then wash, fill with jbweld marine, sand, then I will paint the inside of the skin with Rustoleum Pro. The outside will get the same treatment but will be painted with Pettit EasyPoxy when I do the rest of the hull.
Transom pulled

Pitting and two of the holes on the outside that were under the motor mount

Pitting on the inside of the skin

Pitting behind the knee brace

Pitting by the port u-bolt mounting holes